# Light Up your Christmas Tree with Java and Raspberry Pi
> Here we go with this small project to get you introduced to the world of electronics programming. Get started with Java and the Raspberry Pi!
- URL: https://foojay.io/today/light-up-your-christmas-tree-with-java-and-raspberry-pi/
- Published: 2020-12-23
- Authors: Frank Delporte
- Categories: Embedded, Pi4J, Raspberry Pi
- Originally published at: https://www.javaadvent.com/2020/12/light-up-your-christmas-lights-with-java-and-raspberry-pi.html
Are you a serious Java-developer looking for a fun project?
Or want to learn something completely new and use your Java-knowledge to control electronic components?
Here we go with this small project to get you introduced to the world of electronics programming!
*This post was originally published on "[JVM **Advent** - The JVM Programming **Advent** Calendar](https://www.javaadvent.com/)", a month-long reading list of diverse Java-related articles. A nice addition to your daily read of Foojay!*
We are going the make the "Hello World"-equivalent of an electronics project: a blinking LED. And to make it a bit more challenging, not only blinking one LED but a "full" Christmas tree, well… at least 7 blinking Christmas lights.
Let's get started!
### Raspberry Pi
The Raspberry Pi is a full-PC-on-a-small-board. There are different types, but we will be using a Raspberry Pi 4 Model B in this article. This board is available with 3 different memory sizes (2, 4, or 8Gb) starting from 35$. You can find a local or online reseller on the [product page](https://www.raspberrypi.org/products/raspberry-pi-4-model-b).
#### Operating system
If you buy a new Raspberry Pi, make sure you also have a mini-SD card with minimum 16Gb of space. With the [Imager tool](https://www.raspberrypi.org/software/), you can burn the "Raspberry Pi OS (Full)" to this card. This is a full operating system, based on Debian 32bit, containing a lot of tools, and most importantly OpenJDK 11!
{{< gallery cols="3" caption="Raspberry Pi Imager tool" >}}
imager-start.png
imager-os.png
imager-os-full.png
{{< /gallery >}}
When you start your board for the first time, you'll need to configure the Wifi, and some additional settings. When done, open a terminal and run `java -version` to make sure you used to correct OS.
```
$ java -version
openjdk version "11.0.9" 2020-10-20
OpenJDK Runtime Environment (build 11.0.9+11-post-Raspbian-1deb10u1)
OpenJDK Server VM (build 11.0.9+11-post-Raspbian-1deb10u1, mixed mode)
```
### **New Products 2020**
We need to mention two important new products released in (late) 2020!
#### **Compute Module 4**
The compute module is a special version of the Raspberry Pi. It has no connections at all for peripherals, but needs to be combined with a "base board" you can either buy, or design yourself. The goal of this product is to build your own device with the connections you need, in the right form factor.
So, it isn't aimed at simple DIY, but as a base-computer to be integrated in professional projects.
This new version 4 is based on the Raspberry Pi 4 and is [available in 32 variants](https://www.raspberrypi.org/products/compute-module-4), with a range of RAM and eMMC Flash options, and with or without wireless connectivity.
{{< gallery cols="3" caption="Raspberry Pi Compute Module" >}}
compute.jpg
compute_back.jpg
compute_io_board.jpg
{{< /gallery >}}
#### **Raspberry Pi 400**
This product reminded me of my very first computer 35 years ago, the Commodore 64... It's a keyboard with an integrated computer! The Raspberry Pi 4 with 4Gb of memory has been redesigned to fit in the official, already-existing Raspberry Pi keyboard. All you need is an SD card, power supply, monitor, and mouse. For 75€ this is truly an amazing machine bringing a lot of computer-power to everyone for a low budget.
{{< gallery cols="3" caption="Raspberry Pi 400 versus Commodore 64" >}}
pi_400_front.jpg
pi_400_back.jpg
commodore64.jpg
{{< /gallery >}}
### **Install additional tools**
OK, we have a Raspberry Pi, what's next? Let's add some developer-stuff to it...
#### An IDE
In most cases, I develop my applications for the Raspberry Pi on a PC as I prefer to work with IntelliJ IDEA, which is unfortunately not available for the Pi.
But you can install Visual Studio Code with the Java extensions if you want to work on the Pi itself, which is perfectly possible! For more info see this post "[Visual Studio Code on the Raspberry Pi (with 32 and 64-bit OS)](https://webtechie.be/post/2020-10-15-visual-studio-code-on-raspberry-pi/)".
#### **Maven**
We are going to use Maven to build the application on our Pi, so let's install it with a single command, after which we can immediately check the installation by requesting the version:
```
$ sudo apt install maven
$ mvn -v
Apache Maven 3.6.0
Maven home: /usr/share/maven
```
#### **Pi4J**
To control the LED-lights, we are going to use the Pi4J-library, which makes the bridge between our Java-code and the GPIO-pins on the Raspberry Pi. These General-Purpose Input/Output-pins allow us to connect and control electronic components. There are 40 of those pins on the Raspberry Pi and can be used for different purposes. In this post, we are only using them as output-pins to control the LEDs but there are countless other possibilities.
{{< img src="headerpins_in_header.png" class="size-full is-resized" width="293" height="449" >}}
For full support of the Pi4J-library, we need to install some extra software on the board. Again we only need a single command to do this:
```
$ curl -sSL https://pi4j.com/install | sudo bash
```
#### **Update of WiringPi**
One last step to be fully prepared... If you are using a Raspberry Pi 4, you'll need to update WiringPi. This is used by Pi4J as a native library to control the GPIOs and because the architecture of the system-on-chip has changed on version 4, a new (but final) version 2.52 of WiringPi was released:
```
$ wget https://project-downloads.drogon.net/wiringpi-latest.deb
$ sudo dpkg -i wiringpi-latest.deb
$ gpio -v
gpio version: 2.52
```
### **The Wiring**
This is an electronics project, so we need to connect some components to our Raspberry Pi. I've used some basic ones which you will find in any [electronics starter kit](https://www.ebay.com/sch/i.html?_from=R40&_trksid=p2380057.m570.l1313&_nkw=electronics+starter+kit&_sacat=0): LEDs and 330Ω-resistors. Combined with a breadboard and some wires, you can easily set-up a project like this. Each LED is connected to a GPIO on the plus-side and with a resistor to the shared ground for the negative side of the LED. We use the resistors because the GPIOs work with 0V for a false/off/low state and 3.3V for true/on/high state, but most LEDs are designed for lower voltages.
You can calculate the exact resistor value for each LED-type, but we use the same one here for all LEDs. Maybe they will not give full brightness, but at least we will not burn them 🙂 By the way, there is even a JavaFX mobile application in the Google and Apple app store for this calculation, see "[Building native applications for all PC and mobile platforms from a single JavaFX project with Gluon Mobile and GitHub Actions](https://foojay.io/today/native-applications-for-multiple-devices-from-a-single-javafx-project-with-gluon-mobile-and-github-actions/)"\].
{{< gallery cols="4" caption="Wiring scheme and pictures for this project" >}}
jvm-advent-leds-1024x844.png
wiring-1-1024x498.jpg
wiring-2-1024x498.jpg
wiring-3-498x1024.jpg
{{< /gallery >}}
### **The Application**
TL;DR; run these commands to build and start the application directly on your Raspberry Pi:
```
$ git clone https://github.com/FDelporte/JvmAdvent2020.git
$ cd JvmAdvent2020
$ mvn package
$ sudo java -jar target/jvm-advent-2020-1.0-SNAPSHOT-jar-with-dependencies.jar
```
#### **Maven dependency**
This is a Maven project, and the Pi4J-library is added as a dependency in pom.xml:
```
com.pi4jpi4j-core1.2
```
#### **PWM**
The simplest use of a LED is on or off, but we are going to use them with a PWM (Pulse-Width Modulation) signal. This way we can also have them fading in and out from zero to full brightness. PWM switches fast between low and high. Depending on the durations for the low and/or high state, a "semi-analog output" can be achieved by creating an averaged value. The values to be used in this case are:
* On-time: duration the output is high
* Off-time: duration the output is low
* Period: on-time + off-time
* Duty cycle: percentage of the time the output is high
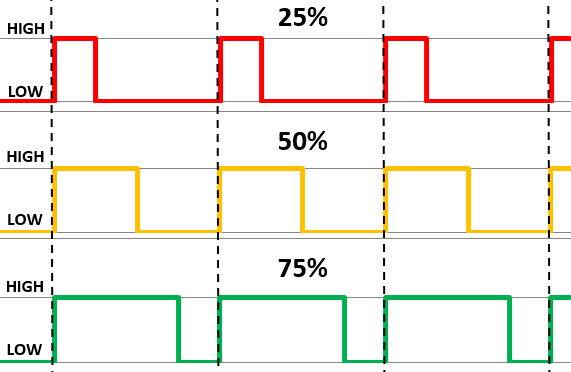 PWM signals in a chart
The Raspberry Pi has a few GPIOs that provide hardware-controlled PWM which you need to use for accurate signals. But in our case we will be using software-controlled PWM as we want to use more LEDs.
To know which GPIO numbers need to be used, you can check the pin-layout drawing above and use the WiringPi-numbers.
#### **Initialization of the LEDs**
In our code we use a list of GpioPinPwmOutput and add all the pins we are using. Pin 32 only supports hardware-PWM so needs to be initialized as such:
```
List leds = new ArrayList<>();
leds.add(gpio.provisionSoftPwmOutputPin(RaspiPin.GPIO_04, "LeftGreen")); // Pin 16
leds.add(gpio.provisionSoftPwmOutputPin(RaspiPin.GPIO_05, "LeftBlue")); // Pin 18
leds.add(gpio.provisionSoftPwmOutputPin(RaspiPin.GPIO_06, "LeftRed")); // Pin 22
leds.add(gpio.provisionSoftPwmOutputPin(RaspiPin.GPIO_10, "Top")); // Pin 24
leds.add(gpio.provisionSoftPwmOutputPin(RaspiPin.GPIO_11, "LedRightGreen"));// Pin 26
leds.add(gpio.provisionSoftPwmOutputPin(RaspiPin.GPIO_31, "RightYellow")); // Pin 28
leds.add(gpio.provisionPwmOutputPin(RaspiPin.GPIO_26, "RightRed")); // Pin 32
```
As we are using software-PWM we also need to do some configuration:
```
int PWM_MAX = 100;
Gpio.pwmSetMode(Gpio.PWM_MODE_MS);
Gpio.pwmSetRange(PWM_MAX);
Gpio.pwmSetClock(500);
```
#### **All On or Off**
Turning all the LEDs on or off has become very easy with the forEach-function of a list:
```
private static void allOff() {
leds.forEach(l -> l.setPwm(0));
}
private static void allOn() {
leds.forEach(l -> l.setPwm(PWM_MAX));
}
```
#### **Fading**
By increasing or decreasing the PWM-value we can dim the LEDs, for example, fading one-by-one from 0 to the maximum value:
```
for (GpioPinPwmOutput led : leds) {
for (int fade = 0; fade <= PWM_MAX; fade += fadeSteps) {
led.setPwm(fade);
Thread.sleep(speed);
}
}
```
### **Building and Running**
The full code contains some more LED methods, so take a look at it to find out what is already there. Get the full Maven project from GitHub, package and run it directly on the Raspberry Pi with these commands:
```
$ git clone https://github.com/FDelporte/JvmAdvent2020.git
$ cd JvmAdvent2020
$ mvn package
$ sudo java -jar target/jvm-advent-2020-1.0-SNAPSHOT-jar-with-dependencies.jar
...
Warming up...
LEDs initialized
All flash 5 times at speed 250
All off
All on
...
One by one on and then off 5 times at speed 100
All off
All random flash 20 times at speed 500
All off
All fade at speed 50 with steps of 2
Fading all up
Fading all down
All off
Fade one by one at speed 25 with steps of 2
Fading up GPIO 4
Fading up GPIO 5
...
Fading down GPIO 31
Fading down GPIO 26
All off
Done
```
And there you have it, the log of the application, controlling the LEDs as you can see in the movie at the start of this article.
### **What's next?**
You have to agree, this is a perfect, fun, small project for the Christmas holiday?!
#### **Experiment!**
This is just a starting point demonstrating one single use of the GPIOs. We only used pins as output to control some LEDs, but you can also use a button as an input to select the LED effect. Or attach more LEDs, or use a [chip to control more LEDs with fewer GPIOs](https://webtechie.be/post/2019-12-18-controlling-a-led-number-display-with-javafx-and-python-on-raspberry-pi/)... Really, the possibilities are endless, only limited by your imagination.
If you create something, please share it. Use [the hashtag #JavaOnRaspberryPi on Twitter](https://twitter.com/hashtag/JavaOnRaspberryPi) to show the world the magic of Java + Raspberry Pi.
#### **Want to Learn More?**
This year I published my book "[Getting Started with Java on the Raspberry Pi](https://webtechie.be/books/)" to inspire more Java developers to start experimenting with electronics components.
It's a great and fun way to learn new stuff when you combine your software knowledge with hardware! Available as [an ebook on Leanpub](https://leanpub.com/gettingstartedwithjavaontheraspberrypi/) and [a paper book on Elektor](https://www.elektor.com/getting-started-with-java-on-the-raspberry-pi). A perfect Christmas gift... 😉