

My second Cloudflare Tunnel

I decided to stop using Twitter, but for my own content and supporting Ukraine against its barbarian invaders, I understood the contemporary media landscape was quite fragmented. I bet on Mastodon, Bluesky, and LinkedIn. My flow is the following: when I read a piece I find interesting, I schedule it for publication. The problem is that every social media platform has a different scheduler: Mastodon has the Mastodon scheduler, LinkedIn has an in-built feature, and Bluesky has… nothing. I had enough.
Hence, I started building an application to schedule posts across multiple social media platforms. Details are irrelevant to this post. Suffice to say, modules are running in a Docker container on my Synology NAS at home. It’s a .local name to access when I’m at home. However, I’ll soon travel to Australia for weeks, and I want to continue publishing content. The question then arose: how do I access it securely from there without exposing my home network and compromising my privacy?
The problem
I have already written a full-fledged post on the privacy problems caused by subdomains. Here’s a summary:
- Port forwarding exposes your home IP address
- Dynamic DNS requires constant updates
- Opening ports is a security risk
- SSL certificates are a hassle to manage
I wanted a solution that would:
- Keep my home network secure
- Provide HTTPS automatically
- Add authentication
- Be simple to maintain
Enter Cloudflare Tunnel
Cloudflare Tunnel creates a secure outbound connection from your network to Cloudflare’s infrastructure. Requests to your domain are routed through this tunnel to your application. No inbound ports are needed!
The flow is straightforward:
Internet → Cloudflare Edge → Tunnel → NAS → Application
All connections are outbound from your NAS, so your firewall stays untouched.
Setting up the Tunnel
The documentation is pretty good, but here are the steps.
Prerequisites
I already had:
- A domain managed by Cloudflare
- The Docker service running on my NAS
- My application running as a Docker container
Create a Named tunnel
In the Cloudflare Zero Trust dashboard:
- Navigate to Access > Tunnels
- Click Create a tunnel
- Choose Cloudflared
- Name it however you want, e.g. ,
nas - Copy the tunnel token - you’ll need it shortly
This token authenticates your tunnel to Cloudflare.
Run cloudflared on the NAS
Pull the official Docker image:
docker pull cloudflare/cloudflared:2025.9.1
Then, create a container via the Synology Docker UI with these settings:
- Container name:
cloudflared - Command:
tunnel --no-autoupdate run - Environment variable:
TUNNEL_TOKEN= - Network: the same network as the one your application is bound to, e.g. ,
bridge
The critical part here is the network. The cloudflared container and the application must be on the same network.
Create a link from the cloudflared container to the application container:
- Link container: name of the container you want to link to, e.g. ,
myapp - Alias: name under which you will access it from
cloudflared. Do yourself a favour, use the same name.
It allows cloudflared to reach the application at http://myapp: without needing to expose any ports.
Configure the public hostname
Back in the Cloudflare dashboard, in the tunnel configuration:
- Go to the Public Hostname tab
- Click Add a public hostname
- Configure your subdomain, the domain, and the service path, e.g. ,
http://myapp:
Note that the hostname here must match exactly what you configured in the Docker link. If you misconfigured (I did), look at the logs:
dial tcp: lookup wrongname on 192.168.1.254:53: no such host
Adding Authentication
At this point, anyone with the URL can access the application. It might be an option, but it’s not in my context.
I considered creating my own authentication mechanism, but ultimately decided against it. Cloudflare provides everything needed with only configuration - no code changes required.
Cloudflare Access supports multiple identity providers:
- One-time PIN via email
- GitHub
- Azure AD
- Okta
- etc.
To add the One-time PIN login method:
- Navigate to Access > Applications
- Click Add an application > Self-hosted
- Configure the application with the application name, domain, and subdomain
- Click Next
- Create a policy:
- Policy name: “Allow myself”
- Action: Allow
- Configure rules:
- Click + Add include
- Selector: Emails
- Value:
[email protected]
- Click Next , then Add application
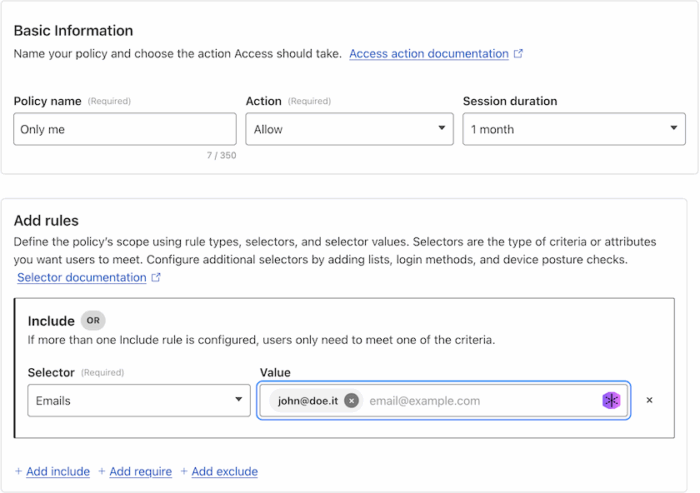
Do not forget to add the policy to the tunnel. I initially hadn’t linked it properly, and wondered why Cloudflare wasn’t sending me an email.
Cloudflare policies are extremely powerful. Have a look.
Result
Now, when I visit my application from the outside:
- Cloudflare displays an authentication page
- I fill in my email
- Cloudflare sends a one-time code
- I authenticate
- Cloudflare proxies requests through the tunnel
- The application receives the request.
I can schedule posts from anywhere!
Conclusion
Cloudflare Tunnel is an elegant solution for self-hosting. The setup took about 30 minutes, most of which I spent troubleshooting my own mistakes with container names and policy assignments.
For personal projects running from home, it’s hard to beat: no cost, automatic HTTPS, built-in authentication, and zero network exposure. I hope the above setup proves useful to others who encounter the same problem.
To go further:
- Cloudflare Tunnel for Home Assistant
- Cloudflare Access controls
- Cloudflare Policies
- I finally understand Cloudflare Zero Trust tunnels
Originally published at A Java Geek on November 30th, 2025
Found a mistake, or something to add? Edit this page on GitHub

Nicolas Frankel
Technologist focusing on cloud-native technologies, DevOps, CI/CD pipelines, and system observability. His focus revolves around creating technical content, delivering talks, and engaging with developer communities to promote the adoption of modern software …