# Spring Boot 4 - OpenTelemetry Guide
> A complete Spring Boot 4 OpenTelemetry guide covering metrics, traces, and logs. Understand native observability features, OTLP support, and how to monitor microservices with detailed tracing and instrumentation.
- URL: https://foojay.io/today/spring-boot-4-opentelemetry-explained/
- Published: 2025-12-10
- Authors: Mahendra Rao B
- Categories: IntelliJ IDEA, Java, Microservices, Mongo, Observability, OpenTelemetry, Spring, Tutorials
In my previous [article](https://foojay.io/today/preparing-for-spring-framework-7-and-spring-boot-4/), I outlined a comprehensive list of features introduced in Spring Framework 7 and Spring Boot 4.
In this series of articles, we will explore these features in detail using a pragmatic approach. In this second article, I will dive deep into integration of Observability framework i.e., ***OpenTelemetry with SpringBoot***.
As an architect and developer, when I engage in system design—whether it involves monolithic architecture, microservices, or contemporary cloud-native applications—I have made the integration of **observability** patterns utilizing **open-telemetry** tools a standard practice. Through observability, we can monitor application behavior via **metrics, logs, and traces** that we trigger
Before the release of Spring Boot 4, developers needed to incorporate numerous dependencies related to open telemetry, including various micrometer dependencies, which could be quite overwhelming at times. However, with the introduction of Spring Boot 4, the team streamlined this process by adding a single starter dependency, namely `spring-boot-starter-opentelemetry`, which automatically includes most of the micrometer dependencies. The OTLP protocol serves as the key enabler here, rather than any specific library.
Before we deep dive into ***OpenTelemetry with Spring Boot 4***, let us first grasp some fundamental concepts and understand what each of them signifies.
## Key Terminology
* **Metrics** act as numerical representations of aggregated data that various input sources, including hardware, software, and applications, provide. This includes monitoring resource utilization, performance, and user behavior. Teams can utilize various types of metrics, specifically **application metrics, system metrics, and business metrics.** Mainly talks about **what** happens inside the system
* **Logs** provide granular information regarding the specifics of the events, offering deeper insights into the reasons behind issues that occur at specific timestamps. Mainly talks about **why** issues occur
* **Traces** show us the events that occur during a complete transaction of a request or session, allowing us to pinpoint where and what transpired within a user session. By utilizing traces, we can identify which metrics or logs we associate with a specific issue, thereby helping us mitigate future problems such as API request slowness, API traffic, service-to-service interactions, workload, and internal API calls. Mainly talks about **where** the issue is occurring.
* **Observability** is evaluating the current state of an application and involves integrating logs, metrics, and traces data.
* **Telemetry** involves collecting all the unprocessed data that contributes to monitoring and enables more in-depth analysis, yielding thorough insights.
* The **OpenTelemetry** documentation states that OpenTelemetry is an **open-source framework for observability** that facilitates users in generating, exporting, and collecting telemetry data such as logs, metrics, and traces.
* **Spring Boot Actuator**, a subproject of Spring Boot, facilitates the management and monitoring of our application through HTTP endpoints or JMX. It reveals multiple endpoints that provide extensive information about the application across various instrumentation details.
After we understand the key terminology, let's explore how and what changed in the integration of open telemetry with Spring Boot 4.
## Why OpenTelemetry?
In contemporary cloud-native applications, we will develop a sophisticated microservice architecture that integrates intricate business requirements. We find the necessity for both application and infrastructure observability to be crucial.
The **OpenTelemetry framework**guides us with two fundamental principles:
* You own the data that you create, ensuring there is no vendor lock-in.
* You need to familiarize yourself with only one set of APIs and conventions.
Before the release of Spring Boot 4, we faced several challenges in integrating open telemetry, specifically:
* **OpenTelemetry Java Agent**—Zero code changes but has version compatibility issues.
* **3rd-party OpenTelemetry Spring Boot Starter** - External dependency
With **Spring Boot 4** , developers provide open telemetry with either native or in-house support as a starter dependency. This**`spring-boot-starter-opentelemetry`**is the recommended approach, as it
* Supports GraalVM native-image and AOT compilation
* Integrates natively with Micrometer
* Exports signals via OTLP protocol
* Works seamlessly with Spring Boot 4.0
## Step-by-Step Guide
If you already have an existing Spring Boot application, you can begin by incorporating the following dependency; otherwise, you can start creating a Spring Boot application using [Spring Initializr.](https://start.spring.io/#!type=maven-project&language=java&platformVersion=4.0.0&packaging=jar&configurationFileFormat=properties&jvmVersion=25&groupId=com.bsmlabs&artifactId=spring-boot-4-features&name=application&description=Explore%20Spring%20Boot%204%20Features%20&packageName=com.bsmlabs.features&dependencies=web,actuator,lombok,h2,data-mongodb,opentelemetry)
**Step 1:** Add the opentelemetry dependency in the `pom.xml`
```xml
org.springframework.boot
spring-boot-starter-opentelemetry
```
Or in the `build.gradle`
```json
implementation 'org.springframework.boot:spring-boot-starter-opentelemetry'
```
**Note:** This starter includes
* OpenTelemetry API
* `io.micrometer:micrometer-registry-otlp` for **metrics**
* `io.micrometer:micrometer-tracing-bridge-otel` for **traces**
In Spring Boot 3, you must add the dependencies mentioned above individually to implement OpenTelemetry.
**Step 2:** Configure ***Logs*** Export
1. Add the OpenTelemetry Logback appender to `pom.xml`
```xml
io.opentelemetry.instrumentation
opentelemetry-logback-appender-1.0
2.21.0-alpha // version might change later
```
Or in `build.gradle`:
```json
implementation 'io.opentelemetry.instrumentation:opentelemetry-logback-appender-1.0:2.21.0-alpha'
```
2. Enable Log Export Property by adding the below property in `application.properties`
```json
management.opentelemetry.logging.export.otlp.endpoint=http://localhost:4318/v1/logs
```
Or in YAML:
```yaml
management:
opentelemetry:
logging:
export:
otlp:
endpoint: http://localhost:4318/v1/logs
```
3. Configure Logback Appender
Create `src/main/resources/logback-spring.xml`:
```xml
```
4. Install OpenTelemetry Appender
Create a component to initialize the appender:
```java
import io.opentelemetry.api.OpenTelemetry;
import io.opentelemetry.instrumentation.logback.appender.v1_0.OpenTelemetryAppender;
import org.springframework.beans.factory.InitializingBean;
import org.springframework.stereotype.Component;
@Component
public class InstallOpenTelemetryAppender implements InitializingBean {
private final OpenTelemetry openTelemetry;
public InstallOpenTelemetryAppender(OpenTelemetry openTelemetry) {
this.openTelemetry = openTelemetry;
}
@Override
public void afterPropertiesSet() throws Exception {
OpenTelemetryAppender.install(openTelemetry);
}
}
```
**Step 3:** Configure ***Metrics*** Export
1. Enable Metrics Export
Add the following property to `application.properties`:
```json
# For development keep 1.0 for all traces to export, production environment keep 0.1
management.tracing.sampling.probability=1.0
management.otlp.metrics.export.url=http://localhost:4318/v1/metrics
```
Or in `application.yml`:
```yaml
management:
otlp:
metrics:
export:
url: http://localhost:4318/v1/metrics
```
2. Configure OpenTelemetry Semantic Conventions
You can select the metrics for export and configure them as beans, such as **Process Metrics, JVM Memory Metrics, and JVM Thread Metrics.**
Create a configuration class to use OpenTelemetry semantic conventions:
```java
import io.micrometer.core.instrument.Tags;
import io.micrometer.core.instrument.binder.jvm.ClassLoaderMetrics;
import io.micrometer.core.instrument.binder.jvm.JvmMemoryMetrics;
import io.micrometer.core.instrument.binder.jvm.JvmThreadMetrics;
import io.micrometer.core.instrument.binder.jvm.convention.otel.OpenTelemetryJvmClassLoadingMeterConventions;
import io.micrometer.core.instrument.binder.jvm.convention.otel.OpenTelemetryJvmCpuMeterConventions;
import io.micrometer.core.instrument.binder.jvm.convention.otel.OpenTelemetryJvmMemoryMeterConventions;
import io.micrometer.core.instrument.binder.jvm.convention.otel.OpenTelemetryJvmThreadMeterConventions;
import io.micrometer.core.instrument.binder.system.ProcessorMetrics;
@Configuration(proxyBeanMethods = false)
public class OpenTelemetryConfiguration {
@Bean
OpenTelemetryServerRequestObservationConvention openTelemetryServerRequestObservationConvention() {
return new OpenTelemetryServerRequestObservationConvention();
}
@Bean
OpenTelemetryJvmCpuMeterConventions openTelemetryJvmCpuMeterConventions() {
return new OpenTelemetryJvmCpuMeterConventions(Tags.empty());
}
@Bean
ProcessorMetrics processorMetrics() {
return new ProcessorMetrics(
List.of(),
new OpenTelemetryJvmCpuMeterConventions(Tags.empty())
);
}
@Bean
JvmMemoryMetrics jvmMemoryMetrics() {
return new JvmMemoryMetrics(
List.of(),
new OpenTelemetryJvmMemoryMeterConventions(Tags.empty())
);
}
@Bean
JvmThreadMetrics jvmThreadMetrics() {
return new JvmThreadMetrics(
List.of(),
new OpenTelemetryJvmThreadMeterConventions(Tags.empty())
);
}
@Bean
ClassLoaderMetrics classLoaderMetrics() {
return new ClassLoaderMetrics(
new OpenTelemetryJvmClassLoadingMeterConventions()
);
}
}
```
**Step 4:** Configure ***Traces*** Export
1. Add the following property to enable trace export in `application.properies`
```json
management.opentelemetry.tracing.export.otlp.endpoint=http://localhost:4318/v1/traces
```
Or in `application.yml`
```yaml
management:
opentelemetry:
tracing:
export:
otlp:
endpoint: http://localhost:4318/v1/traces
```
Spring Boot automatically configures:
* `OtlpHttpSpanExporter` (or `OtlpGrpcSpanExporter` for gRPC)
* OpenTelemetry SDK for trace export
* Micrometer Observation API to OpenTelemetry bridge
In the configuration mentioned above, **`management.otlp.metrics.export.url`** specifies the destination for metrics in Spring Boot which uses **Micrometer's OTLP exporter (** hence**`management.otlp.metrics`).** A collector that is compatible with OTLP directs the data. **management.opentelemetry.tracing.export.otlp.endpoint** indicates where Spring Boot should send traces and **use the OpenTelemetry tracing bridge** (hence**management.opentelemetry.tracing**).
Both send data to the same collector **(port 4318)**, but the configuration paths differ because of the way the libraries integrate.
**Step 5:** Add Trace ID to HTTP Response Headers
Create a Servlet filter to include *trace ID* in response headers:
```java
import io.micrometer.tracing.Tracer;
import jakarta.servlet.FilterChain;
import jakarta.servlet.ServletException;
import jakarta.servlet.http.HttpServletRequest;
import jakarta.servlet.http.HttpServletResponse;
import org.jspecify.annotations.Nullable;
import org.springframework.stereotype.Component;
import org.springframework.web.filter.OncePerRequestFilter;
import java.io.IOException;
@Component
public class TraceIdFilter implements Filter {
@Override
public void doFilter(ServletRequest request, ServletResponse response, FilterChain chain)
throws IOException, ServletException {
if (response instanceof HttpServletResponse httpResponse) {
String traceId = Span.current().getSpanContext().getTraceId();
httpResponse.setHeader("X-Trace-Id", traceId);
}
chain.doFilter(request, response);
}
}
```
This allows users to include the trace ID when reporting errors.
### Testing with Docker Compose
1. Set Up Local OTLP Backend
Create `compose.yaml` in your project root:
```yaml
services:
otel-lgtm:
image: grafana/otel-lgtm
ports:
- "3000:3000" # Grafana UI
- "4318:4318" # OTLP HTTP receiver
- "4317:4317" # OTLP gRPC receiver
environment:
- GF_SECURITY_ADMIN_PASSWORD=admin
```
2. Add Docker Compose Support (Optional)
Add dependency for automatic Docker Compose integration:
```xml
org.springframework.boot
spring-boot-docker-compose
runtime
true
```
Spring Boot will automatically:
* Detect `compose.yaml`
* Run `docker compose up`
* Configure OTLP endpoints automatically
3. Run and Verify
1. Start your application
2. Access Grafana at `http://localhost:3000` (username: admin, password: admin)
3. Make requests to your application
4. View:
* **Logs**: All application logs with trace IDs
* **Traces**: Distributed traces with span details
* **Metrics**: JVM metrics, custom metrics, HTTP metrics
5. Navigate **Home \> Explore \> Tempo**
6. Click **Search** and select service *"spring-boot-app-with-mongodb"*
7. Click on a Trace to see the span details
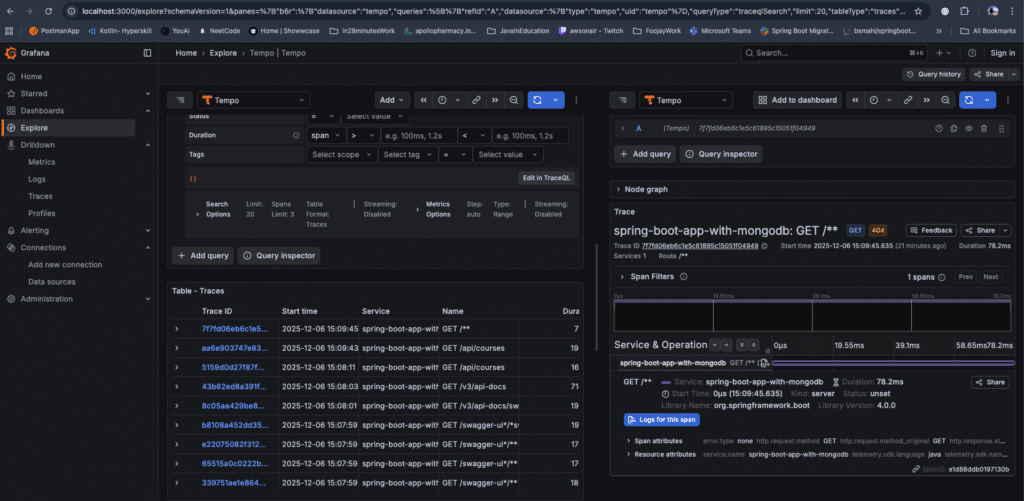 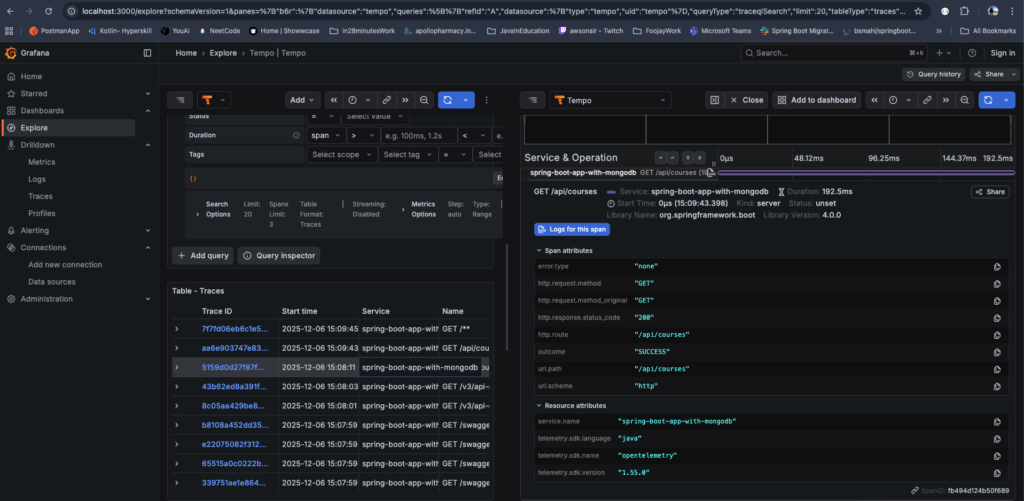
The complete code can be found [over on Github](https://github.com/bsmahi/spring-boot-app-with-mongodb).
## Conclusion
Developers must incorporate observability into modern cloud-native applications, as it has become essential and significantly aids in effectively monitoring the application. With `spring-boot-starter-opentelemetry` dependency, spring boot it automcatically perform an instrumentation for:
* The HTTP server handles requests for all controller endpoints.
* The HTTP client makes requests using **RestTemplate(deprecated), RestClient, and WebClient**.
* The JDBC database executes calls.
* Logs contain **Trace/span IDs.**
### References
1. **OpenTelemetry:**
2. **Observability**
3. **Spring Blog**
*Happy Learning!*