

Apache APISIX Loves Rust! (And Me Too)
- September 26, 2022
- 4 min read
Apache APISIX is built upon the shoulders of two giants:
- NGINX, a widespread Open Source reverse-proxy
- OpenResty, a platform that allows scripting NGINX with the Lua programming language via LuaJIT
This approach allows APISIX to provide out-of-the-box Lua plugins that should fit most business requirements. But it always comes a time when generic plugins don't fit your requirements. In this case, you can write your own Lua plugin.
However, if Lua is not part of your tech stack, diving into a new ecosystem is a considerable investment. Therefore, Apache APISIX offers developers to write plugins in several other languages. In this post, I'd like to highlight how to write such a plugin with Rust.
A bit of context
Before I dive into the "how", let me first describe a bit of context surrounding the Rust integration in Apache APISIX. I believe it's a good story because it highlights the power of Open Source.
It starts with the Envoy proxy.
Envoy is an open source edge and service proxy, designed for cloud-native applications
Around 2019, Envoy's developers realized a simple truth. Since Envoy is a statically compiled binary, integrators who need to extend it must compile it from the modified source instead of using the official binary version. Issues range from supply chains more vulnerable to attacks to a longer drift when a new version is released. For end-users, whose core business is much further, it means having to hire specialized skills for this reason only.
The team considered to solve the issue with C++ extensions, but discarded this approach as neither APIs nor ABIs were stable. Instead, they chose to provide a stable WebAssembly-based ABI. If you're interested in a more detailed background, you can read the whole piece on GitHub.
The specification is available on GitHub.
- Developers can create SDK for their tech stack
- Proxy and API Gateway providers can integrate
proxy-wasmin their product
Apache APISIX and proxy-wasm
The Apache APISIX project decided to integrate proxy-wasm into the product to benefit from the standardization effort. It also allows end-users to start with Envoy, or any other proxy-wasm-compatible reverse proxy, to migrate to Apache APISIX when necessary.
APISIX doesn't implement proxy-wasm but integrates wasm-nginx-module. It's an Apache v2-licensed project provided by api7.ai, one of the main contributors to Apache APISIX. As its name implies, integration is done at the NGINX level.
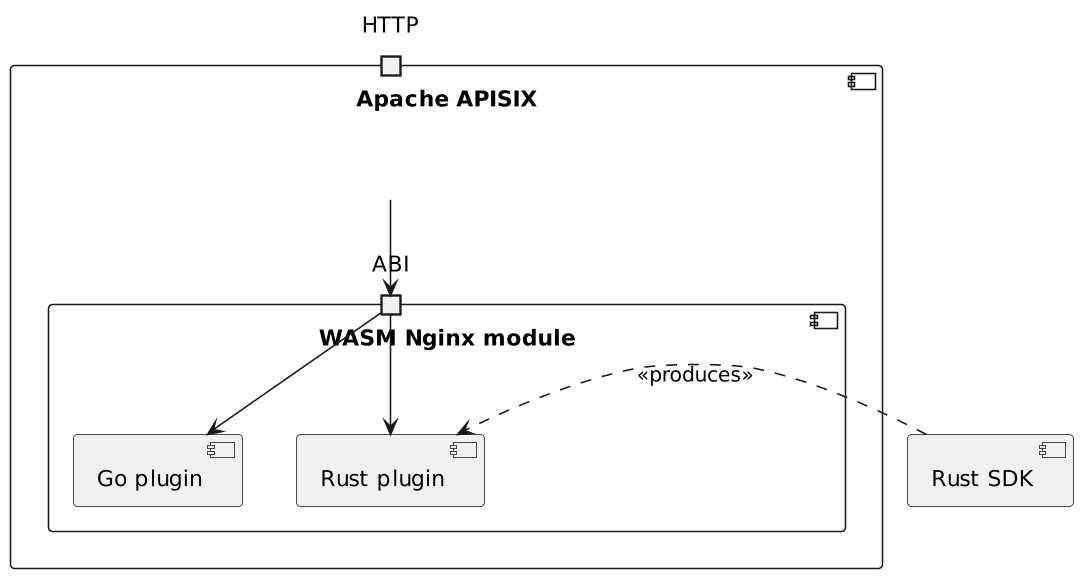
Apache APISIX and WebAssemby architecture overview
Let's code!
Now that we have explained how everything fits together, it's time to code.
Preparing Rust for WebAssembly
Before developing the first line of code, we need to give Rust WASM compilation capabilities.
rustup target add wasm32-wasi
It allows the Rust compiler to output WASM code:
cargo build --target wasm32-wasi
The WASM code is found in:
target/wasm32-wasi/debug/sample.wasmtarget/wasm32-wasi/release/sample.wasm(when compiled with the--releaseflag)
Setting up the project
The setup of the project is pretty straightforward:
cargo new sample --lib #1
- Create a
libproject with the expected structure
The code itself
Let me first say that the available documentation is pretty sparse. For example, proxy-wasm's is limited to the methods' signature (think JavaDocs). Rust SDK is sample-based. However, one can get some information from the C++ SDK.
WASM module is running in a stack-based virtual machine and its memory is isolated from the host environment. All interactions between host and WASM module are through functions and callbacks wrapped by context object.
At bootstrap time, a root context is created. The root context has the same lifetime as the VM/runtime instance and acts as a target for any interactions which happen at initial setup. It is also used for interactions that outlive a request.
At request time, a context with incremental is created for each stream. Stream context has the same lifetime as the stream itself and acts as a target for interactions that are local to that stream.
The Rust code maps to the same abstractions.
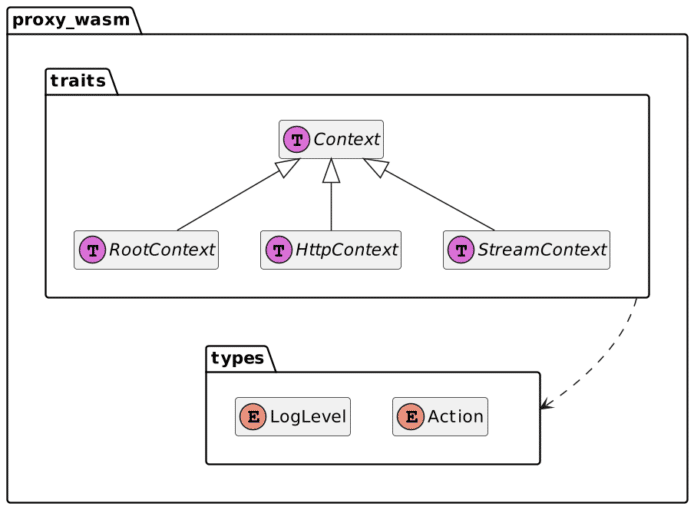
Rust's 'structure diagram'
Here's the code for a very simple plugin that logs to prove that it's invoked:
use log::warn;
use proxy_wasm::traits::{Context, HttpContext};
use proxy_wasm::types::{Action, LogLevel};

proxy_wasm::main! {{
    proxy_wasm::set_log_level(LogLevel::Trace);                                          //1
    proxy_wasm::set_http_context(|_, _| -> Box<dyn HttpContext> { Box::new(HttpCall) }); //2
}}

struct HttpCall;

impl Context for HttpCall {}                                                             //3

impl HttpContext for HttpCall {                                                          //4
    fn on_http_request_headers(&mut self, _: usize, _: bool) -> Action {                 //5
        warn!("on_http_request_headers");                                                //6
        Action::Continue
    }
}
- Set the log level to Apache APISIX's default
- Set the HTTP context to create for each request
- Need to implement
Context. By default, all functions are implemented inContext, so implementation is not mandatory - Likewise for
HttpContext - Implement the function. Functions in
HttpContextrefer to a phase in the ABI lifecycle when headers are decoded. It should return anAction, whose value is eitherContinueorPause. - Log - finally
After generating the WebAssembly code (see above), we have to configure Apache APISIX.
Configuring Apache APISIX for WASM
Apache APISIX's documentation is geared toward Go. Still, since both Go and Rust generate WebAssembly, we can reuse most of it.
We need to declare each WASM plugin:
wasm:
  plugins:
    - name: sample
      priority: 7999
      file: /opt/apisix/wasm/sample.wasm
Then, we can use the plugin like any other:
routes:
  - uri: /*
    upstream:
      type: roundrobin
      nodes:
        "httpbin.org:80": 1
    plugins:
      sample:                                #1
       conf: "dummy"                         #2
#END
- Plugin name
- At the moment, the
confattribute is mandatory and must be non-empty on the Apache APISIX validation side, even though we don't configure anything on the Rust side
At this point, we can ping the endpoint:
curl localhost:9080
The result is as expected:
rust-wasm-plugin-apisix-1 | 2022/09/21 13:43:14 [warn] 44#44: *286 on_http_request_headers, client: 192.168.128.1, server: _, request: "GET / HTTP/1.1", host: "localhost:9080"
Conclusion
In this post, I described the history behind the proxy-wasm and how Apache APISIX integrates it via the WASM Nginx module. I explained how to set up your Rust local environment to generate WebAssembly. Finally, I created a dummy plugin and deployed it to Apache APISIX.
In the next post, we'll beef up the plugin to provide valuable capabilities.
The source code is available on GitHub.
To go further:
Originally published at A Java Geek on September 25th, 2022
- September 26, 2022
- 4 min read
Technologist focusing on cloud-native technologies, DevOps, CI/CD pipelines, and system observability. His focus revolves around creating technical content, delivering talks, and engaging with developer communities to promote the adoption of modern software practices. With a strong background in software, he has worked extensively with the JVM, applying his expertise across various industries. In addition to his technical work, he is the author of several books and regularly shares insights through his blog and open-source contributions.


Comments (0)
No comments yet. Be the first.