

Controlling a LED strip with Pi4J and JBang
- November 28, 2022
- 3 min read
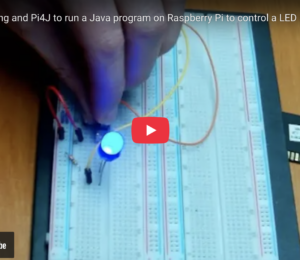
In an earlier post here on Foojay.io, JBang and Pi4J were used to control a LED and button connected to a Raspberry Pi.
This week Robert von Burg, one of the main contributors of the Pi4J project, shared on Mastodon another project where a LED strip is controlled via I2C.
This is the result, notice the Foojay.io startup artwork 😉
Wiring
The Raspberry Pi in the video is attached to a custom PCB used by Robert in medical cabinets.
This PCB contains a few different connectors:
- An 8 port I2C multiplexer for connecting up to 8 additional I2C devices, thus nesting I2C buses.
- An 8 port 1-Wire over I2C bridge to connect 8 1-Wire buses over I2C.
- In the middle of the board is an extension of the Raspberry Pi's I2C bus.
- The LED strip itself is connected to a custom PCB with a PIC16F18344 from Microchip. This chips firmware communicates with the LED, allowing to be configured over I2C.
For a simple Raspberry Pi-only setup, connect the wires of the LED strip to:
- 5V
- Ground
- GPIO 2, physical pin 3, I2C data (see https://pinout.xyz/pinout/i2c)
In this case make sure to only use a short LED strip, as the board can not provide enough power for a large number of LEDs.
Code
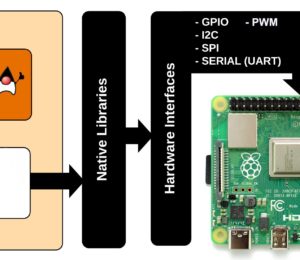
As this is a JBang project, all the dependencies and code are combined into one single file.
The structure of this file is:
- "Trick" the system to run this file with JBang using the comment in the first line
- Tell JBang which dependencies are needed with the
//DEPS ...comment lines - And the rest is just a normal Java class
///usr/bin/env jbang "$0" "$@" ; exit $?

//DEPS org.slf4j:slf4j-api:2.0.3
//DEPS org.slf4j:slf4j-simple:2.0.3
//DEPS com.github.lalyos:jfiglet:0.0.8
//DEPS com.pi4j:pi4j-core:2.2.1
//DEPS com.pi4j:pi4j-plugin-raspberrypi:2.2.1
//DEPS com.pi4j:pi4j-plugin-pigpio:2.2.1
//DEPS com.pi4j:pi4j-plugin-linuxfs:2.2.1

import com.github.lalyos.jfiglet.FigletFont;

import com.pi4j.Pi4J;
import com.pi4j.context.Context;
import com.pi4j.io.i2c.I2C;
import com.pi4j.io.i2c.I2CConfig;
import com.pi4j.io.i2c.I2CProvider;

class LedStrip {

    static final byte ADDR_LED_STRIP = 0x48;

    static final byte CMD_COLOR = 0x01;
    static final byte CMD_CONTRAST = 0x02;
    static final byte CMD_PATTERN = 0x03;

    static final byte CMD_PTR_GRB_LED_1 = 0x10;
    static final byte CMD_PTR_GRB_LED_2 = 0x13;
    static final byte CMD_PTR_GRB_LED_3 = 0x16;
    static final byte CMD_PTR_GRB_LED_4 = 0x19;

    static final byte PATTERN_ON = (byte) 0xFF;
    static final byte PATTERN_OFF = 0x00;

    static final byte PATTERN_BLINK_1S = (byte) 0xAA;
    static final byte PATTERN_BLINK_2S = (byte) 0xCC;
    static final byte PATTERN_BLINK_4S = (byte) 0xF0;

    static final byte COL_A_AZURE = 0x41;
    static final byte COL_B_BLUE = 0x42;
    static final byte COL_C_CYAN = 0x43;
    static final byte COL_D_DARK = 0x44;
    static final byte COL_F_FUSCHIA = 0x46;
    static final byte COL_G_GREEN = 0x47;
    static final byte COL_L_LIME = 0x4C;
    static final byte COL_M_MAGENTA = 0x4D;
    static final byte COL_O_ORANGE = 0x4F;
    static final byte COL_R_RED = 0x52;
    static final byte COL_S_SPRING = 0x53;
    static final byte COL_V_VIOLET = 0x56;
    static final byte COL_W_WHITE = 0x57;
    static final byte COL_Y_YELLOW = 0x59;

    static final byte[] COLORS = new byte[] {COL_A_AZURE, COL_B_BLUE, COL_C_CYAN, COL_D_DARK, COL_F_FUSCHIA, COL_G_GREEN, COL_L_LIME, COL_M_MAGENTA, COL_O_ORANGE,
                                COL_R_RED, COL_S_SPRING, COL_V_VIOLET, COL_W_WHITE, COL_Y_YELLOW};

    public static void main(String... args) throws Exception {
        System.out.println(FigletFont.convertOneLine("Hello foojay.io!"));

        Context pi4j = Pi4J.newAutoContext();
        I2CProvider i2CProvider = pi4j.provider("linuxfs-i2c");
        I2CConfig i2cConfig = I2C.newConfigBuilder(pi4j).bus(1).device(0x48).build();
        try (I2C ledStrip = i2CProvider.create(i2cConfig)) {
            ledStrip.writeRegister(CMD_COLOR, COL_W_WHITE);
            Thread.sleep(10);
            ledStrip.writeRegister(CMD_CONTRAST, 0x50);
            Thread.sleep(10);
            ledStrip.writeRegister(CMD_PATTERN, PATTERN_ON);
            Thread.sleep(10);

            // cycle all colors
            int green = 0;
            int red = 0;
            int blue = 0;
            while(true) {
                if (red < 254) {
                    red++;
                } else if (green < 254) {
                    green++;
                } else if (blue < 254) {
                    blue++;
                } else {
                    break;
                }

                ledStrip.writeRegister(CMD_PTR_GRB_LED_2, new byte[] {(byte) green, (byte) red, (byte) blue});
                Thread.sleep(10);
            }

            // turn all off
            ledStrip.writeRegister(CMD_PATTERN, PATTERN_OFF);
        }
    }
}
Conclusion
The Raspberry Pi, Pi4J and JBang are a perfect combination to experiment with electronics!
Give it a try!!!
- November 28, 2022
- 3 min read
Frank Delporte is a Java Champion, Java Developer, Senior Technical Writer at Azul, Blogger, Author of "Java Programming for Raspberry Pi - A Hands-On Guide to Electronics and IoT Projects", and Open-Source Contributor for Pi4J, Lottie4J, MelodyMatrix,... Frank writes and talks about Java in business production environments, but also in places people don’t always expect it, on the Raspberry Pi, driving GPIO pins, rendering JavaFX UIs, and running on RISC-V single-board computers.


Comments (1)
Controlling a LED strip with Pi4J and JBang – JUGBD
4 years ago[…] post Controlling a LED strip with Pi4J and JBang appeared first on […]