

Journeys in Java, Level 4: Building an Empire of Microservices
- April 27, 2022
- 7 min read
This article is the fourth iteration in a series of posts about building microservices in Java.
The initial post started with a single string message passed between two locally-running applications, and we are gradually adding services and functionality along the way.
In this level 4 instalment, we will add a new service that will manage book authors. It will call a database containing a data domain of books and retrieve authors and their information. This will entail creating a new, separate service from our previously written service1 and service2.
However, our previous data set also was not broad enough to cover authors as separate data entities, so I needed to find and load a better data set for our progressing use case.
We will try to keep the details short on data loading, so that we can focus on the microservices themselves.
Without further ado, let’s get started!
Architecture
The first microservices architecture we started with in the level 1 version of this project comprised of two Spring Boot applications trading a single message string between them. In the next two levels, we added an embedded and then a separate MongoDB database with imported book data set for the applications to host and call.
Today’s level 4 architecture adds a totally new service to host a REST API for interacting with author data. For now, we are only creating the backend service that hosts the API. We can build other services to use it at a later date.
Here is the updated architecture:
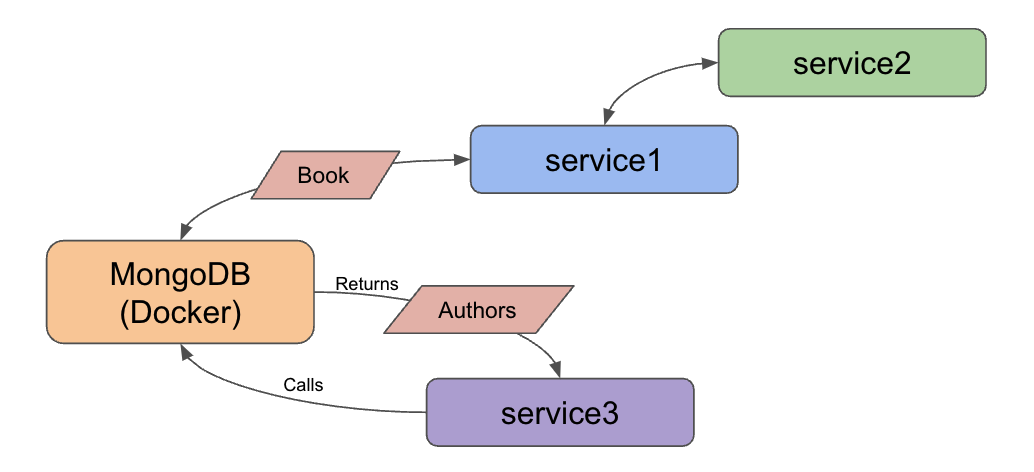
We also have a few changes in services 1 and 2 due to switching data sets in the database. A couple of field names are different, and the data has more information. While we won’t spend a lot of time on that, the new data set is a trimmed-down subset of the UCSD Book Graph.
New data load
The above-mentioned UCSD Book Graph data set we are using is very thorough and diverse, which makes it great for larger projects.
However, for lightweight demos, I needed to carve out a smaller subset to load and use. With some effort and time (more than I’d like), the resulting data set contained 10,000 books and a little over 12,000 authors.
I used the load script from the previous level 3 code with an updated data file name to import books, and then created a similar script for loading the author data into a separate database collection.
Once the data was in, I ran a couple queries to verify the format looked as I expected it, then turned to the microservices application code!
*Note:* For more info about trimming the data set for this project, check out my blog post on picking data cleaning tools. Detailed steps on importing the data to the database are provided in the Github project’s docker folder.
Applications - Service 1
Since we are adding a separate service to interact with a different entity (author vs. book), the only changes needed for service1 are to align properties with the new data set.
The pom.xml file does not need any updates, as we are not changing the technologies used, and there is only one small change to a more generic database name (goodreads vs books) in the properties file.
spring.data.mongodb.database=goodreads
Changes in the application class code will also be very few. Let’s take a look at that next.
Service 1 - project code
The data domain class (Book) is the only section that needs to change here. This is due to the fields on the book object have changed with the new data set. The updated class code is below.
@Data
@Document
class Book {
	@Id
	private String mongoId;
	@NonNull
	private String book_id;

	private String title, format, isbn, isbn13, edition_information;
}
If you are looking at the previous version of the code, we have added a couple more fields and removed the authors field. Since authors are now a separate entity (and database collection), this field will end up in our new service.
With those changes to the data domain, let’s see what changes to service2 entail.
Applications - Service 2
There are no changes to the dependencies, properties, or other configuration pieces of the application, so we can skip straight to the application class.
Service 2 - project code
The same changes we made to the data domain in service1 also need to be made in service2 for field name changes and additions.
@Data
class Book {
	private String mongoId;
	private String book_id;
	private String title, format, isbn, isbn13, edition_information;
}
On to the new service for the book authors!
Applications - Service 3
This will be the real core of this step in the microservices project. We are adding a separate service to manage and interact with author data. The code will look very similar to service1 for books because we are essentially creating the same functionality, except for author objects.
Just like we did with our previous services, we can go to the Spring Initializr at start.spring.io to create the skeleton of our project.
The first three fields keep default values (Maven project, Java language, Spring Boot 2.6.5), but I’ll tweak the group and artifact fields for my preference. Packaging and Java version will also stay defaulted.
In the Dependencies area, we need to add 3 things - Spring Reactive Web, Lombok, and Spring Data Reactive MongoDB. The use of Lombok is personal preference, as well, but I wanted to use it here to trim some code. Next, click the Generate button at the bottom of the screen and pick a location to save it.
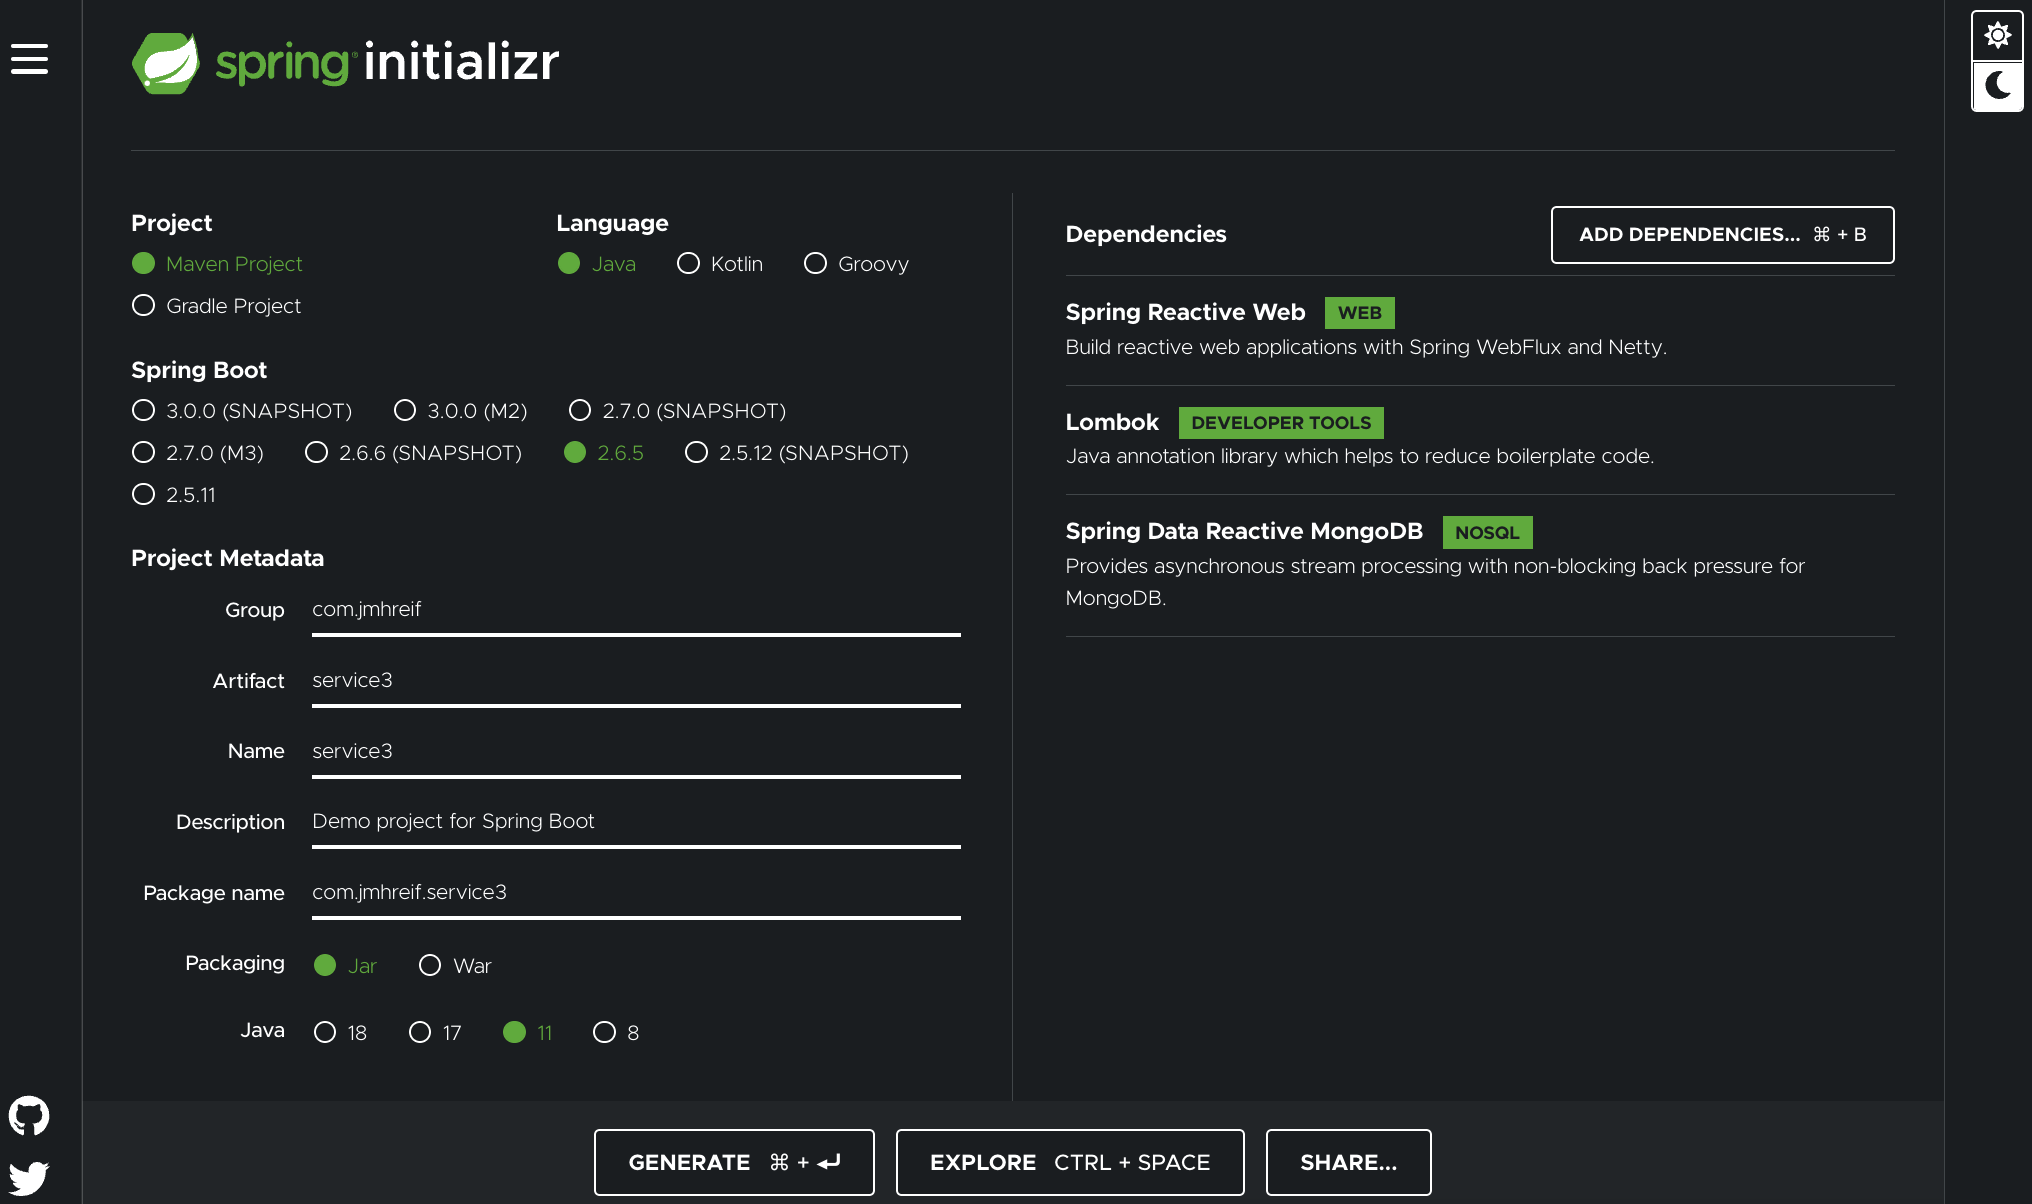
Note: the Spring Initializr displays in dark mode or light mode via the moon or sun icons in the right column of the page. The image above is in dark mode.
After the project downloads, find the .zip file where it downloaded and uncompress it. Open the uncompressed folder in your favorite IDE, and let’s start coding!
Our pom.xml and application.properties files will look nearly identical to service1’s. We have the same three dependencies (plus the standard test and reactor ones) - webflux for reactive REST, MongoDB reactive for the database connection, and lombok for reducing boilerplate.
Though our properties will also be nearly the same, we need to specify a different port for service3 so that traffic doesn’t conflict with service1 or service2. Service1 is on 8081, and service2 is on 8080, so we’ll assign 8082 for service3. The other two properties are for connecting to the MongoDB database running in a Docker container.
server.port=8082

#database connection
spring.data.mongodb.uri=mongodb://mongoadmin:Testing123@localhost:27017
spring.data.mongodb.database=goodreads
On to the code!
Service 3 - project code
The data domain class, repository interface, and controller class in service3 follow the same patterns as what we did in service1, but for authors. That means really only fields, names, and endpoints need changed, so let’s take a look!
@Data
@Document
class Author {
	@Id
	private String mongoId;
	@NonNull
	private String author_id;

	private String name, average_rating, ratings_count, text_reviews_count;
}
The @Data and @Document annotations create our getter and setter methods for the class fields and map the class to document objects in the database, respectively. Then, we have our @Id annotation followed by the related id field for the class, along with other fields we want to capture about the author below that.
In the AuthorRepository interface, we extend the ReactiveCrudRepository, just like we did in service1. We don’t define any methods here because (for now) we are sticking with the default ones provided out-of-the-box in Spring Data.
The rest controller class code also looks remarkably like service1.
@RestController
@AllArgsConstructor
@RequestMapping("/db")
class AuthorController {
	private final AuthorRepository authorRepo;

	@GetMapping("/authors")
	Flux getAuthors() { return authorRepo.findAll(); }
}
We annotate this class as a rest controller using @RestController and @RequestMapping and define the base endpoint as /db, just like in service1. On line 5 of the controller class, we inject the AuthorRepository interface, so we can access the methods for the database.
Next, we set up a nested endpoint of /authors that will be mapped to the getAuthors() method. This method returns a Flux (one or more objects) of authors and calls the author repository’s built-in findAll() method, retrieving all authors in the database.
Moving to the Service3Application class, no changes are needed. It already includes a standard main() method that is defaulted when the project is created.
Let’s test all the services together!
Put it to the test
As usual, we will spin up our project from top to bottom, starting with the database in the Docker container. Running docker ps will show us whether the container is running. If not started, use docker start mongoBooks to kick it off.

Next, we can start the service1, service2, and service3 applications, either through an IDE or the command line. Once running, we can test each service with the below commands.
- Test service1 for backend books api: open a browser and go to
localhost:8081/db/booksor go to command line withcurl localhost:8081/db/books. - Test service2 for client service connecting to books api: open a browser and go to
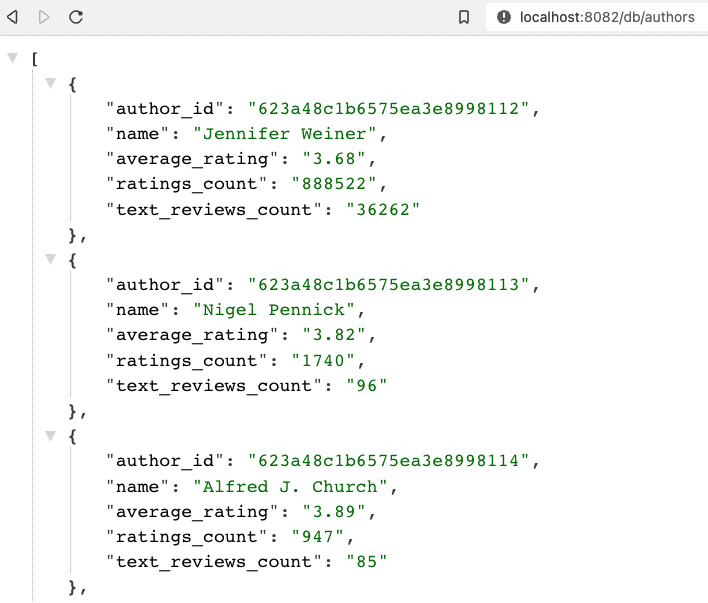
localhost:8080/goodreads/booksor go to command line withcurl localhost:8080/goodreads/books. - Test service3 for backend authors api: open a browser and go to
localhost:8082/db/authorsor go to command line withcurl localhost:8082/db/authors.
And here is the resulting output from authors api results from service3!
Wrapping up!
In this post, we took another big leap by adding a separate, new service that hosts a REST API for authors in the database.
The outline of the service3 code looks very similar to that of service1, as each is providing an api - one for books and one for authors.
We also transitioned our database to a new data set, but stuck with a book domain.
This meant that we had a few minor changes to field names on our domain classes, but not much else was impacted in the application layer.
However, there was some work at the database level to trim the larger data set down to demo size and get it loaded, though those steps were only mentioned in this post.
We ran and tested all of these changes together by starting all three of our applications and hitting their related endpoints; however, you may have noticed that three services and a database is a lot to spin up manually. It provides a great transition to a tool for running and managing multiple applications together. That is where we will go in the next post, so stay tuned. 🙂
Happy coding!
Resources
- Github: microservices-level4 repository
- Previous blog posts: Microservices Level 1, Microservices Level 2, Microservices Level 3
- Data set blog post: Goodreads data cleaning
- April 27, 2022
- 7 min read
Developer Relations Engineer at Neo4j


Comments (1)
This Week in Neo4j: Microservices, European Gas Network, FIFA22, DevTools, Java, Kubernetes, and More - Neo4j Graph Data Platform
4 years ago[…] JOURNEYS IN JAVA, LEVEL 4: Building an Empire of Microservices […]