

Journeys in Java, Level 3: Building an Empire of Microservices
- March 04, 2022
- 8 min read
We are still in the beginning stages of building microservices with Java, but we have already seen how to send and receive communications between two Spring Boot applications. In the first blog post of this series, our two applications transmitted a message string of "Hello, World!". In the second blog post, we took it one step further by embedding a MongoDB database into our service1, added a data domain (books) with four pre-populated entries, and transmitted the Book information between the two applications.
This post will advance once again by upgrading our embedded MongoDB instance to a full-fledged database running in a Docker container. Under official terms, we probably wouldn’t classify the container as a separate microservice. What actually would classify it as a microservice might vary depending on who you talked to. For now, since our database container only connects to the backend API service to provide the data for it, we will simply consider this a backing service, or even a supporting component of the service1.
I like to think of it like a restaurant kitchen. It is usually walled off separately and hidden (though still part of the same building), but the kitchen is the heart and a critical component of the restaurant. However you want to think of it, let’s get started building it!
Architecture
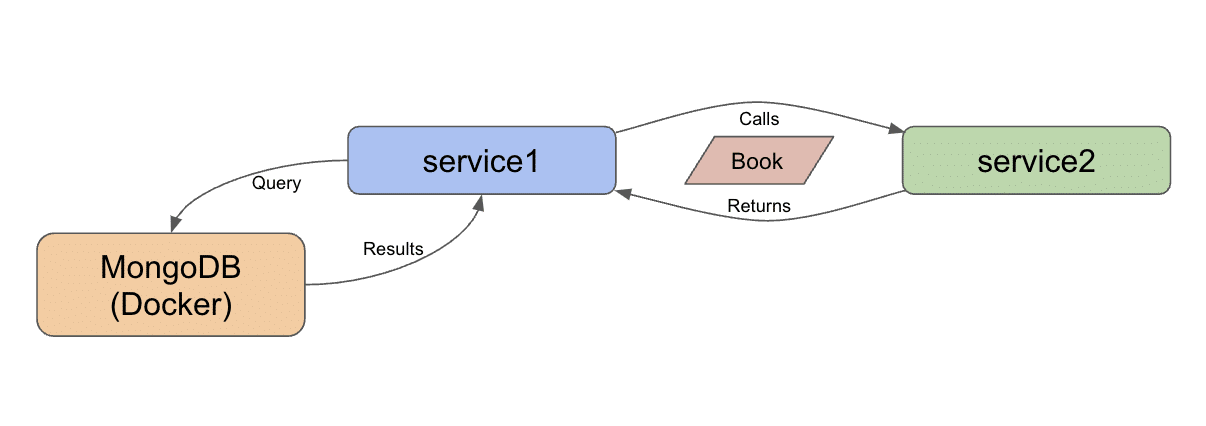
Our architecture from the previous couple of blog posts started with two Spring Boot applications communicating to one another via HTTP. The project goal is to slowly assemble microservices in manageable pieces to improve understanding (yours and mine). 🙂
With this in mind, this third installment of the microservices project will migrate our "test environment" embedded database to a MongoDB instance in a Docker container with imported external data.
Here is the updated architecture:
We decided on a data domain of books in the previous blog post, so we can load Kaggle’s existing Goodreads data set as a starting source.
That means we need to spin up a Docker container with MongoDB first, then load the data into it second before we can move to our interacting applications.
Docker container
Many of you are probably familiar with what Docker is and how to use containers, but let me spend a couple of sentences on background anyway. The term containers actually matches the design of the technology itself. It’s like taking all the required components for running an application (a mini virtual machine, the application, and any other necessary tools) and putting them inside a neatly packaged box (i.e. container). Yes, I like metaphors. 🙂
This architecture makes these containers smaller in size than a full VM counterpart and independent of environment. Containers are composed from a recipe-style file (called a Dockerfile) so that they can be created and destroyed quickly and consistently using the defined recipe.
To create a container with MongoDB running in it, we will need to create that recipe Dockerfile. Many companies have eliminated the duplication of creating custom containerized versions of their software by providing base images - a starter recipe that others can run or use as a foundation. We have done just that in our Dockerfile using MongoDB’s base image.
All of the code for our Docker container is available in the related folder of the Github project.
#Pull base image
#-----------------
FROM mongo

#Author
#-------
LABEL org.opencontainers.image.authors="Jennifer Reif,[email protected],@JMHReif"

#expose the default port
EXPOSE 27017
In the first code block, we are pulling that base image (mongo) for MongoDB. The next section tells anyone who might use this Dockerfile who maintains it (me). The last couple of lines expose a port in order to connect to the container using MongoDB’s default port is 27017.
If you clone the full microservices-level3 repository, you should be able to follow the instructions in the README file in the docker-mongodb folder to build and run the container on your machine.
Note: If you are particular about file locations, you might want to change the folder paths in the runMongoDB.sh script to be something specific to your preferences. You’re also welcome to use what I’ve defined, if it doesn’t matter. Also, Windows users will need to adjust the syntax to match Windows file syntax and paths.
Next, we will get the data loaded to our MongoDB instance running in the container.
Book data import
As mentioned earlier in the architecture section, we are going to load data about books using the Goodreads data set on Kaggle. The spreadsheet-formatted data is free to use, and it includes data such as title, author, reviews, and ratings about each book. There are several fields, but not so many to be unmanageable.
The Github repository loadData folder already contains the spreadsheet, so if you downloaded the repository, you already have it. A formatted version of the spreadsheet (for better import) is also included, along with the load script.
To start the data load, we need to copy the books_quoted.csv and the insert_books.sh files into a folder that the container can reach. Thankfully, in our script to spin up the container (runMongoDB.sh), we specified a data directory that maps to an external folder on our local machine. So, we can copy the CSV and shell script over to whatever specified there. If you used my defaults, then it would be $HOME/Projects/docker/mongoBooks/data.
Then, we need to get into our container to load the data in there. All of the steps for that are outlined in the related section of the README from the repository, along with some tests for checking that the data loaded properly.
Back to our microservices applications!
Applications - Service 1
Our application code doesn’t change much to go from an embedded to a separate instance of MongoDB. Though our database instance is becoming separate from the application, we aren’t classifying it as a different service because it is the backing/support for service1.
The largest amount of work was setting up the database itself, and if you have gotten this far, then the hardest part is already complete! Most of what we change, then, is going to be the connection details to plug in to the datatbase instance. Changes start in our pom.xml file, where we need to update our dependency from the embedded test version to the production-style independent instance.
<dependency>
  <groupId>org.springframework.boot</groupId>
  <artifactId>spring-boot-starter-data-mongodb-reactive</artifactId>
</dependency>
We are using the official Spring Data MongoDB dependency, which means we get all the goodness of Spring’s functionality interacting with a production-grade database. You may have also noticed the reactive suffix of the artifactId. Spring Data MongoDB provides a separate library for imperative-style code. Since we want to move data and events between applications for microservices as asynchronously as possible, we will use the reactive library.
We will also need to make a couple of changes to the application.properties file to connect to the database instance and remove the test instance properties. Our updated property file looks like the one below.
server.port=8081

#database connection
spring.data.mongodb.uri=mongodb://mongoadmin:Testing123@localhost:27017
spring.data.mongodb.database=books
We removed the MongoDB port and embedded versioning in favor of a full URI property (includes the MongoDB port of 27017) along with a database name on the instance. This is because a single MongoDB instance can hold multiple separate data stores with different data sets. I could have a database of books and a database of customers that exist in the same installation, but are organized in separate storage compartments of that installation.
On to the Java code!
Service 1 - project code
Since we are not really changing much in our project code itself, I left our classes in the main Service1Application Java file. As always, we will start at the bottom of the file and work our way up.
First, some of the fields in our spreadsheet that we loaded had slightly different naming. So, our database has different property names than our application. That’s ok, but it means that we will need to map those fields, or Spring won’t know what equals what.
We can do this in a couple of different ways. 1) keep our variable names in the application and add the @Property annotation to specify what that field equals in the database, 2) change our variable names. The database fields are sensible and understandable, so in this case, I will just change the variable names in the application to match the database.
@Data
@Document
class Book {
	@Id
	private String bookID;
	@NonNull
	private String title;
	@NonNull
	private String authors;
}
You might ask what changed? The id field went from bookId to bookID, and the author field went from author to authors. These are very minor differences, but ones that wouldn’t allow the values to be mapped properly if we didn’t match exactly.
The BookRepository interface just above the domain class does not change at all and neither does the BookController class above that. However, the Service1Application class does. We actually revert back to what we had in the Level1 rendition of the code with only the main method.
@SpringBootApplication
public class Service1Application {

	public static void main(String[] args) {
		SpringApplication.run(Service1Application.class, args);
	}
}
The CommandLineRunner bean is no longer needed because we are not populating an embedded database with dummy data, but rather using a separate database with a real data set loaded. Once we remove the bean, that is all for service1! Time to move over to service2.
Applications - Service 2
This service is our client-side service that calls service1 and displays the response. Because we are not changing functionality on the frontend side of the application, we do not need to update the pom.xml or the application.properties file.
Let’s see about the class code.
Service 2 - project code
Since we changed the domain class in service1, that means we need to align the domain class in service2, as well.
@Data
class Book {
	private String bookID;
	private String title;
	private String authors;
}
Just as in service1, we updated the first and last properties to bookID and authors. This maps our data coming from service1 to the correct fields in service2.
We do not need to change the way the request is pulling/retrieving the information. However, we did change our data domain, so I will make one minor change to the client url from /hello to /goodreads so that it aligns with our domain better.
@RestController
@AllArgsConstructor
@RequestMapping("/goodreads")
class BookController {
    private final WebClient client;
    @GetMapping
    Flux<Book> getBooks() {
        return client.get()
                .uri("/db/books")
                .retrieve()
                .bodyToFlux(Book.class);
    }
}
The @RequestMapping annotation is the only line that has changed, so we will need to go to localhost:8080/gooodreads now.
Let’s test our changes!
Put it to the test
Just like in updating the code, I like to spin up functionality from the bottom and move up. So, we need to make sure the database is running in our Docker container. You can check whether the container is running with docker ps. If you don’t see anything, you can start the container with docker start mongoBooks. Then we can use docker ps to check it again.


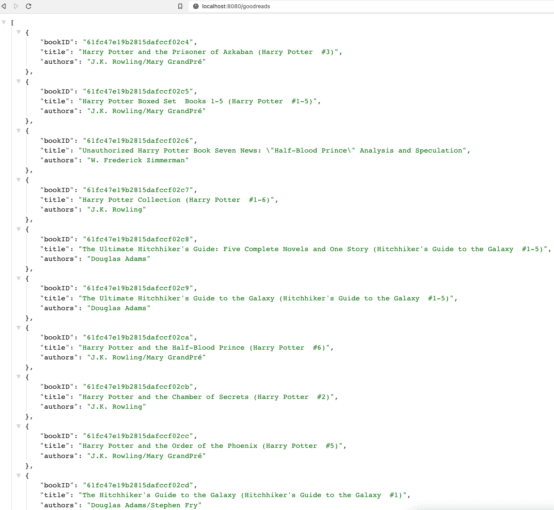
Next, we can start the service1 and service2 applications, either through an IDE or the command line. Once both are running, open a browser and go to localhost:8080/goodreads. Alternatively, you can run this at the command line with curl localhost:8080/goodreads or (if you have httpie tool installed) http :8080/goodreads.
And here is the resulting output!
Wrapping up!
This step in our microservices project took us from an embedded instance of MongoDB to a standalone database running in a Docker container. The service1 and service2 application code may not have changed much, but it puts us in a production-ready layout.
We saw how to create and run MongoDB database in a Docker container using a Dockerfile as our recipe, and we imported external data from a spreadsheet. We kept our two Spring Boot applications passing book data, with service1 now connecting to the MongoDB backing database to retrieve the loaded books.
As always, there is much more to learn and many more steps to a large system of services, but we are on our way to building and understanding microservices one small step at a time.
Happy coding!
Resources
- Github: microservices-level3 repository
- Documentation: Spring Data MongoDB
- Previous blog posts: Microservices Level 1, Microservices Level 2
- Containers: Docker
- March 04, 2022
- 8 min read
Developer Relations Engineer at Neo4j


Comments (3)
Build a Java Microservice With AuraDB Free - Secretofcss
4 years ago[…] offers several deployment options. We could spin up a Docker container (as we did in an earlier project using MongoDB) or take advantage of the database-as-a-service option called AuraDB with a free tier. Neo4j will […]
Build a Java Microservice With AuraDB Free – GetUpdated
4 years ago[…] offers several deployment options. We could spin up a Docker container (as we did in an earlier project using MongoDB) or take advantage of the database-as-a-service option called AuraDB with a free tier. Neo4j will […]
Build a Java Microservice With AuraDB Free – DZone Microservices - A Mega App Platform
4 years ago[…] offers several deployment options. We could spin up a Docker container (as we did in an earlier project using MongoDB) or take advantage of the database-as-a-service option called AuraDB with a free tier. Neo4j will […]