

Learn JShell with JavaFX in 60 Seconds
- July 12, 2021
- 8 min read
Spoon boy : Do not try and bend the spoon. That's impossible. Instead... only try to realize the truth.
Neo : What truth?
Spoon boy : There is no spoon.
Neo : There is no spoon?
Spoon boy : Then you'll see, that it is not the spoon that bends, it is only yourself.
-- The Matrix, a conversation between Neo and Spoon boy.
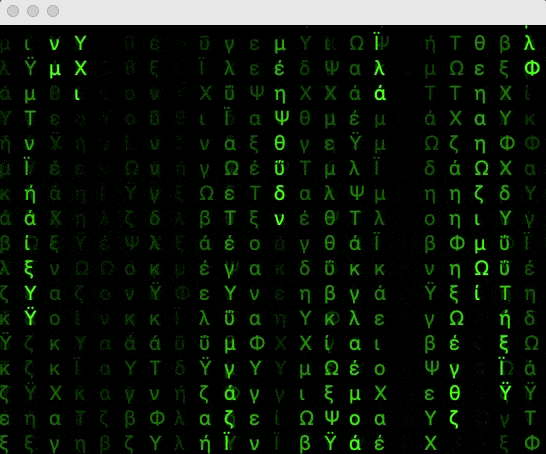
In the classic science fiction movie, The Matrix, there’s a cool special effect better known as the falling or raining green code effect. In one scene the character named 'Cypher' played by Joe Pantoliano explains how they can monitor activity inside the matrix by looking at the patterns as the code rains down. He claims it's done this way to simplify seeing people in the matrix than other means due to the fact that there is just way too much data (movie scifi magic talk).
In this article, I will demonstrate how to use JShell and JavaFX in an interactive way. No IDE or Build tools are needed.
Requirements
Java 11 or greater (JDK builds containing JavaFX modules).
I typically download one binary containing Java and JavaFX at Azul: https://www.azul.com/downloads/?package=jdk-fx
To jump right into the code, as a Maven project you'll want to clone the project at GitHub https://github.com/carldea/matrixfx. There you'll see the pom.xml file using the latest plugin from the GluonHQ team. To learn more about using the plugin or generating a project from scratch head over to https://start.gluon.io
Before we start the stop watch here's a quick introduction to jshell.
Introduction to JShell
Once you've installed Java 11 or greater the JDK provides a command line tool for the Java language called jshell. Similar to Python's command line REPL tool, you will be able to interact with a Java runtime environment.
To begin a jshell session get to your terminal or console command prompt and type jshell and hit enter.
$ jshell
|  Welcome to JShell -- Version 11.0.9
|  For an introduction type: /help intro
Note: Assuming your system's JAVA_HOME environment variable is properly set the typical executables should be available at the command line prompt: java, javac, and jshell.
What's nice about using jshell is you don't have to create any Java specific coding ceremony such as a public static void main (String[] args) method or having to create a class surrounding the main() method. You can simply do the following:
jshell> System.out.println("JavaFX Rocks!")
JavaFX Rocks!
Another nice feature is the autocomplete ability when hitting the tab key to show available method signatures.
Below is showing the available println() methods.
jshell> System.out.println(
Signatures:
void PrintStream.println()
void PrintStream.println(boolean x)
void PrintStream.println(char x)
void PrintStream.println(int x)
void PrintStream.println(long x)
void PrintStream.println(float x)
void PrintStream.println(double x)
void PrintStream.println(char[] x)
void PrintStream.println(String x)
void PrintStream.println(Object x)

<press tab again to see documentation>
Next, let's try a simple variable assignment by assigning a primitive 5 into a variable x.
jshell> var x = 5
x ==> 5
After an assignment you can do arithmetic statements like the following:
jshell> x + 1
$2 ==> 6
Whenever you don't assign a variable to a result as shown above (after hitting the carrage return), JShell will assign a reference variable (a number prefixed with a $ dollar sign) such as $2. To verify the result ($2) again just enter the reference variable and hit enter to output the value inside as shown below:
jshell> $2
$2 ==> 6
So, how do you know what packages and classes are available in the current jshell session?
That's simple: enter the /imports command. You should see something like the following:
jshell> /imports
|    import java.io.*
|    import java.math.*
|    import java.net.*
|    import java.nio.file.*
|    import java.util.*
|    import java.util.concurrent.*
|    import java.util.function.*
|    import java.util.prefs.*
|    import java.util.regex.*
|    import java.util.stream.*
How do you import a class not among the ones shown above. You either use /open (load Java file) or add a 3rd party library to your classpath before you launch jshell as shown below:
$ jshell --class-path /opt/libs/log4j.jar:/opt/libs/commons-lang3.jar
After 3rd party libraries are on the classpath you can now import them.
Shown below is an example of how to import the StringUtils class from Apache commons.
jshell> import org.apache.commons.lang3.StringUtils
You can now perform the following:
jshell> StringUtils.isEmpty("")
$6 ==> true
Now that you are more familiar with jshell let's see how to launch a JavaFX application.
JShell in 60 Seconds
In the following steps you will learn how to run a JavaFX application and interact with it during runtime using JShell.
Step 1: Make sure you have Java 11 or greater with JavaFX modules.
Do the following to check to make sure:
java --list-modules | grep javafx
You should see something like the following:
[email protected]
[email protected]
[email protected]
[email protected]
[email protected]
[email protected]
[email protected]
If you don’t see the modules shown above, you probably downloaded just the JDK itself (not containing JavaFX’s modules). (Head over to Azul to download Zulu builds with JavaFX here: https://www.azul.com/downloads/?package=jdk-fx.)
Step 2: Copy and Paste the following code into a file named Main.java into a directory:
import javafx.animation.AnimationTimer;
import javafx.application.Application;
import javafx.scene.Scene;
import javafx.scene.canvas.Canvas;
import javafx.scene.canvas.GraphicsContext;
import javafx.scene.layout.StackPane;
import javafx.scene.paint.Color;
import javafx.scene.text.Font;
import javafx.stage.Stage;
import java.util.Random;

/**
 * A JavaFX application using the Canvas API to create the Matrix falling/raining green code effect.
 */
public class Main extends Application {
    public static String color = "#00ff00"; // the color green

    @Override
    public void start(Stage stage) {
        StackPane root = new StackPane();

        Canvas canvas = new Canvas(1280, 640);

        // bind the width and height properties when screen is resized.
        canvas.widthProperty().bind(root.widthProperty());
        canvas.heightProperty().bind(root.heightProperty());

        init(canvas);

        root.getChildren().add(canvas);

        Scene scene = new Scene(root, 1280, 640);
        stage.setScene(scene);
        stage.show();
    }

    private void init(Canvas canvas) {
        GraphicsContext gc = canvas.getGraphicsContext2D();
        int fontSize = 25; // font size in pixels

        // Animate the matrix effect
        new AnimationTimer() {
            long lastTimerCall = 0;
            final long NANOS_PER_MILLI = 1000000; //nanoseconds in a millisecond
            final long ANIMATION_DELAY = 50 * NANOS_PER_MILLI; // convert 50 ms to ns

            // Capture current dimensions of the Canvas
            int prevWidth = (int) canvas.getWidth();
            int prevHeight = (int) canvas.getHeight();

            // Keeps track of each column's y coordinate for next iteration to draw a character.
            int[] ypos = resize(gc, fontSize);

            // Random generator for characters and symbols
            Random random = new Random();

            @Override
            public void handle(long now) {
                // elapsed time occurred so let's begin drawing on the canvas.
                if (now > lastTimerCall + ANIMATION_DELAY) {
                    lastTimerCall = now;

                    int w = (int) canvas.getWidth();
                    int h = (int) canvas.getHeight();

                    // did resize occur?
                    if (w != prevWidth || h != prevHeight) {
                        // clear canvas and recalculate ypos array.
                        ypos = resize(gc, fontSize);
                        prevWidth = w;
                        prevHeight = h;
                    }

                    // Each frame add a small amount of transparent black to the canvas essentially
                    // creating a fade effect.
                    gc.setFill(Color.web("#0001"));
                    gc.fillRect(0, 0, w, h);

                    // Set an opaque color for the drawn characters.
                    gc.setFill(Color.web(color));
                    gc.setFont(new Font("monospace", fontSize-5));

                    // Based on the stored y coordinate allows us to draw the character next (beneath the previous)
                    for (int i = 0; i < ypos.length; i++) {
                        // pick a random character (unicode)
                        //char ch = (char) random.ints(12353, 12380) // Japanese
                        //char ch = (char) random.ints(12100, 12200) // Chinese
                        char ch = (char) random.ints(932, 960) // Greek
                                .findFirst()
                                .getAsInt();
                        String text = Character.toString(ch);

                        // x coordinate to draw from left to right (each column).
                        double x = i * fontSize;

                        // y coordinate is based on the value previously stored.
                        int y = ypos[i];

                        // draw a character with an opaque color
                        gc.fillText(text, x, ypos[i]);

                        // The effect similar to dripping paint from the top (y = 0).
                        // If the current y is greater than the random length then reset the y position to zero.
                        if (y > 100 + Math.random() * 10000) {
                            // (restart the drip process from the top)
                            ypos[i] = 0;
                        } else {
                            // otherwise, in the next iteration draw the character beneath this character (continue to drip).
                            ypos[i] = y + fontSize;
                        }
                    }
                }
            }
        }.start();
    }

    /**
     * Fill the entire canvas area with the color black. Returns a resized array of y positions
     * that keeps track of each column's y coordinate position.
     * @param gc
     * @param fontSize
     * @return
     */
    private int[] resize(GraphicsContext gc, int fontSize) {
        // clear by filling the background with black.
        Canvas canvas = gc.getCanvas();
        gc.setFill(Color.web("#000"));
        gc.fillRect(0, 0, canvas.getWidth(), canvas.getHeight());

        // resize ypos array based on the width of the canvas
        int cols = (int) Math.floor(canvas.getWidth() / fontSize) + 1;
        int[] ypos = new int[cols];
        return ypos;
    }

    public static void main(String[] args) {
        launch(args);
    }
}
Things to notice:
- No package namespace at the top
- One
public static Stringvariable denoting the color for the text color. - It’s a relatively small one file application
Step 3: Launch the JShell (command-line tool) and load the Main.java file in the current session.
Note: In your terminal (console) be sure to be in the directory location where the Main.java file was created from the previous step.
$ jshell Main.java
|  Welcome to JShell -- Version 11.0.9
|  For an introduction type: /help intro

jshell>
Or just type jshell , then on the command prompt type the following:
jshell> /open Main.java
This will simply load the file into the current jshell session.
To see more commands, type /help.
Step 4: Instantiate a Main class (JavaFX Matrix Application object):
jshell> Main app = new Main()
Here you’ll notice there is no semicolon at the end of the statement. Semicolons are optional for simple one line statements.
In the JavaFX Matrix application, I created one public static String variable named color that will allow us to change its value dynamically all the while the application is running. The string variable will have a hex value representing an RGB color. The color is used to paint (fill) the characters on the canvas. Below is the code that will convert the string hex value color into a javafx.scene.paint.Color instance.
gc.setFill(Color.web(color));
Next, you'll check the current color value used.
Do the following:
jshell> System.out.println(app.color)
You should see the hex value for the color green:
jshell> System.out.println(app.color)
#00ff00
Since it’s using the RGB color model the hex FF bits are turned on for green, red and blue bytes are set to zero. The format of the hex value is prefixed with the hash '#' symbol.
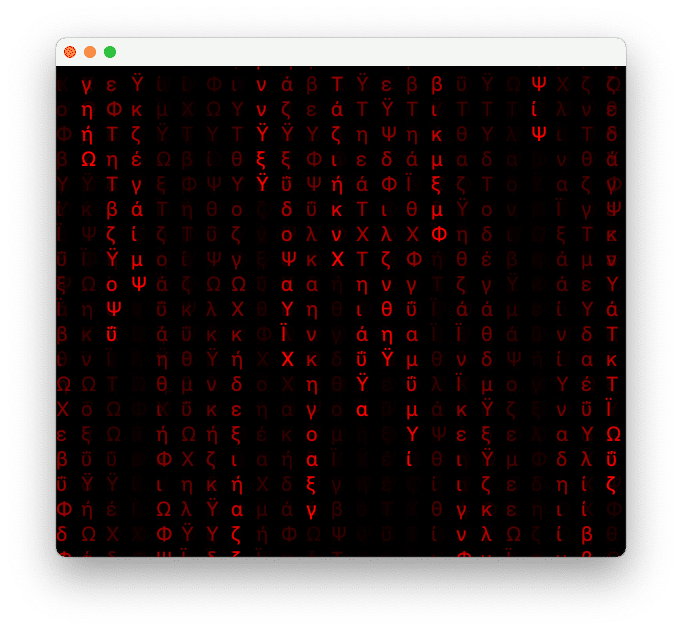
Later, we will change the color from green to red during runtime, but let's learn how to properly launch a JavaFX application within jshell.
Step 5: Create a Thread instance to invoke the Main.main() method.
jshell> new Thread(() -> app.main(null)).start()
Or you can do the following:
jshell> new Thread(() -> app.main(null))
Then you’ll see a reference variable assigned to the new Thread instance (dollar symbol and number). It should output something similar to the following:
$13 ==> Thread[Thread-0,5,main]
To start the thread instance type the following into the command prompt:
jshell> $13.start()
Since the application starts on a new thread JShell’s command prompt will not be blocked thus allowing you to interact with the runtime environment (main thread).
Step 6: Change the color variable interactively. Set the color to red.
jshell> app.color = “#ff0000”
This should dynamically output the following while the application is running.
Step 7: Stopping the JavaFX Application. Click on the close button to exit. Next, you'll need to reset the jshell session.
Type the following in jshell:
jshell> /reset
|  Resetting state.
A reset will kill the JavaFX Application thread and clear all objects in the current jshell session.
To rerun the application simply type the following:
jshell> /open Main.java
Another convenience is the ability to recall previously used commands. By using the up and down arrow keys you can cycle through commands or statements previously entered. This will help you save some time typing ;-).
To do simple edits, you can also type the command /edit. This will launch an simple text editor type UI allowing you to edit the current program in memory (current session). Subsequently, you can type the command /save to save changes.
Observations
If you run the application by entering new Main().main(null) on the jshell prompt instead of a new Thread(...).start() you’ll notice the jshell command line will block (not allowing you to type or interact). Therefore, I included a step to create a thread instance to run separately.
After stopping the application, you’ll need to enter a /reset command to kill the JavaFX application thread. If you do not enter /reset and attempt to rerun the application the runtime environment will complain and you'll get the following error message:
jshell> Main.main(null)
|  Exception java.lang.IllegalStateException: Application launch must not be called more than once
|        at LauncherImpl.launchApplication (LauncherImpl.java:175)
|        at LauncherImpl.launchApplication (LauncherImpl.java:156)
|        at Application.launch (Application.java:296)
|        at Main.main (#11:123)
|        at (#13:1)
Conclusion
We started with an introduction of the basics of using jshell. Next, you got a chance to learn how to run a JavaFX application file from a terminal command prompt and from within jshell's command prompt.
After that, launching the application we were able to change the color interactively by setting the public static member variable color.
Lastly, we learned how to stop a JavaFX application properly via /reset command.
Happy coding! If you have any questions comments are always welcome.
- July 12, 2021
- 8 min read
Carl Dea is a Lead Developer and Software Engineer at Deloitte. He has authored Java books and has been developing software for 20+ years with many clients, from Fortune 500 companies to nonprofit organizations. He has written software ranging from mission-critical applications to e-commerce applications. Carl has been using Java since the very beginning (when Applets were cool) and is a JavaFX enthusiast (fanboy) dating back to when it used to be called F3/JavaFX script. He greatly loves sharing and advocating Java based technologies.


Comments (2)
Mariano
5 years agoNice to see a tutorial that highlight the power of the Java REPL, many platforms have one and developers use them a lot, but in Java we didn't have that option for a long time. One thing that in other REPLs is not a problem an is a problem in Java because the way we import our dependencies is have the ability to import them, e.g. in Node you have all the dependencies you need in the node_modules/ folder, so there is no need to explicitly load them when invoking the CLI `node`. But in Java we use to have the dependencies in cache folders, and we use tools like Gradle or Maven to call Java with all the dependencies loaded. In case you want to play a bit with the JShell using your dependencies and also the classes from your project, try the jshell-plugin with Gradle: https://github.com/mrsarm/jshell-plugin In the website you will find also a special section for spring boot projects, that explain how with a few simple steps play with your "business" objects: DAOs, Services, ..
Carl Dea
5 years agoMariano, Thank you! Yep, it's about time Java had a Repl ;-) Very nice to know about jshell-plugin. Having this plugin will definitely improve productivity and a way to prove out a concept rapidly, without having to setup a full development environment. -Carl