

OIDC Client with Mutual TLS Client Authentication
- February 04, 2021
- 9 min read
It is common to authenticate OAuth and OpenID Connect (OIDC) clients with secrets. When you register a client in the Authorization Server (i.e., the OpenID Connect Provider, OP), you typically get a client ID and a secret. These are then used as credentials whenever your client sends requests to the Authorization Server. Often, this type of credential will provide a sufficient level of security for a deployment; other times, however, this simply is not enough. Authenticating with client ID and secret means that if anyone manages to steal or guess your application’s credentials, they will be able to use them to impersonate it. The attacker does not even have to intercept the credentials themselves. They may be able to capture a request sent to the Authorization Server and replay it. The Authorization Server does not know who is sending the request; it can only check whether the credentials are valid. (This is why it’s also important to use TLS and unguessable client secrets when using this type of credential.)
You can achieve a much higher security level by implementing mutual TLS in the communication between your client and the Authorization Server. In such a setup, your client will be sure that it is talking to the right Server (by verifying its certificate in the same way as when mutual TLS is not used), and the Authorization Server will have certainty that it is receiving requests from a legitimate client (by verifying the client’s certificate). Mutual TLS can be used in OAuth and OIDC as a way of authenticating a client, instead of sending the secret. What is more, when mutual TLS is used, the server can issue tokens that are bound to the caller’s certificate, creating Proof-of-Possession (PoP) tokens (instead of bearer tokens). To use such tokens, the client must present a proof of its possession of the same private key used when authenticating to the Authorization Server and its certificate (which contains its public key). This means that even if someone manages to intercept such an access token, they will not be able to use it without having access to the client key.
In this article, you’ll learn how to set up an OpenID Connect (OIDC) client with Spring Security using mutual TLS as a method for authenticating the client. Mutual TLS is not supported out-of-the-box by Spring Security, so there are a few steps that need to be completed to use this feature.
Before You Start
There are a few prerequisites that you’ll need to complete this tutorial. You will need:
- An Authorization Server that supports OpenID Connect. The server also needs to support mutual TLS connections, and it should expose the OIDC metadata endpoint.
- A client registered with the Authorization Server which has mutual TLS enabled as an authentication option. You will need to provide the server with your client’s certificate. See the section below to learn how to generate a certificate locally, if you don’t have one.
Using the Curity Identity Server as an Example
In order to make the example code a bit more tangible, we will be using the Curity Identity Server as the Authorization Server, but you can use any Authorization Server that fulfills the requirements listed above. If you want to learn more about the Curity Identity Server, or need help in installing and configuring it, have a look at the Getting Started section of Curity’s web site. If you have an instance of the Curity Identity Server running and only need help with configuring mutual TLS for the client, then have a look at the Token Service Admin Guide, where this is described in detail.
Parameters Used in this Tutorial
The values listed below are used in the code and configuration examples throughout this article. They are example values, so remember to tailor them according to your implementation details and deployment setup.
| Parameter Name | Value used in the tutorial |
| Authorization Endpoint | https://idsvr.example.com/oauth/v2/oauth-authorize |
| Token Endpoint | https://idsvr.example.com/oauth/v2/oauth-token |
| JSON Web Key Set | https://idsvr.example.com/oauth/v2/oauth-anonymous/jwks |
| Keystore file | demo-client.p12 |
| Keystore password | Secr3t |
| Client certificate | demo-client.cer |
| Client ID | demo-client |
| Scopes | openid |
| Redirect Uri | https://localhost:9443/login/oauth2/code/idsvr |
Create a Client Certificate
We’ll need a private key and client certificate that we can use in our OIDC client for the mutual TLS authentication. For this tutorial, we’ll use a self-signed certificate. We will store the certificate and its private key in a Java keystore. Run this command from a terminal to create one:
keytool -genkeypair \
     -alias demo-client \
     -keyalg RSA \
     -keysize 4096 \
     -keystore demo-client.p12 \
     -storepass Secr3t \
     -storetype pkcs12 \
     -validity 10 \
     -dname "CN=demo-client, OU=Example, O=MyCompany, C=SE"
Let’s take a brief look at the command. Firstly, note that we created a Java keystore file (i.e., a PKCS#12 file) called demo-client.p12 that is protected with the password Secr3t. The keystore contains an RSA key used to create a self-signed certificate with a validity of 10 days and the subject distinguished name of “CN=demo-client, OU=Example, O=MyCompany, C=SE”. The certificate and the key are grouped by the alias demo-client.
Once you have the project in place, you will place the keystore file in your application’s src/main/resources folder.
Now export the certificate. You will need the exported certificate to register it with your Authorization Server.
keytool -export \
    -alias demo-client \
    -keystore demo-client.p12 \
    -storepass Secr3t \
    -file demo-client.cer
Prepare Your Project
We will create a simple Spring Boot application from scratch using Spring Initializr. In the configuration window that opens, enter io.curity.example for the name of the group and call the artifact demo-client.
Search for and add the following dependencies:
- Spring Security
- OAuth2 Client
- Spring Reactive Web
- Thymeleaf
Generate the application. Spring Initializr creates an archive with a bootstrap application that includes the selected dependencies. Download and extract the archive, and import the project into an IDE of your choice.
Setup HTTPS
It is a good practice to secure web applications with HTTPS. Below is a quick explanation how to secure your app with SSL.
Run the following command to create a self-signed certificate for localhost:
keytool -genkeypair
     -alias https
     -keyalg RSA
     -keysize 4096
     -keystore server.p12
     -storepass Secr3t
     -storetype pkcs12
     -validity 10
     -dname "CN=localhost, OU=Example, O=MyCompany, C=SE"
Copy the file server.p12 into src/main/resources. Rename application.properties in the same folder to application.yml and configure HTTPS for the application by adding the following fragment to the file:
server:
  port: 9443
  ssl:
    key-store: classpath: server.p12
    key-store-password: Secr3t
    key-store-type: pkcs12
    key-store-alias: https
The application will now run on https://localhost:9443.
Insecure Certificate
The browser will not trust this self-signed server certificate. You may notice an SSLHandshakeException in the console when running this example. Make sure your browser trusts the certificate if you want to get rid of the error.
Add a Controller
We will add a controller to demonstrate how to obtain tokens by returning some access and ID token data. Use the @RegisteredOAuth2AuthorizedClient annotation to get the client and the access token it obtained. Use @AuthenticationPrincipal for accessing information about the user. When using OpenID Connect, choose OidcUser for the class representing the authenticated principal. This class holds the ID token and additional user information if available.
The controller updates the model and returns the index template.
@Controller
public class OidcLoginController {
    @GetMapping("/")
    public String index(Model model,
           @RegisteredOAuth2AuthorizedClient OAuth2AuthorizedClient authorizedClient,
           @AuthenticationPrincipal OidcUser oidcUser) {
        model.addAttribute("userName",
                            authorizedClient.getPrincipalName());
        model.addAttribute("userClaims",
                            oidcUser.getClaims());
        model.addAttribute("clientName",
                            authorizedClient.getClientRegistration().getClientName());
        model.addAttribute("scopes",
                            authorizedClient.getAccessToken().getScopes());
        return "index";
    }
}
Configure the OAuth Client
Register the following client in the application configuration file src/main/resources/application.yml:
spring:
  security:
    oauth2:
      client:
        registration:
          idsvr:
            client-name: Demo
            client-id: demo-client
            client-authentication-method: none
            authorization-grant-type: authorization_code
            redirect-uri: "{baseUrl}/login/oauth2/code/{registrationId}"
            scope: openid
        provider:
          idsvr:
            authorizationUri: https://idsvr.example.com/oauth/v2/oauth-authorize
            tokenUri: https://idsvr.example.com/oauth/v2/oauth-token
            jwkSetUri: https://idsvr.example.com/oauth/v2/oauth-anonymous/jwks

custom:
  client:
    ssl:
      key-store: demo-client.p12
      key-store-password: Secr3t
      key-store-type: pkcs12
      trust-store: idsvr.p12
      trust-store-password: changeit
      trust-store-type: pkcs12
This triggers String Boot to register a client with an id idsvr. This id is also used in the redirect-uri through the placeholder {registrationId}.
The remaining properties, client-id, authorization-grant-type, and scope, have been defined when configuring the client in the Authorization Server. You can choose any client-name. This is the string that will be used in the default login page setup at /login.
Spring Boot will use the authorization and token endpoints for the OAuth 2.0 flow. The JSON Web Key Set is used to validate the ID token.
Note that we specify the client authentication method as none. At first, this may seem like we’re configuring a public client, but we’re not. Our client will authenticate with the certificate and is a private key. This setting may look misleading, as Spring Security does not yet support mutual TLS out of the box.
When obtaining a token - either as part of the code flow or when using refresh tokens - the client must authenticate with a client certificate. For the TLS connection to work, it also must trust the certificate presented by the server. We will use the custom.client.ssl settings to configure the client (mutual) TLS settings. In this example, the keystore with the client key and the truststore with the server certificate will be fetched from the resources folder.
Configure Security
Let’s configure mutual TLS for the OAuth 2.0 client authentication. We want Spring Security to use our client certificate in a mutual TLS connection with the Authorization Server when requesting the access token. For that, we will have to load the client keystore that we prepared, use that keystore in an SSL context, and apply that context to an HTTP client that we tell the framework to use when requesting the access token.
Load Client Key
- Place the client keystore in the resources folder of your application.
- Create a configuration-class and call it TrustStoreConfig. This class will be responsible for reading the custom.client.ssl properties from application.yml.
- Load the key material.
- Prepare SSL/TLS context that can be used by the web clients when sending requests to the Authorization Server.
@Configuration
public class TrustStoreConfig {

    private SslContextBuilder mutualTLSContextBuilder;

    [...]

    public TrustStoreConfig(
            @Value("${custom.client.ssl.trust-store-type:jks}")
                String trustStoreType,
            @Value("${custom.client.ssl.trust-store:}")
                String trustStorePath,
            @Value("${custom.client.ssl.trust-store-password:}")
                String trustStorePassword,
            @Value("${custom.client.ssl.key-store}")
                String keyStorePath,
            @Value("${custom.client.ssl.key-store-password}")
                String keyStorePassword,
            @Value("${custom.client.ssl.key-store-type:jks}")
                String keyStoreType)

            throws CertificateException, NoSuchAlgorithmException, KeyStoreException, IOException, UnrecoverableKeyException {

        TrustManagerFactory trustManagerFactory = trustManagerFactory(
            trustStoreType, trustStorePath, trustStorePassword);

        mutualTLSContextBuilder = SslContextBuilder
                .forClient()
                .keyManager(
                    keyManagerFactory(keyStoreType, keyStorePath, keyStorePassword)
                );

        if (trustManagerFactory != null) {
            mutualTLSContextBuilder.trustManager(trustManagerFactory);
        }
    }

    private KeyManagerFactory keyManagerFactory(
            String keyStoreType, String keyStorePath, String keyStorePassword)

            throws KeyStoreException, NoSuchAlgorithmException, IOException, CertificateException, UnrecoverableKeyException {

            KeyStore clientKeyStore = KeyStore.getInstance(keyStoreType);
            KeyManagerFactory keyManagerFactory = KeyManagerFactory.getInstance(KeyManagerFactory.getDefaultAlgorithm());

            try (InputStream ksFileInputStream = new ClassPathResource(keyStorePath).getInputStream()) {
                clientKeyStore.load(ksFileInputStream, keyStorePassword.toCharArray());
                keyManagerFactory.init(clientKeyStore, keyStorePassword.toCharArray());
            }
            return keyManagerFactory;
    }
}
Trust Store
The trust store can be loaded accordingly but was not outlined here for readability. You can see a complete example on GitHub.
Configure OAuth 2.0 with Mutual TLS
- Create a configuration-class and call it SecurityConfig.java. This class makes use of the TrustStoreConfig to get the SslContext for the web clients used in the different parts of the OAuth 2.0 flow. It will also enable OAuth 2.0 login.
@Configuration
@Import(TrustStoreConfig.class)
public class SecurityConfig {

    /**
     * Configuration of a custom trust store.
     */
    private final TrustStoreConfig customTrustStoreConfig;

    /**
     * Load the configuration of the custom key and trust store.
     * @param trustStoreConfig
     */
    public SecurityConfig(final TrustStoreConfig trustStoreConfig) {
        this.customTrustStoreConfig = trustStoreConfig;
    }

    @Bean
    SecurityWebFilterChain springSecurityFilterChain(ServerHttpSecurity http) {
        http
                .authorizeExchange(exchanges ->
                        exchanges
                                .anyExchange().authenticated()
                )
                .oauth2Login(Customizer.withDefaults());
        return http.build();
    }
Spring reactive WebClient abstracts the reactive HTTP client it uses for the requests. By default, it uses Reactor Netty HttpClient internally (see Spring Docs). Therefore, we also build our solution on the same.
- Create a secure HttpClient
- Use the Reactor Netty implementation of ClientHttpConnector with the preconfigured HttpClient
- Build a WebClient with the ReactorClientHttpConnector as shown here:
private WebClient createWebClient(SslContext sslContext) {

    HttpClient nettyClient = HttpClient
            .create(ConnectionProvider.create("small-test-pool", 3))
            .wiretap(true)
            .secure(sslContextSpec -> sslContextSpec.sslContext(sslContext)
                    .handshakeTimeout(Duration.of(2, ChronoUnit.SECONDS)));

    ClientHttpConnector clientConnector = new ReactorClientHttpConnector(nettyClient);

    return WebClient
            .builder()
            .clientConnector(clientConnector)
            .build();
}
We are now ready to create a token response client that can handle the code flow of our application with mutual TLS client authentication.
@Bean
ReactiveOAuth2AccessTokenResponseClient<OAuth2AuthorizationCodeGrantRequest> reactiveOAuth2AccessTokenResponseClientWithMtls() throws SSLException {
    SslContext sslContext = customTrustStoreConfig.createMutualTlsContext();

    WebClientReactiveAuthorizationCodeTokenResponseClient mtlsClient = new
            WebClientReactiveAuthorizationCodeTokenResponseClient();

    WebClient mtlsWebClient = createWebClient(sslContext);
    mtlsClient.setWebClient(mtlsWebClient);

    return mtlsClient;
}
Take into account that there is another implementation for when refresh tokens are used to obtain a new access token. Update ReactiveOAuth2AccessTokenResponseClient<OAuth2RefreshTokenGrantRequest> accordingly, like in the example above. Also, Spring Security will fetch the public key from the Authorization Server to verify the tokens using the value from the jwkSetUri setting. The web client retrieving those keys must trust the server certificate.
Run the Demo Application
Start the demo application with mvn spring-boot:run if you use maven or ./gradlew bootRun for a gradle project.
Navigate to https://localhost:9443 to access the index site and trigger a login.
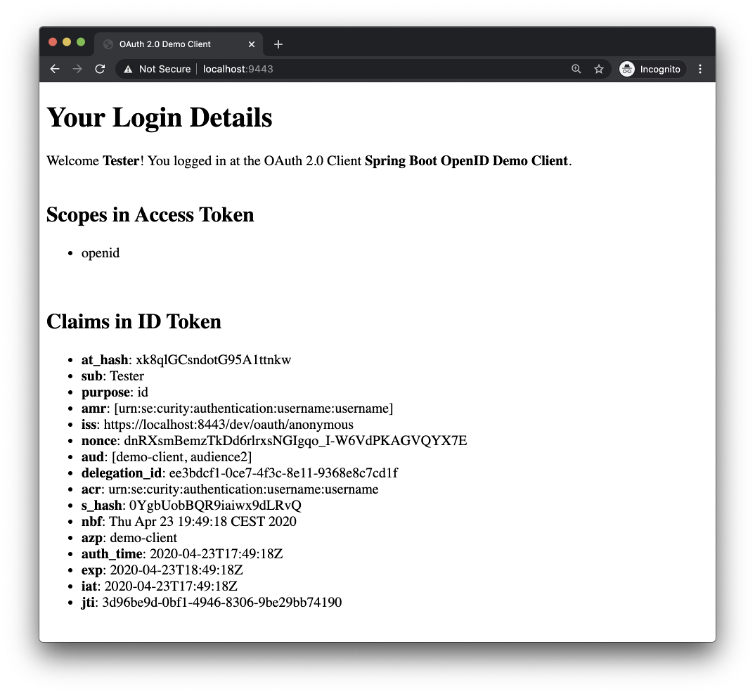
After successful login, you will be presented with details retrieved from the ID token.
Conclusion
Authenticating the client with a key that it proves possession of by using it to establish two-way SSL instead of a shared secret gives you a much higher level of security in the communication with the Authorization Server. It also opens up possibilities for further security improvements, like using sender-constrained or Proof-of-Possession access tokens. In this article, we have shown you how to implement mutual TLS authentication in a Spring Security OIDC client.
Even though Spring Security does not support mutual TLS out of the box, using it for client authentication is a great way to enhance your security. You need to be aware, however, of the details of the OAuth / OIDC flows that your application will use, such as the code flow and refresh tokens. Each web client that handles requests to your Authorization Server that requires authentication must be updated in the way it establishes a TLS context. The configuration of a custom trust store may be cumbersome due to the lack of customizable web clients - the web client has to be updated separately in every place where Spring sends requests to the Authorization Server. This sometimes requires knowledge of Spring Security’s implementation details. The framework is under constant development. Some of the drawbacks mentioned in this tutorial have registered issues (see Spring Security Issues 4498 and 8882) and may be solved in future versions.
Further Information and Source Code
You can find the source code of the example on Curity’s GitHub page. For further examples and help regarding OAuth 2 and Spring Security visit Spring Security Reference. More information on the Curity Identity Server can be found on the Curity web site.
- February 04, 2021
- 9 min read
Michał Trojanowski is a Product Marketing Engineer at Curity. He is a developer with more than 10 years of experience working with web technologies. Working on different projects allowed him to learn different languages and observe different approaches on design patterns – also concerning APIs. Interested in sharing the knowledge of making great APIs.


Comments (0)
No comments yet. Be the first.