Pitest: Do You Test Your Tests?
- August 15, 2023
- 7770 Unique Views
- 7 min read
What is Pitest?
Pitest is a library that helps us do mutation testing.
Mutation testing is a process in which random variations of the code under test are generated.
Hence, our tests will run against variants of the code that we’re intending to test.
If the test fails, the mutation is killed, if it still passes it lives. So in subsequent runs, you will see this mutation once again. Surviving mutations may indicate issues with our test set since application code changes should lead to different end results, and thus to failing tests. So to further reduce the survivors we will need to enhance our test cases and/or add extra.
In other words, Pitest helps you assess the quality of your test suite.
Mutations can take a lot of forms, relational operators (+, -, *, /) being switched around, increments becoming decrements, calls to void methods being removed, …
A full list of possible mutators can be found on the Pitest Mutator Overview Page
Ok, but why should I use it?
The question we have to ask ourselves is: Who watches the watchmen?
By default, coverage reports give us information on what code is (not) tested, but no indication of whether our tests are actually able to detect issues properly.
After all, who here hasn’t seen a codebase where the tests contain no asserts, yet all branches are executed?
It can also help us find issues if there were gaps in our Test Driven Development cadence.
We test our tests
A short demo
If you want to run the code yourself, please make sure you have Maven installed, and that you have cloned or downloaded the code from the GitHub repository.
The actual application itself doesn't entail much, it just contains a simple function that's sensitive to mutations.
Let’s run mvn test on this project, and we’ll get this magnificent JaCoCo project:
![]()
A line & branch coverage of 100% magnificent, isn’t it?
Of course, if we then take a look at our tests the keen-eyed will spot the lack of assertions.
Now of course a proper analysis tool like Sonar will point out this lack of assertions, but it’s always nice to spot this sooner.
In this project a basic Pitest setup has already been done, so we can also take a look at those results at target/pit-reports/index.html.
As you can see

Things do not look quite as good over here. Pitest mutated our code, and 6 out of 7 mutations survived.
If we click on the package, and then our main class, we can see which mutations were applied, where, and which survived.
A mutation can have the following states:
* Killed
* Lived
* No coverage (the same as lived, but just not covered by a test)
* Non-viable mutation (invalid bytecode)
* Timed Out
* Memory error
* Run error (akin to non-viable, some of these can lead to a run error)
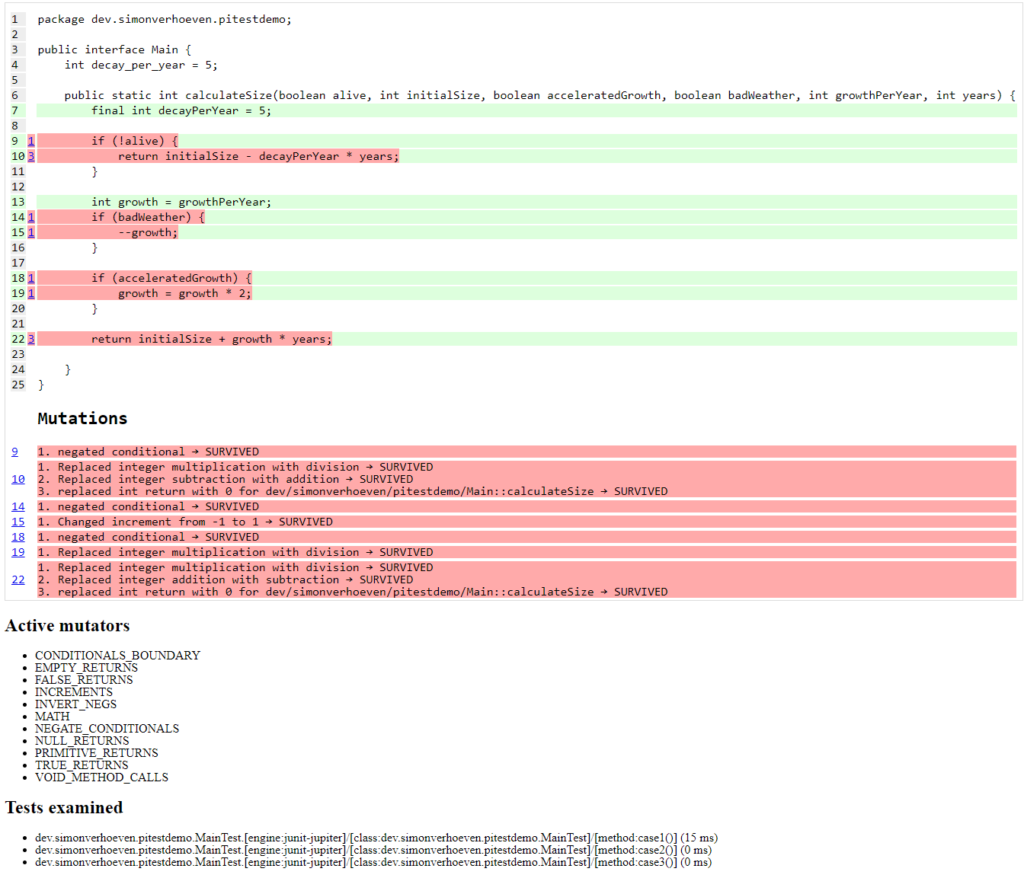
Now we know which holes in our testing remain, we can work towards fixing these and after these steps, we can rerun the Pitests to verify how many mutations remain alive.
For example, let’s add quite a (too) simplistic check for our decay:
@Test
void decays() {
    int initialSize = 100;
    int result = Main.calculateSize(false, 100, true, true, 5, 5);
    assertTrue(initialSize > result);
}
If we then run Pitest again, we’ll already see some improvements:
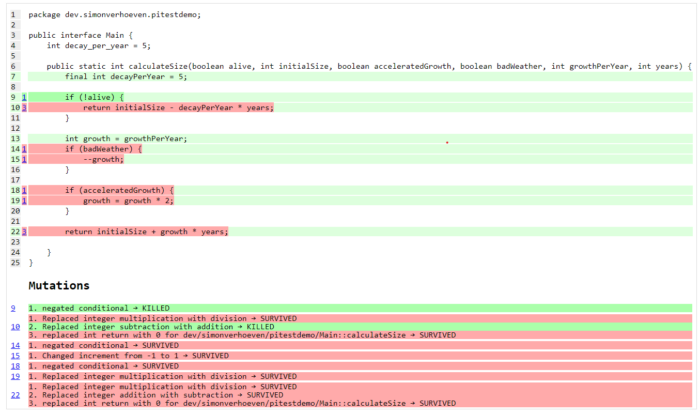
However, we’ll notice there are still a couple of surviving mutations.
For example, the second one, which makes sense given both 100 - 5 * 5 and 100 - 5 / 5 results in a number lower than 100.
Now if we replace the above test with:
@Test
void decays() {
    boolean alive = false;
    int initialSize = 100;
    int years = 5;
    int growthPerYear = 5;
    boolean badWeather = false;
    int expected = initialSize - years * Main.decay_per_year;
    boolean acceleratedGrowth = false;

    int result = Main.calculateSize(alive, initialSize, acceleratedGrowth, badWeather, growthPerYear, years);
    assertEquals(expected, result, "The expected size, and resulting size should be equal!");
}
And rerun our tests we’ll see that 2 more mutations have joined the choir invisible:
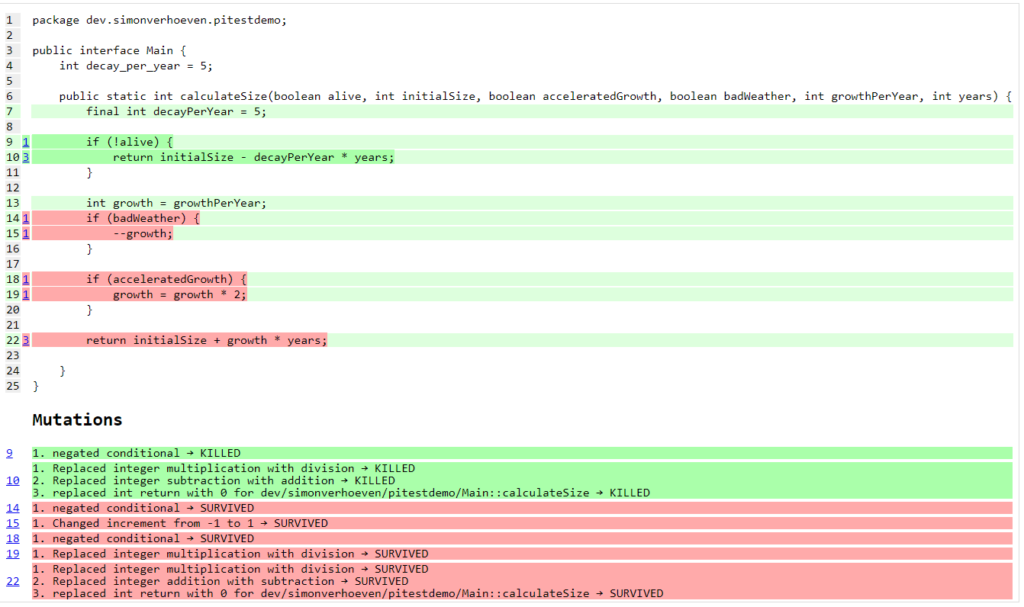
Note: hovering over a covered mutation will show you which testcase(s) have killed it:

Now if we take a look at the remaining mutations we notice we can cover a lot of mutations in one by testing our happy path:
- the two negated conditionals
- addition replaced with subtraction
- multiplication replaced with division
By adding this test case
@Test
void aliveWithNiceWeatherAndNormalGrowth() {
    boolean alive = true;
    int initialSize = 100;
    int years = 5;
    int growthPerYear = 5;
    boolean acceleratedGrowth = false;
    boolean badWeather = false;
    int expected = initialSize + years * growthPerYear;

    int result = Main.calculateSize(alive, initialSize, acceleratedGrowth, badWeather, growthPerYear, years);
    assertEquals(expected, result, "The expected size, and resulting size should be equal!");
}
And as we can see after our run:
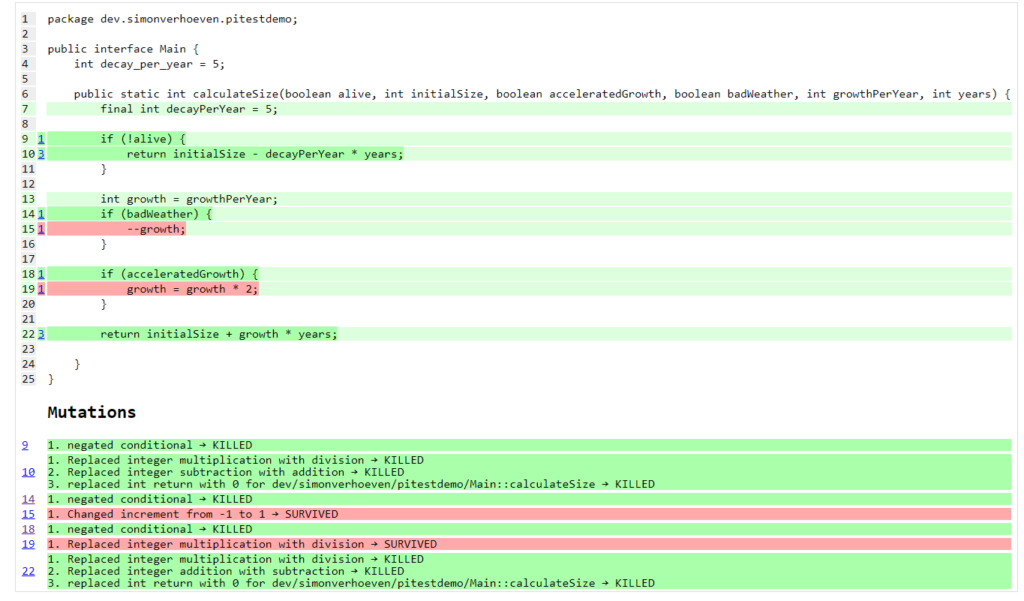
In this manner, we can keep eliminating the gaps in our test coverage.
Configuration
Pitest can be quite a resource-intensive plugin, so proper configuration is important.
For example, you can define which code is mutated, and which tests are run using it using targetClasses and targetTests respectively.
You can define the percentage of mutations that should be eliminated using mutationThreshold
A list of configuration options can be found on the command line quick start page.
The list of possible features is shown when verbose logging is enabled.
Sample setup
Personally, I like to use this setup:
<profile>
    <id>pitest</id>
    <build>
        <plugins>
            <plugin>
                <groupId>org.pitest</groupId>
                <artifactId>pitest-maven</artifactId>
                <version>1.14.2</version>
                <dependencies>
                    <dependency>
                        <groupId>org.pitest</groupId>
                        <artifactId>pitest-junit5-plugin</artifactId>
                        <version>1.2.0</version>
                    </dependency>
                </dependencies>
                <executions>
                    <execution>
                        <id>pitest</id>
                        <phase>test</phase>
                        <goals>
                            <goal>mutationCoverage</goal>
                        </goals>
                    </execution>
                </executions>
                <configuration>
                    <failWhenNoMutations>false</failWhenNoMutations>
                    <timestampedReports>false</timestampedReports>
                    <mutators>STRONGER</mutators>
                    <withHistory>true</withHistory>
                    <features>
                        +auto_threads
                    </features>
                </configuration>
            </plugin>
        </plugins>
    </build>
</profile>
With this setup, I can just run mvn -Ppitest test to have everything mutated in my project, or I can pass in a glob to limit what gets mutated (-DtargetClasses="dev.simonverhoeven.analyseme").
It’s configured so that:
- no failure if there is nothing to mutate
- no timestamped output folder for the results (false is the default, but sometimes I like to tweak it)
- more mutators are used (STRONGER set)
- history in/output files are enabled to speed up the analysis
- auto threads is enabled, so it uses the number of threads reported by my current machine NOTE: it is not recommended to use this on a CI server
Advice
The value of mutation testing lies in the analysis and the actions taken, not its execution.
Given the resource cost, it might be tempting to only run it nightly on your CI server. But it’s like a tree falling in a forest. If nobody looks at the results, did the mutation tests really run?
Now of course, as documented earlier you can certainly set a target mutation score, and whilst that will help pinpoint gaps at the end, it’s like a last-minute scope change.
One thinks they’re done, but yet not quite. It might make one grumble a bit, and add some test cases to satisfy the tool which is the wrong motivator.
It’s a tool to help you receive quick feedback in your development lifecycle, not at the end.
Please run it before your code’s set in stone, especially as the implications of certain mutations might help point out spots where a different approach might be a better fit.
Frequently Asked Questions
- How can I speed up Pitest?
- use proper slicing, and specific rules to target what’s actually of interest to you (see for reference this blogpost)
- increase the number of threads (1 by default), or make use of the
auto_threadsfeature - there is experimental support for incremental analysis
- by making use of the Arcmutate accelerator plugin
- Are Pitests random?
No, they’re deterministic - How are mutants created?
They’re generated by bytecode manipulation, and held in memory (unless you use theEXPORTfeature, and even then they’re placed in the report directory, so there’s no risk of accidentally releasing them) - Do I need to use a build tool plugin?
- No, you can use Pitest from the command line, but using one of the build plugins is recommended, see for reference: command line quick start
- What are the requirements?
- For Pitest 1.4+ you’ll need Java 8 or higher, and at least JUnit or TestNG on your classpath.
Note: thepitest-junit5-pluginplugin is needed when you’re usingJUnit 5
- For Pitest 1.4+ you’ll need Java 8 or higher, and at least JUnit or TestNG on your classpath.
- I am encountering a lot of timeouts, what can I do?
In certain cases a mutation might lead to an infinite loop, or Pitest might think there’s one. In a future release, there might be a fix for this. For now, you can try to resolve this by increasingtimeoutConst. - Can I aggregate tests across modules?
Yes, but it’ll require some extra setup and is documented on the Pitest set at Test Aggregation Across Modules - What is I want Subsumption analysis?
This is part of the pitest extensions available through Arcmutate but does require a paid license
References
- Source code for this project
- Official website
- Arcmutate - from the team behind Pitest, offers extra operators
- Descartes - a mutation plugin engine for PIT implementing extreme mutation operators
- State of Mutation Testing at Google
Don’t Forget to Share This Post!




Comments (0)
No comments yet. Be the first.