

Sliding Window Counter Rate Limiter (Redis & Java)
- February 25, 2025
- 10 min read
This content is also available on YouTube. Check it out!
The Sliding Window Counter offers a more efficient way to handle rate limiting compared to the Sliding Window Log. While the Sliding Window Log keeps an exact log of timestamps for each request, allowing precise tracking over a rolling time period, this precision comes at the cost of higher memory usage and computational overhead as the number of requests increases.
In contrast, the Sliding Window Counter approximates the request rate by dividing time into smaller intervals and counting requests within each interval. By maintaining these interval counts and using weighted averages to estimate the rolling window, it provides a balance between accuracy and efficiency.
Though not as precise as the Sliding Window Log, the Sliding Window Counter requires significantly less memory since it avoids storing individual timestamps. This makes it better suited for scenarios with high traffic or resource constraints while still enforcing rate limits smoothly and without abrupt resets.
Index
- Introduction
- How the Sliding Window Counter Rate Limiter Works
- Implementation with Redis and Java
- Testing with TestContainers and AssertJ
- Conclusion (GitHub Repo)
How It Works
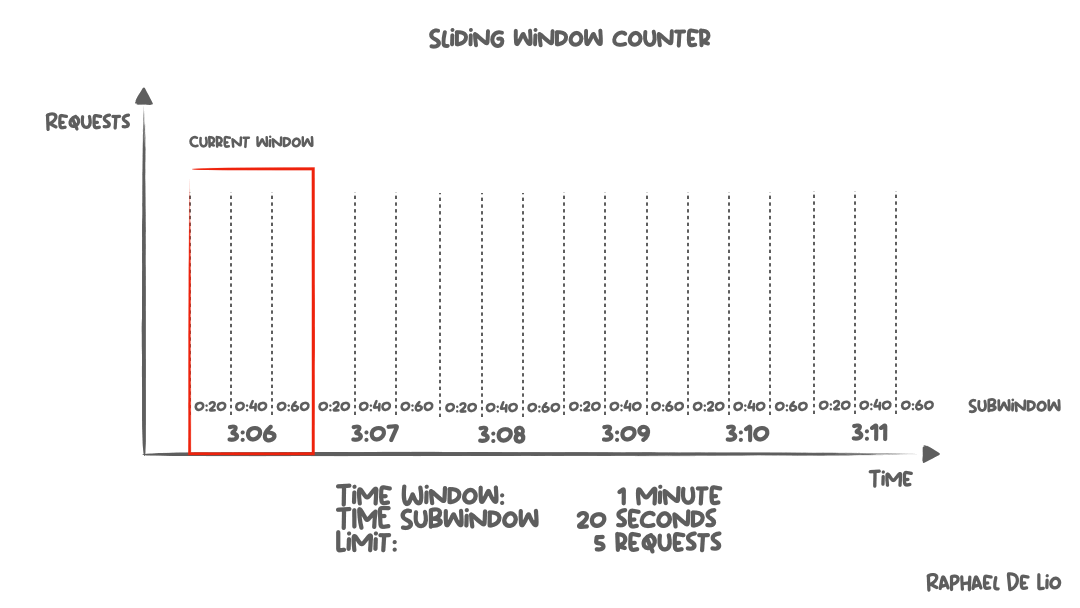
1. Define a Time Window
Choose a rolling time window, such as the last 1 second, 1 minute, or 1 hour.
2. Track Requests
Divide the time window into smaller sub-intervals (e.g., 1-second intervals) and maintain a counter for each sub-interval. Increment the counter for the current sub-interval as each request comes in.
3. Remove Expired Intervals
Continuously clean up expired sub-intervals that fall outside the current rolling time window to keep memory usage efficient.
4. Rate Limit Check
Calculate the total number of requests within the current rolling window by summing the counters for the active sub-intervals. If the total exceeds the allowed limit, reject new requests; otherwise, allow them.
How to Implement It with Redis
Implementing the Sliding Window Counter with Redis involves maintaining counts for smaller sub-intervals within the rolling window and calculating the total to enforce rate limits. Here’s how to do it:
1. Track Requests by Sub-Interval
Use a Redis hash (HSET) to store the count of requests for each sub-interval within the rolling window. The sub-intervals are identified by their start times (e.g., Unix timestamps rounded to the nearest second).
HINCRBY client-1 1
Each request increments the counter for the current sub-interval.
2. Remove Expired Intervals
Clean up entries that fall outside the rolling time window. Use the new HEXPIRE command to let Redis remove automatically fields representing sub-intervals older than the current window duration:
HEXPIRE client-1 subWindowSize NX FIELDS 1 sub-counter
This ensures the hash only contains counts for active sub-intervals within the rolling window.
3. Sum Counts for the Active Window
Use the HGETALL command to retrieve all counts for the sub-intervals currently in the hash. Sum these counts to calculate the total number of requests within the rolling window:
HGETALL my_counter
Compare the total count to the allowed limit. If it exceeds the limit, reject the new request; otherwise, allow it and update the counter.
Cool! Now that we understand the steps, let’s implement this in Java with Jedis!
Implementing it with Jedis
Jedis is a popular library that makes it easy to work with Redis in Java applications. Its simple and intuitive API is perfect for implementing a rate limiter, allowing us to efficiently manage requests and enforce limits.
Add Jedis to Your Maven File
Check the latest version here.
redis.clients
jedis
5.2.0
Create a SlidingWindowCounterRateLimiter class:
The rate limiter will:
- Use a Redis hash to store request counts for each time sub-window.
- Allow requests if the total count across the sliding window is within the limit.
- Automatically clean up expired sub-windows.
Here’s the basic structure:
package io.redis;

import redis.clients.jedis.Jedis;
import redis.clients.jedis.Transaction;

import java.util.ArrayList;
import java.util.List;

public class SlidingWindowCounterRateLimiter {

    private final Jedis jedis;
    private final int limit;
    private final long windowSize; // Total sliding window size in seconds
    private final long subWindowSize; // Size of each sub-window in seconds

    public SlidingWindowCounterRateLimiter(Jedis jedis, int limit, long windowSize, long subWindowSize) {
        this.jedis = jedis;
        this.limit = limit;
        this.windowSize = windowSize;
        this.subWindowSize = subWindowSize;
    }
}
Validate the Requests
The core task of the rate limiter is to determine whether a client’s request is within the allowed limit. If it is, the request is allowed, and the count for the current sub-window is updated. If it isn’t, the request is denied.
Step 1: Generate a key
Our isAllowed method receives a client id, used for identifying different clients independently. We then start by defining the key space in which this key will be stored in Redis, allowing us to keep our data organized within the database.
public boolean isAllowed(String clientId) {
    String key = "rate_limit:" + clientId;
}
For example, if the client ID is user123, and the keyspace is rate_ limit, their key would be rate_limit:user123.
Step 2: Check the number of active requests and if the new one is allowed to be processed
We will do it by using the hgetAll command. This command will receive the key of our hash and return all the fields and their respective values.
The values are the actual counter of the sub windows. We will sum them to get the total count. Then, we will compare the total count to the limit and decide whether this request is allowed to proceed.
Map subWindowCounts = jedis.hgetAll(key);
long totalCount = subWindowCounts.values().stream()
        .mapToLong(Long::parseLong)
        .sum();

boolean isAllowed = totalCount < limit;
Step 3: Track Requests by Sub-Window
If the request is allowed to be processed, we’ll determine the actual current sub window in which the request falls into and that will be used to separate counters within our hash.
if (isAllowed) {
    // Calculate the current sub-window index based on the time
    long currentTime = System.currentTimeMillis();
    long subWindowSizeMillis = subWindowSize * 1000;
    long currentSubWindow = currentTime / subWindowSizeMillis;

    // Start a transaction to increment the current sub-window count and set TTL
    Transaction transaction = jedis.multi();
    transaction.hincrBy(key, Long.toString(currentSubWindow), 1);
    transaction.hexpire(key, windowSize, NX, String.valueOf(currentSubWindow));
    List<Object> result = transaction.exec();

    if (result == null || result.isEmpty()) {
        throw new IllegalStateException("Empty result from Redis transaction");
    }
}

return isAllowed;
Here, we’ll start a transaction to ensure that our operation is going to be atomic and that all of our commands are going to be sent at once to the database. This will allow us to achieve even a better performance by avoiding unnecessary network trips.
Then, we will call the hincrBy function to increment the current counter, the current sub window we calculated before. The key is the key to the hash. The currentSubWindow is the field key within this hash and 1 is the value by which this field will be increment by.
If the actual hash doesn’t exist yet, don’t worry, Redis will create it for us.
After that, we’ll set an expiration for this field using the new Redis HEXPIRE command.
This function receives the key to the hash, the expiration time, which is our subWindowSize, the expiration option, and the fields which we want the expiration to be set for.
The NX expiration option is important here because it tells Redis to only set the expiration to our field if it hadn’t been set before. If we don’t do this, we’ll reset the expiration everytime a new request comes in and end up extending the sub window for longer than it should exist.
After we run the transaction, Redis will return the response of all commands we sent. To make sure our operation succeeded, we need to make sure the response isn’t empty.
And finally, we return if the request is able to proceed
Full Implementation
Here’s the full code for the SlidingWindowCounterRateLimiter class:
package io.redis;

import redis.clients.jedis.Jedis;
import redis.clients.jedis.Transaction;

import java.util.ArrayList;
import java.util.List;

public class SlidingWindowCounterRateLimiter {

    private final Jedis jedis;
    private final int limit;
    private final long windowSize; // Total sliding window size in seconds
    private final long subWindowSize; // Size of each sub-window in seconds

    public SlidingWindowCounterRateLimiter(Jedis jedis, int limit, long windowSize, long subWindowSize) {
        this.jedis = jedis;
        this.limit = limit;
        this.windowSize = windowSize;
        this.subWindowSize = subWindowSize;
    }

    public boolean isAllowed(String clientId) {
        String key = "rate_limit:" + clientId;
        Map<String, String> subWindowCounts = jedis.hgetAll(key);
        long totalCount = subWindowCounts.values().stream()
                .mapToLong(Long::parseLong)
                .sum();

        boolean isAllowed = totalCount < limit;

        if (isAllowed) {
            // Calculate the current sub-window index based on the time
            long currentTime = System.currentTimeMillis();
            long subWindowSizeMillis = subWindowSize * 1000;
            long currentSubWindow = currentTime / subWindowSizeMillis;

            // Start a transaction to increment the current sub-window count and set TTL
            Transaction transaction = jedis.multi();
            transaction.hincrBy(key, Long.toString(currentSubWindow), 1);
            transaction.hexpire(key, windowSize, NX, String.valueOf(currentSubWindow));
            List<Object> result = transaction.exec();

            if (result == null || result.isEmpty()) {
                throw new IllegalStateException("Empty result from Redis transaction");
            }
        }

        return isAllowed;
    }
}
And we’re ready to start testing its behavior!
Testing our Rate Limiter
To ensure our Sliding Window Counter Rate Limiter behaves as expected, we’ll write tests for various scenarios. For this, we’ll use three tools:
1. Redis TestContainers: This library spins up an isolated Redis container for testing. This means we don’t need to rely on an external Redis server during our tests. Once the tests are done, the container is stopped, leaving no leftover data.
2. JUnit 5: Our main testing framework, which helps us define and structure tests with lifecycle methods like @BeforeEach and @AfterEach.
3. AssertJ: A library that makes assertions readable and expressive, like assertThat(result).isTrue().
Let’s begin by adding the necessary dependencies to our pom.xml.
Adding Dependencies
Here’s what you’ll need in your Maven pom.xml file:
<dependency>
    <groupId>org.junit.jupiter</groupId>
    <artifactId>junit-jupiter-engine</artifactId>
    <version>5.10.0</version>
    <scope>test</scope>
</dependency>
<dependency>
    <groupId>com.redis</groupId>
    <artifactId>testcontainers-redis</artifactId>
    <version>2.2.2</version>
    <scope>test</scope>
</dependency>
<dependency>
    <groupId>org.assertj</groupId>
    <artifactId>assertj-core</artifactId>
    <version>3.11.1</version>
    <scope>test</scope>
</dependency>
Once you’ve added these dependencies, you’re ready to start writing your test class.
Setting Up the Test Class
The first step is to create a test class named SlidingWindowCounterRateLimiterTest. Inside, we’ll define three main components:
1. Redis Test Container: This launches a Redis instance in a Docker container.
2. Jedis Instance: This connects to the Redis container for sending commands.
3. Rate Limiter: The actual SlidingWindowCounterRateLimiterTest instance we’re testing.
Here’s how the skeleton of our test class looks:
public class SlidingWindowCounterRateLimiterTest {
    private static final RedisContainer redisContainer = new RedisContainer("redis:latest")
            .withExposedPorts(6379);
    private Jedis jedis;
    private SlidingWindowCounterRateLimiterTest rateLimiter;

    static {
        redisContainer.start();
    }
}
Preparing the Environment Before Each Test
Before running any test, we need to ensure a clean Redis environment. Here’s what we’ll do:
1. Connect to Redis: Use a Jedis instance to connect to the Redis container.
2. Flush Data: Clear any leftover data in Redis to ensure consistent results for each test.
We’ll set this up in a method annotated with @BeforeEach, which runs before every test case.
@BeforeEach
public void setup() {
    jedis = new Jedis(redisContainer.getHost(), redisContainer.getFirstMappedPort());
    jedis.flushAll();
}
FLUSHALL is an actual Redis command that deletes all the keys of all the existing databases. Read more about it in the official documentation.
Cleaning Up After Each Test
After each test, we need to close the Jedis connection to free up resources. This ensures no lingering connections interfere with subsequent tests.
@AfterEach
public void tearDown() {
    jedis.close();
}
Full Setup
Here’s how the complete test class looks with everything in place:
public class SlidingWindowCounterRateLimiterTest {

    private static final RedisContainer redisContainer = new RedisContainer("redis:latest")
            .withExposedPorts(6379)
            .withReuse(true);

    static {
        redisContainer.start();
    }

    private Jedis jedis;
    private SlidingWindowCounterRateLimiter rateLimiter;

    @BeforeEach
    public void setup() {
        jedis = new Jedis(redisContainer.getHost(), redisContainer.getFirstMappedPort());
        jedis.flushAll();
    }

    @AfterEach
    public void tearDown() {
        jedis.close();
    }
}
Verifying Requests Within the Limit
This test ensures the Sliding Window Counter rate limiter allows requests within the defined limit.
We configure it with a limit of 5 requests, a 10-second window, and 1-second sub-windows. We then call isAllowed(“client-1”) 5 times. Each call should return true, confirming the rate limiter correctly tracks and permits requests under the limit.
@Test
public void shouldAllowRequestsWithinLimit() {
    rateLimiter = new SlidingWindowCounterRateLimiter(jedis, 5, 10, 1);
    for (int i = 1; i <= 5; i++) {
        assertThat(rateLimiter.isAllowed("client-1"))
                .withFailMessage("Request %d should be allowed", i)
                .isTrue();
    }
}
Verifying Requests Beyond the Limit
This test ensures the Sliding Window Counter rate limiter correctly denies requests once the defined limit is exceeded.
We configure it with a limit of 5 requests, a 60-second window, and 1-second sub-windows. We then call isAllowed(“client-1”) 5 times and expect all to return true. On the 6th call, it should return false, verifying the rate limiter blocks requests beyond the allowed limit.
@Test
public void shouldDenyRequestsOnceLimitIsExceeded() {
    rateLimiter = new SlidingWindowCounterRateLimiter(jedis, 5, 60, 1);
    for (int i = 1; i <= 5; i++) {
        assertThat(rateLimiter.isAllowed("client-1"))
                .withFailMessage("Request %d should be allowed", i)
                .isTrue();
    }

    assertThat(rateLimiter.isAllowed("client-1"))
            .withFailMessage("Request beyond limit should be denied")
            .isFalse();
}
Verifying Requests After Sliding Window Resets
This test ensures that the Sliding Window Counter rate limiter correctly resets the sliding window and allows requests after the window duration has passed.
We configure it with a limit of 5 requests, a 2-second window, and 1-second sub-windows. We first call isAllowed(“client-1”) 5 times and expect all to return true. On the 6th call, the rate limiter should return false, indicating that the limit has been reached.
After waiting for the sliding window to reset (2 seconds + a buffer), the next request is allowed. This verifies that the sliding window correctly clears expired entries and permits new requests.
@Test
public void shouldAllowRequestsAgainAfterSlidingWindowResets() throws InterruptedException {
    int limit = 5;
    String clientId = "client-1";
    long windowSize = 2L;
    long subWindowSize = 1L;

    rateLimiter = new SlidingWindowCounterRateLimiter(jedis, limit, windowSize, subWindowSize);

    for (int i = 1; i <= limit; i++) {
        assertThat(rateLimiter.isAllowed(clientId))
                .withFailMessage("Request %d should be allowed", i)
                .isTrue();
    }

    assertThat(rateLimiter.isAllowed(clientId))
            .withFailMessage("Request beyond limit should be denied")
            .isFalse();

    Thread.sleep((windowSize + 1) * 1000);

    assertThat(rateLimiter.isAllowed(clientId))
            .withFailMessage("Request after window reset should be allowed")
            .isTrue();
}
Verifying Independent Handling of Multiple Clients
This test ensures that the Sliding Window Counter rate limiter handles multiple clients independently.
We configure it with a limit of 5 requests, a 10-second window, and 1-second sub-windows. The first 5 requests from client-1 are allowed (true), while the 6th request is denied (false). Simultaneously, all 5 requests from client-2 are allowed (true), confirming that the rate limiter maintains separate counters for each client.
@Test
public void shouldHandleMultipleClientsIndependently() {
    int limit = 5;
    String clientId1 = "client-1";
    String clientId2 = "client-2";
    long windowSize = 10L;
    long subWindowSize = 1L;

    rateLimiter = new SlidingWindowCounterRateLimiter(jedis, limit, windowSize, subWindowSize);

    for (int i = 1; i <= limit; i++) {
        assertThat(rateLimiter.isAllowed(clientId1))
                .withFailMessage("Client 1 request %d should be allowed", i)
                .isTrue();
    }

    assertThat(rateLimiter.isAllowed(clientId1))
            .withFailMessage("Client 1 request beyond limit should be denied")
            .isFalse();

    for (int i = 1; i <= limit; i++) {
        assertThat(rateLimiter.isAllowed(clientId2))
                .withFailMessage("Client 2 request %d should be allowed", i)
                .isTrue();
    }
}
Verifying Gradual Request Allowance in Sliding Window
This test ensures that the Sliding Window Counter rate limiter gradually allows requests as older requests expire from the window.
We configure it with a limit of 3 requests, a 4-second window, and 1-second sub-windows. Initially, we call isAllowed(“client-1”) 3 times, each 1 second apart, and expect all to return true. On the 4th call, the request is denied (false), confirming the limit has been reached.
After waiting 2 seconds, enough older requests have expired to allow one new request. This verifies that the sliding window dynamically adjusts and permits requests as the window progresses.
@Test
public void shouldAllowRequestsAgainGraduallyInSlidingWindow() throws InterruptedException {
    int limit = 3;
    long windowSize = 4L;
    long subWindowSize = 1L;
    String clientId = "client-1";

    rateLimiter = new SlidingWindowCounterRateLimiter(jedis, limit, windowSize, subWindowSize);

    for (int i = 1; i <= limit; i++) {
        assertThat(rateLimiter.isAllowed(clientId))
                .withFailMessage("Request %d should be allowed", i)
                .isTrue();
        Thread.sleep(1000);
    }

    assertThat(rateLimiter.isAllowed(clientId))
            .withFailMessage("Request beyond limit should be denied")
            .isFalse();

    Thread.sleep(2000);

    assertThat(rateLimiter.isAllowed(clientId))
            .withFailMessage("Request should be allowed in a sliding window")
            .isTrue();
}
Is there any other behavior we should verify? Let me know in the comments!
Conclusion
The Sliding Window Counter Rate Limiter is a great way to manage request rates with a balance of precision and efficiency. Unlike simpler methods, it ensures rate limits are applied smoothly as the window progresses, without abrupt resets.
Thanks to Redis’s speed and reliability, and using straightforward commands like HINCRBY and HEXPIRE, we built a dynamic solution that tracks requests within a rolling time window. The implementation in Java with Jedis made the process intuitive, and testing it with Redis TestContainers, JUnit 5, and AssertJ helped ensure it works as expected in real-world scenarios.
This setup is not only easy to implement but also flexible enough to grow with your needs. Whether you’re just managing basic request limits or scaling up for more complex requirements, this is a solid foundation to start from.
GitHub Repo
You can find this implementation in Java and Kotlin:
- Java (Implementation, Test)
- Kotlin (Implementation, Test)
- February 25, 2025
- 10 min read
Software Engineer | Developer Advocate | International Conference Speaker | Tech Content Creator | Working @ Redis


Comments (0)
No comments yet. Be the first.