

Blink a LED on Raspberry Pi with Vaadin
- March 25, 2022
- 9 min read
As I'm becoming a senior developer, at least in terms of age, I've transitioned from one language to another.
One of my main interests has always been clean, easy-to-understand UIs (User Interfaces). That journey started for me with Director (to create multimedia CD-ROMs), Flash website animation, and Flex Rich Internet Applications (= "Flash on steroids").
When I started developing with Java over 10 years ago, we had some projects with the early versions of Vaadin and JavaFX.
As I went on with server side applications, I only continued with JavaFX for some personal and side projects and loved the way you can create a UI both with XML (FXML actually) and code, exactly the same approach I loved with Flex.
Since then, my love for Java and JavaFX only grew and it's still my major programming environment.
But JavaFX has one missing piece: running it in the browser... Yes, JPRO can do this, but it needs a license and a dedicated server.
And yes, there are some projects ongoing to bring JavaFX fully to the browser, but they are ongoing and not mature yet...
Let's look at another approach: Vaadin Flow and run it on a Raspberry Pi to control a LED and show the state of a button.
About Vaadin
Only recently, I re-discovered Vaadin to build Web User Interfaces, and this really feels like JavaFX in the browser.
Full Java code to create your views and run it in the browser without the need to write a single HTML, CSS, JavaScript, or TypeScript file!
Vaadin Flow is a unique framework that lets you build modern (responsive!) web apps 100% in Java without writing HTML or JavaScript.
In this tutorial, I'm using Vaadin Flow combined with Pi4J to create a web interface to interact with a LED and button connected to the GPIO (General Purpose Input/Output) pins of a Raspberry Pi.
The finished project is available on GitHub.
About Pi4J
Pi4J, the Java I/O library for the Raspberry Pi, aims to unite Java programming with electronics.
The project started in 2012. Version 1.3 was released in February 2021 to support the newest Raspberry Pi boards (4, 400, and Compute 4) and is the last version that is based on Java 8.
In the summer of 2021, a completely refactored V2 was launched, based on Java 11, PiGpio, Java modules, etc.
By using the Pi4J-dependency in a project, controlling electronic components connected to the GPIO (General Purpose Input/Output) pins of the Raspberry Pi can be controlled as objects in the Java code.
Pi4J uses native libraries to control the GPIOs so you as a programmer don’t need to fully be aware of all the “magic” which relates to hardware communication.
Why run Java on a Raspberry Pi?!
The goal of the Raspberry Pi project was to build an inexpensive PC (starting at 15$) that is affordable for all. You can connect it to your TV if you don’t have a computer screen and different versions are available, depending on your budget. The Raspberry Pi is a "full" Linux PC and offers different versions of the Raspberry Pi Operating System to get you started easily with all programming languages, yes also Java.
But the main reason I fell in love with the Raspberry Pi is the GPIOs. When you look at the Raspberry Pi board, you’ll find 40 pins (2 rows of 20). Those are the GPIO (= General-purpose input/output) pins. Some of those can be used as a digital input or output pin, meaning 0 Volt is off, 3.3 Volt is on. And the number of things you can do with it is amazing!
These GPIOs pins are the main factors to make the Raspberry Pi such a success! You can indeed find a cheap second-hand laptop that includes a battery, screen, etc. but you’ll never be able to build experiments combining soft- and hardware in such an easy way as you can do with the Raspberry Pi.
And one final pro for the Raspberry Pi: its power! The 4-version is fast and has a lot of memory. I wrote a full book on it and created a lot of different Java applications with it. You can connect up to two 4K monitors, which means a lot of space to have different applications, terminals, file explorer, etc. open at once.
Example Spring + Vaadin + Pi4J application
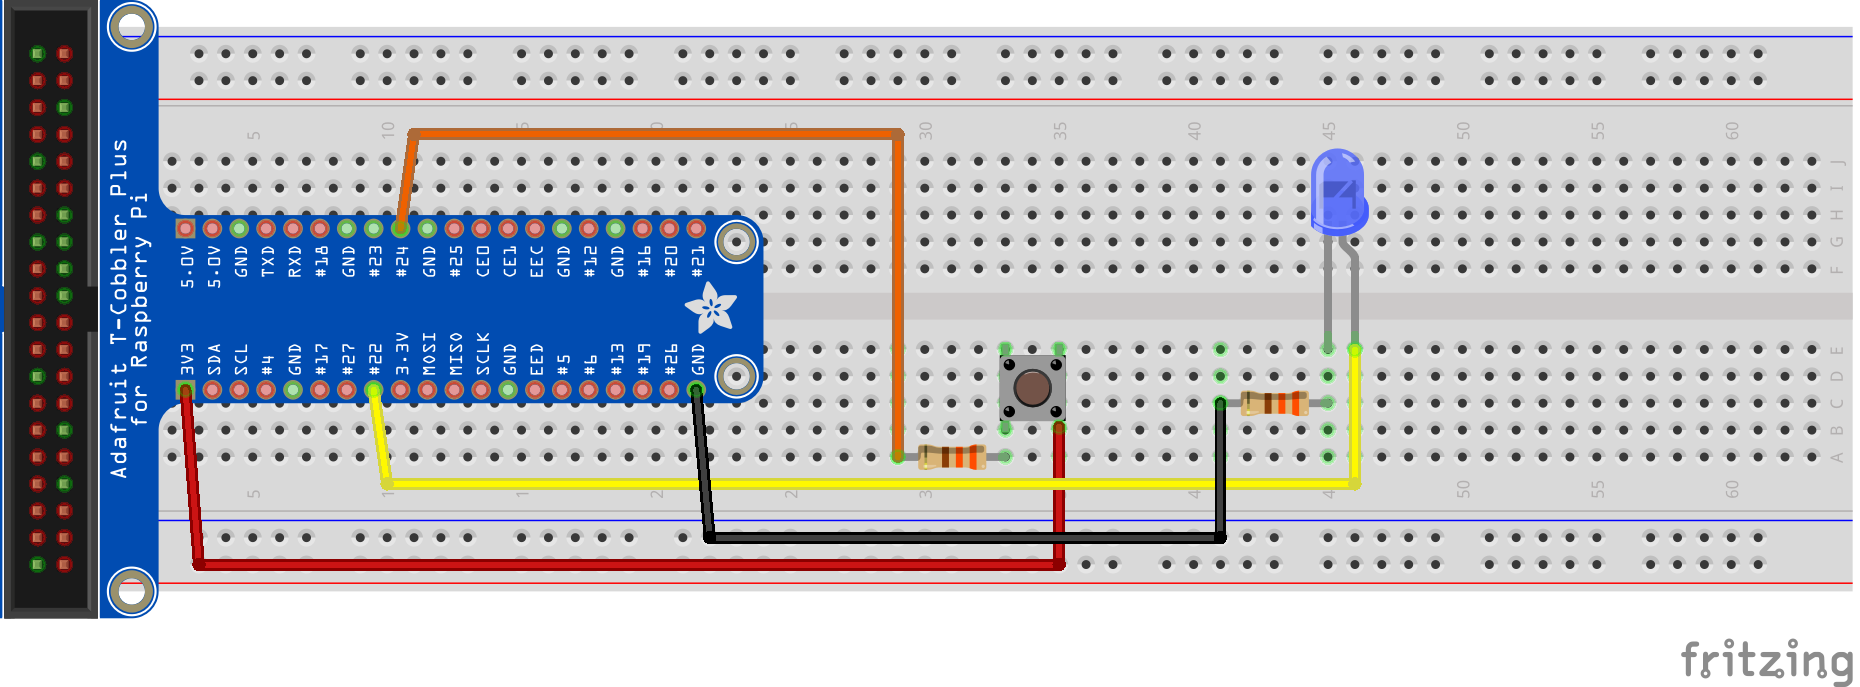
Let's create a Spring-based demo project to illustrate how a Vaadin User Interface (website) can interact with the GPIOs of a Raspberry Pi by using the Pi4J library. The GPIO interaction is based on the Pi4J minimal example application and uses a button and a LED to demonstrate the digital input and output interaction. The wiring is very simple and only needs a few components.
The base code was generated on start.vaadin.com/app with the following selections:
- Vaadin 23
- Java 17
- Flow (Java only)
- Extra page and custom icons
Download the sources, unzip and open in your preferred IDE. It's a Maven project, so you can immediately run it and check the code that was generated automatically. When you start it, the application will be available on [http://localhost:8080](http://localhost:8080).
Extra dependencies
As we want to interact with the GPIOs with Pi4J, we need some extra dependencies to be added to pom.xml:
- pi4j-core
- pi4j-plugin-raspberrypi
- pi4j-plugin-pigpio
Pi4J service
Because we already have a Spring application pre-generated, we can easily extend it with a service to manage all the Pi4J-related methods. Let's start with the initialization of the Pi4J Context that is responsible for all GPIO interactions.
private final Context pi4j;

private static final int PIN_BUTTON = 24; // PIN 18 = BCM 24
private static final int PIN_LED = 22; // PIN 15 = BCM 22

private final Queue<ButtonListener> buttonListeners;
private DigitalOutput led;

public Pi4JService() {
    pi4j = Pi4J.newAutoContext();
    buttonListeners = new ConcurrentLinkedQueue<>();
Once we have the context, we can use it to configure and initialize a DigitalOutput for the LED, and DigitalInput for the button. In our example application, we only have one component that changes based on the button state, but by using a ButtonListener-interface and a list of implementations, we can link an unlimited number of components with the state of the button.
private void initLed() {
    try {
        var ledConfig = DigitalOutput.newConfigBuilder(pi4j)
                .id("led")
                .name("LED")
                .address(PIN_LED)
                .shutdown(DigitalState.LOW)
                .initial(DigitalState.LOW)
                .provider("pigpio-digital-output");
        led = pi4j.create(ledConfig);
        logger.info("The LED has been initialized on pin {}", PIN_LED);
    } catch (Exception ex) {
        logger.error("Error while initializing the LED: {}", ex.getMessage());
    }
}

/**
* Toggle the LED on or off.
*
* @param on
*/
public void setLedState(boolean on) {
    led.setState(on);
}

private void initButton() {
    try {
        var buttonConfig = DigitalInput.newConfigBuilder(pi4j)
                .id("button")
                .name("Button")
                .address(PIN_BUTTON)
                .pull(PullResistance.PULL_DOWN)
                .debounce(3000L)
                .provider("pigpio-digital-input");
        var button = pi4j.create(buttonConfig);
        button.addListener(e -> {
            logger.info("Button state changed to {}", e.state());
            buttonListeners.forEach(bl -> bl.onButtonEvent(e.state()));
        });
        logger.info("The button has been initialized on pin {}", PIN_BUTTON);
    } catch (Exception ex) {
        logger.error("Error while initializing the button: {}", ex.getMessage());
    }
}

/**
* Add a button listener which will get all state changes of the button DigitalInput
*
* @param buttonListener
*/
public void addButtonListener(ButtonListener buttonListener) {
    buttonListeners.add(buttonListener);
}
Additionally, there are some helper methods to show the state of the Pi4J library. This is only one of them, please check the sources for the full implementations:
/**
* Providers are intended to represent I/O implementations and provide access to the I/O interfaces available on
* the system. Providers 'provide' concrete runtime implementations of I/O interfaces.
*/
public String getProviders() {
    if (pi4j == null || pi4j.providers() == null) {
        return "None";
    }
    return pi4j.providers().all().entrySet().stream()
            .map(e -> e.getKey() + ": " + e.getValue())
            .collect(Collectors.joining(","));
}
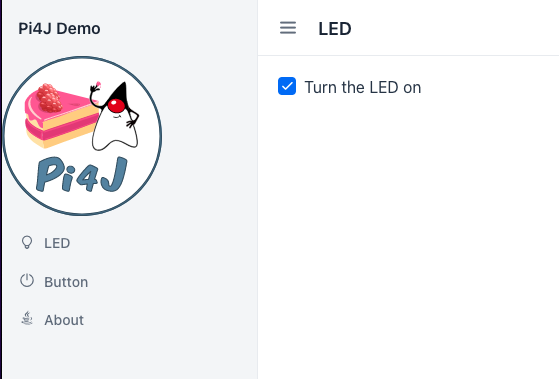
UI to toggle the LED
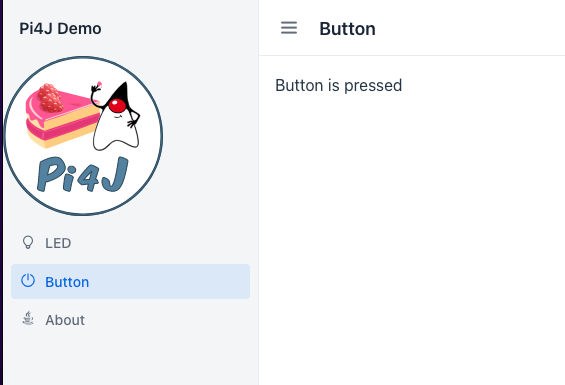
Now let's change the first page to control the LED. The code is actually very limited as we are using a Checkbox and add a value-listener to tell our Pi4JService to change the state of the LED.
public class ButtonView extends HorizontalLayout implements ButtonListener {

    Logger logger = LoggerFactory.getLogger(ButtonView.class);

    private final UI ui;
    private final Label lbl;

    public ButtonView(@Autowired Pi4JService pi4JService) {
        ui = UI.getCurrent();
        lbl = new Label("Waiting for button change...");
        add(lbl);

        setMargin(true);
        setVerticalComponentAlignment(Alignment.END, lbl);

        pi4JService.addButtonListener(this);
    }

    @Override
    public void onButtonEvent(DigitalState state) {
        var isPressed = state.equals(DigitalState.HIGH);
        logger.info("Button event in listener: {} - Is on: {}", state, isPressed);
        ui.accessSynchronously(() -> lbl.setText(isPressed ? "Button is pressed" : "Button is released"));
    }
}
UI to see the state of the button
This UI has a bit more code. It extends the ButtonListener so needs to override the onButtonEvent, but the other parts of the code are very self-explaining. One extra thing to notice here: we need to use ui.accessSynchronously to change the component which is part of the view as the Pi4JService and user interface are running in separate threads.
public class ButtonView extends HorizontalLayout implements ButtonListener {

    Logger logger = LoggerFactory.getLogger(ButtonView.class);

    private final UI ui;
    private final Label lbl;

    public ButtonView(@Autowired Pi4JService pi4JService) {
        ui = UI.getCurrent();
        lbl = new Label("Waiting for button change...");
        add(lbl);

        setMargin(true);
        setVerticalComponentAlignment(Alignment.END, lbl);

        pi4JService.addButtonListener(this);
    }

    @Override
    public void onButtonEvent(DigitalState state) {
        var isPressed = state.equals(DigitalState.HIGH);
        logger.info("Button event in listener: {} - Is on: {}", state, isPressed);
        ui.accessSynchronously(() -> lbl.setText(isPressed ? "Button is pressed" : "Button is released"));
    }
}
An additional change is needed in the main class. Because we want to send changes from the backend to the user interface we need to add the @Push attribute. This tiny change, allows you to update the UI from the server, without the user explicitly requesting updates. This is based on a client-server connection (WebSocket if supported, or alternative) which the client establishes and the server can then use to send updates to the client.
@SpringBootApplication
@Theme(value = "pi4jdemo")
@NpmPackage(value = "line-awesome", version = "1.3.0")
@Push
public class Application extends SpringBootServletInitializer implements AppShellConfigurator {
UI with Pi4J Information
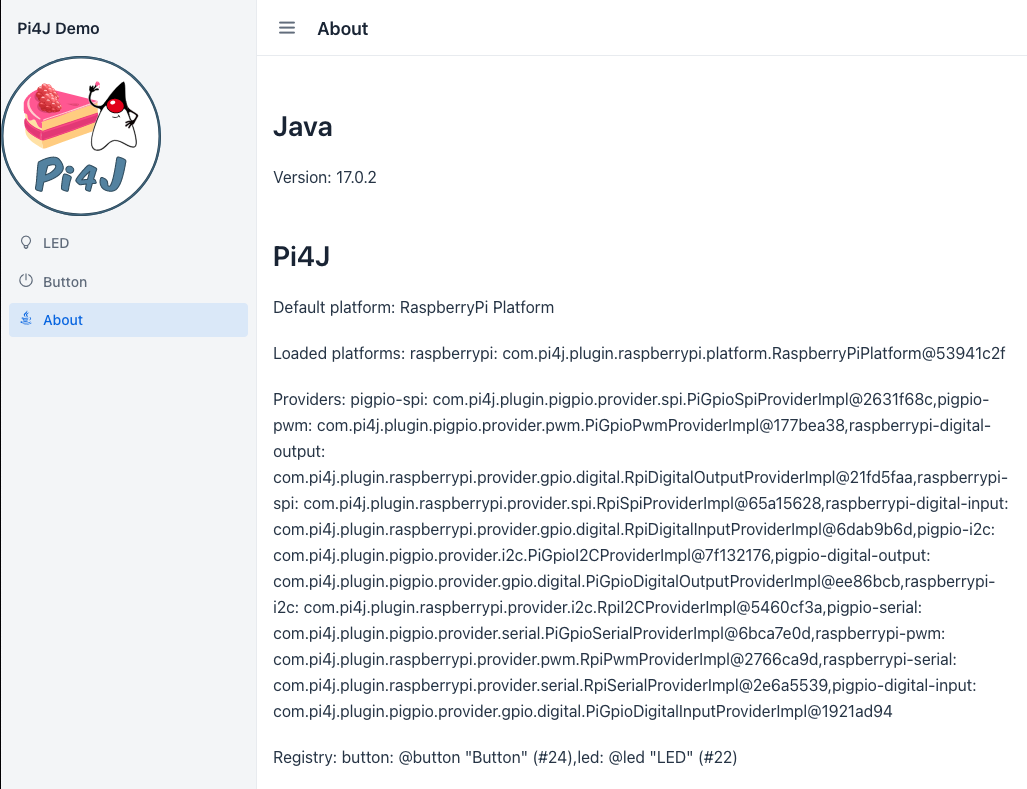
To be able to debug how Pi4J interacts with the GPIOs, some additional info is added to the "About" screen to show the loaded platforms and providers. The Registry contains a list of all the initialized inputs and outputs, so we expect to see the LED and button here.
public class AboutView extends VerticalLayout {
    public AboutView(@Autowired Pi4JService pi4JService) {
        setSpacing(false);
        add(
            new H2("Java"),
            new Paragraph("Version: " + System.getProperty("java.version")),
            new H2("Pi4J"),
            new Paragraph("Default platform: " + pi4JService.getDefaultPlatform()),
            new Paragraph("Loaded platforms: " + pi4JService.getLoadedPlatforms()),
            new Paragraph("Providers: " + pi4JService.getProviders()),
            new Paragraph("Registry: " + pi4JService.getRegistry())
        );
        setSizeFull();
        getStyle().set("text-align", "left");
    }
}
Build and upload to Raspberry Pi
If you are developing on a PC, you can build the application with the following command
- Windows:
mvnw clean package -Pproduction - Mac & Linux:
./mvnw clean package -Pproduction
and upload to your Raspberry Pi with the following command (replace login pi and the IP address with the one of your board):
$ scp target/pi4jdemo-1.0-SNAPSHOT.jar [email protected]://home/pi
Run on Raspberry Pi
We can now start the application on our Raspberry Pi, but need to run with sudo as Pi4J (still) needs this to be able
to interact with the GPIOs using PiGpio as the native library.
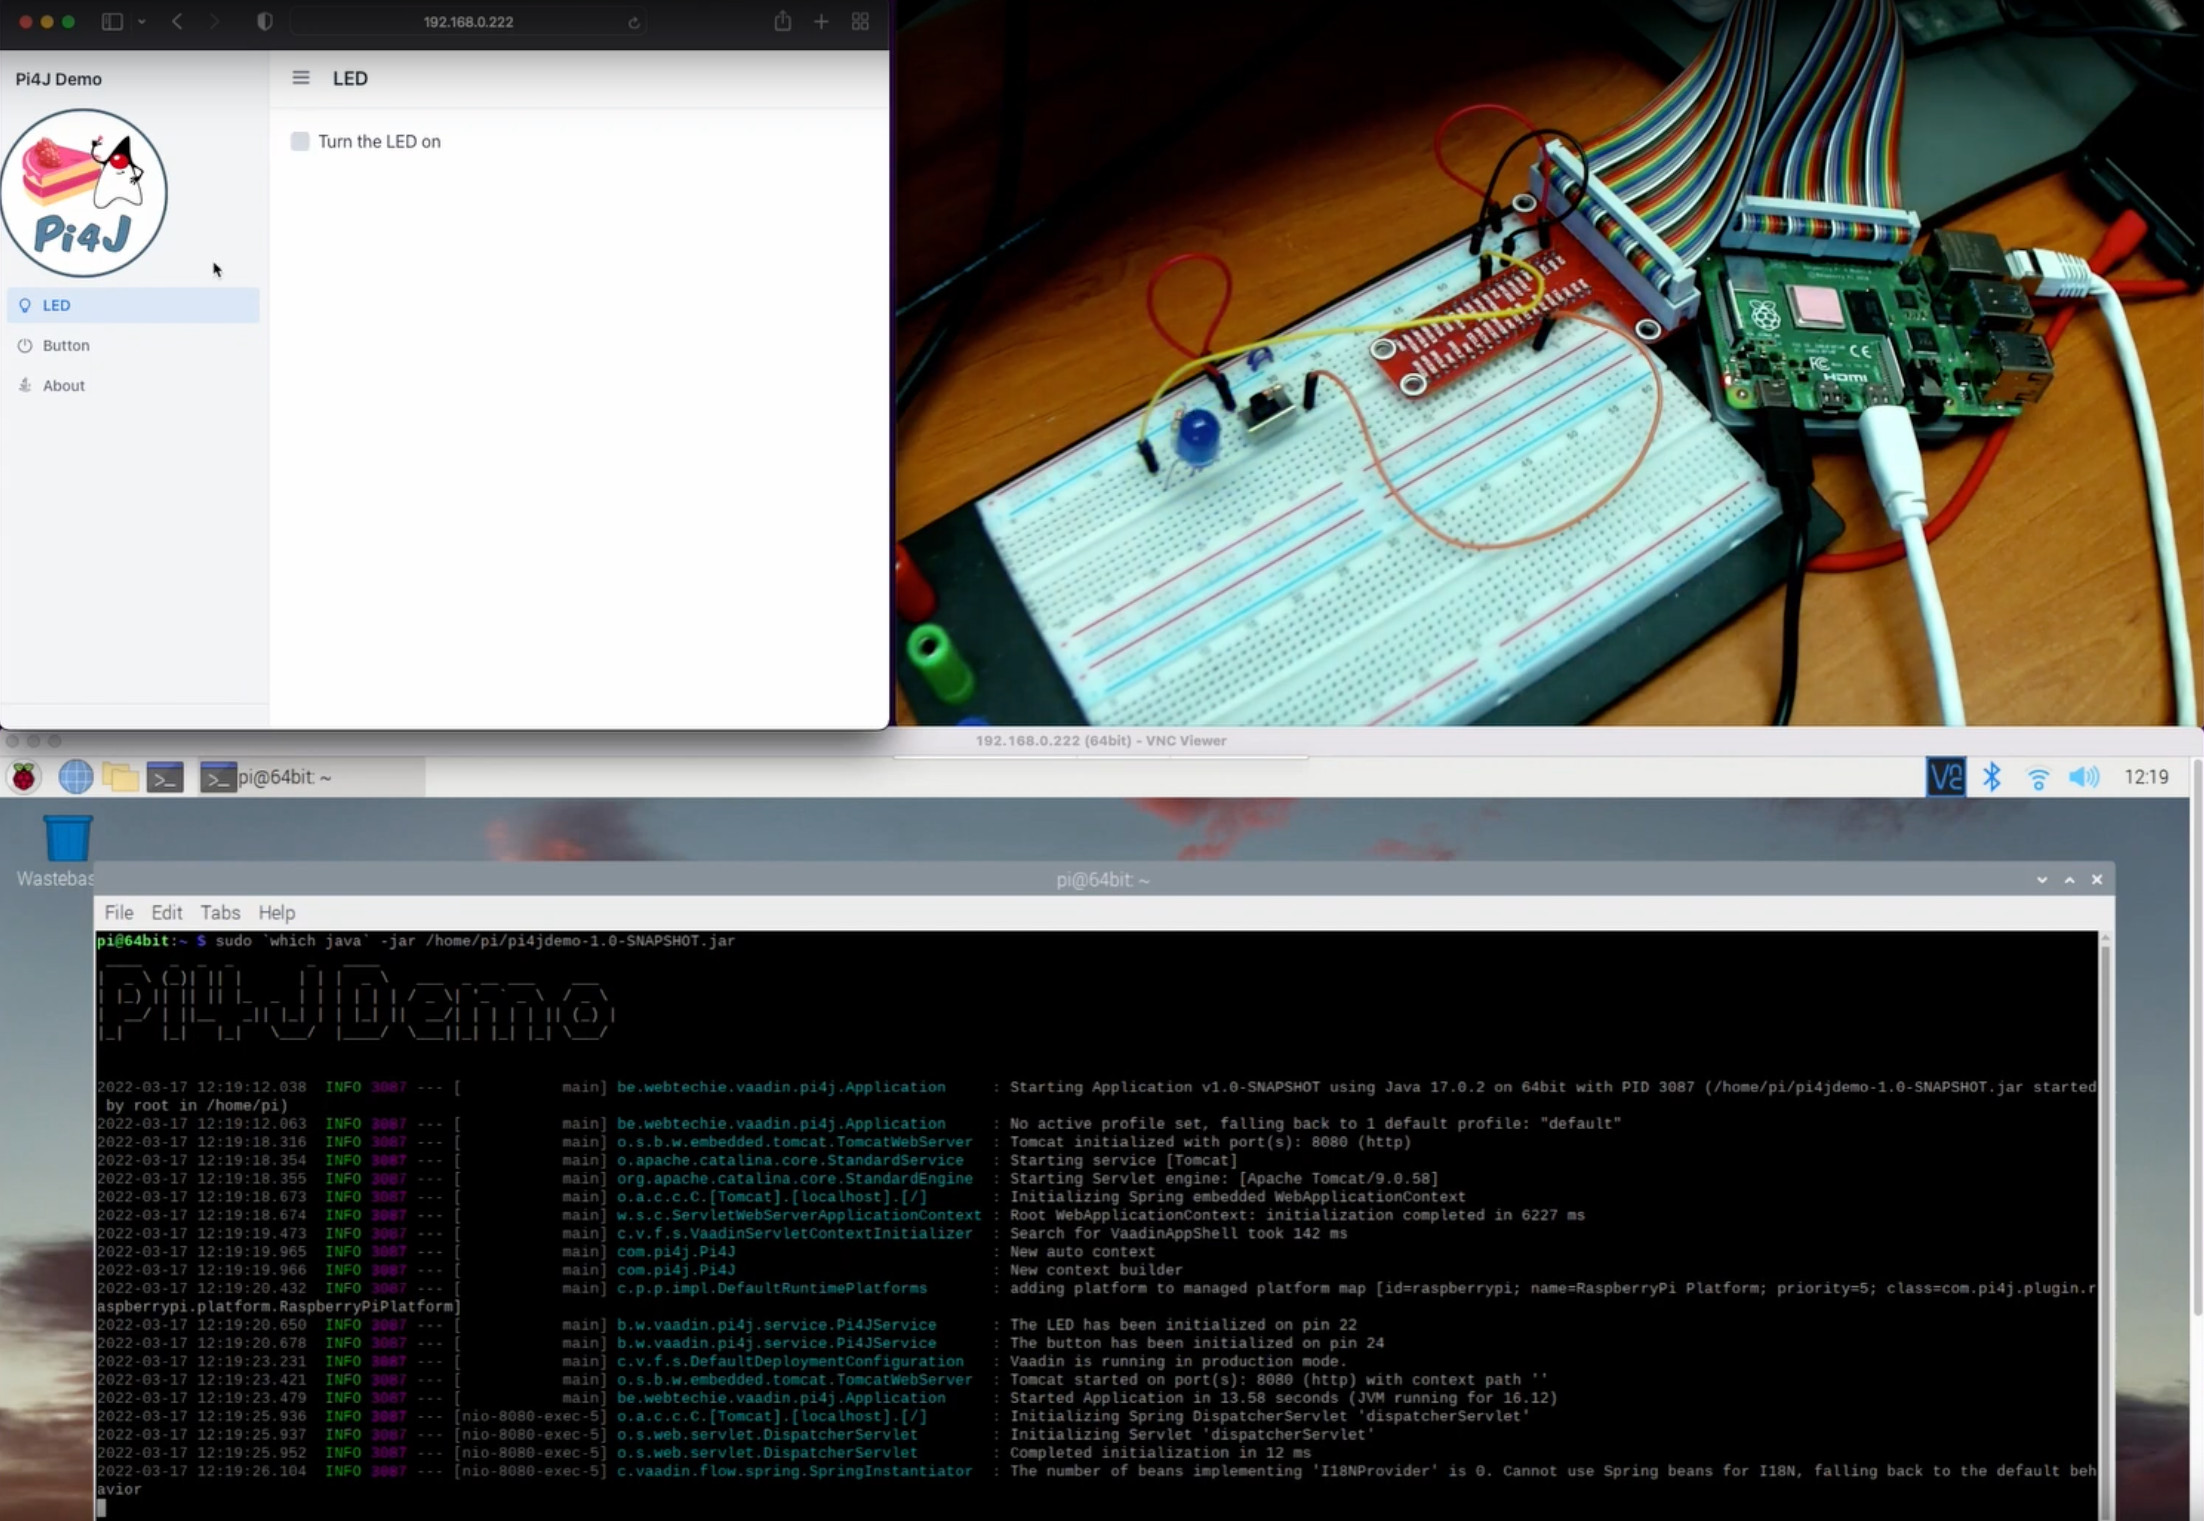
$ sudo java -jar /home/pi/pi4jdemo-1.0-SNAPSHOT.jar
If you installed Java with SDKMAN as a normal user, you will probably get this error:
sudo: java: command not found
One way to fix this is let the command itself lookup where Java is installed by using `which java`:
$ sudo `which java` -jar /home/pi/pi4jdemo-1.0-SNAPSHOT.jar

 ____   _  _  _        _   ____
|  _ \ (_)| || |      | | |  _ \   ___  _ __ ___    ___
| |_) || || || |_  _  | | | | | | / _ \| '_ ` _ \  / _ \
|  __/ | ||__   _|| |_| | | |_| ||  __/| | | | | || (_) |
|_|    |_|   |_|   \___/  |____/  \___||_| |_| |_| \___/


INFO 1807 --- [           main] be.webtechie.vaadin.pi4j.Application     : Starting Application v1.0-SNAPSHOT using Java 17.0.2 on 64bit with PID 1807 (/home/pi/pi4jdemo-1.0-SNAPSHOT.jar started by root in /home/pi)
INFO 1807 --- [           main] be.webtechie.vaadin.pi4j.Application     : No active profile set, falling back to 1 default profile: "default"
INFO 1807 --- [           main] o.s.b.w.embedded.tomcat.TomcatWebServer  : Tomcat initialized with port(s): 8080 (http)
INFO 1807 --- [           main] o.apache.catalina.core.StandardService   : Starting service [Tomcat]
INFO 1807 --- [           main] org.apache.catalina.core.StandardEngine  : Starting Servlet engine: [Apache Tomcat/9.0.58]
INFO 1807 --- [           main] o.a.c.c.C.[Tomcat].[localhost].[/]       : Initializing Spring embedded WebApplicationContext
INFO 1807 --- [           main] w.s.c.ServletWebServerApplicationContext : Root WebApplicationContext: initialization completed in 6486 ms
INFO 1807 --- [           main] c.v.f.s.VaadinServletContextInitializer  : Search for VaadinAppShell took 125 ms
INFO 1807 --- [           main] com.pi4j.Pi4J                            : New auto context
INFO 1807 --- [           main] com.pi4j.Pi4J                            : New context builder
INFO 1807 --- [           main] c.p.p.impl.DefaultRuntimePlatforms       : adding platform to managed platform map [id=raspberrypi; name=RaspberryPi Platform; priority=5; class=com.pi4j.plugin.raspberrypi.platform.RaspberryPiPlatform]
INFO 1807 --- [           main] b.w.vaadin.pi4j.service.Pi4JService      : The LED has been initialized on pin 22
INFO 1807 --- [           main] b.w.vaadin.pi4j.service.Pi4JService      : The button has been initialized on pin 24
INFO 1807 --- [           main] c.v.f.s.DefaultDeploymentConfiguration   : Vaadin is running in production mode.
INFO 1807 --- [           main] o.s.b.w.embedded.tomcat.TomcatWebServer  : Tomcat started on port(s): 8080 (http) with context path ''
INFO 1807 --- [           main] be.webtechie.vaadin.pi4j.Application     : Started Application in 14.089 seconds (JVM running for 17.643)
INFO 1807 --- [nio-8080-exec-1] o.a.c.c.C.[Tomcat].[localhost].[/]       : Initializing Spring DispatcherServlet 'dispatcherServlet'
INFO 1807 --- [nio-8080-exec-1] o.s.web.servlet.DispatcherServlet        : Initializing Servlet 'dispatcherServlet'
INFO 1807 --- [nio-8080-exec-1] o.s.web.servlet.DispatcherServlet        : Completed initialization in 3 ms
INFO 1807 --- [nio-8080-exec-1] c.vaadin.flow.spring.SpringInstantiator  : The number of beans implementing 'I18NProvider' is 0. Cannot use Spring beans for I18N, falling back to the default behavior
INFO 1807 --- [       Thread-7] b.w.vaadin.pi4j.service.Pi4JService      : Button state changed to LOW
INFO 1807 --- [       Thread-7] b.w.vaadin.pi4j.views.button.ButtonView  : Button event in listener: LOW - Is on: false
INFO 1807 --- [       Thread-8] b.w.vaadin.pi4j.service.Pi4JService      : Button state changed to HIGH
INFO 1807 --- [       Thread-8] b.w.vaadin.pi4j.views.button.ButtonView  : Button event in listener: HIGH - Is on: true
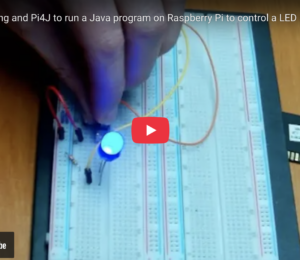
In this video, you can see the logs of the running application on the Raspberry Pi, a browser on a PC in the same network to illustrate the responsive web interface, and a camera view of the breadboard and Raspberry Pi with the LED and button:
Conclusion
Thanks to the start-site provided by Vaadin, you can get a fully running application with a few clicks.
Adding GPIO-interaction is easy with the Pi4J library and allows you to fully interact with electronic components connected to the GPIO pins of the Raspberry Pi.
With the sources of this article, you can get started easily and further extend with other types of components.
- March 25, 2022
- 9 min read
Frank Delporte is a Java Champion, Java Developer, Senior Technical Writer at Azul, Blogger, Author of "Java Programming for Raspberry Pi - A Hands-On Guide to Electronics and IoT Projects", and Open-Source Contributor for Pi4J, Lottie4J, MelodyMatrix,... Frank writes and talks about Java in business production environments, but also in places people don’t always expect it, on the Raspberry Pi, driving GPIO pins, rendering JavaFX UIs, and running on RISC-V single-board computers.


Comments (0)
No comments yet. Be the first.