Build and Run TornadoVM with IntelliJ IDEA
- November 20, 2024
- 6282 Unique Views
- 6 min read
- a) Add a name for your application
- b) In the "Build and run" area apply the following configurations:
TornadoVM is an open-source Java technology that is developed to aid Java programmers in adapting their code bases for hardware acceleration.
This blog aims to explain how Java programmers can build TornadoVM with IntelliJ IDEA, and how they can run TornadoVM unit-tests or other Java programs.
Prerequisites
This blog uses IntelliJ IDEA 2024.2.4 version and the list of required plugins are as follows:
- Python plugin to be installed in IntelliJ. This plugin allows python scripting from the IDE.
Additionally, the following commands must be installed in your system and should be added in your PATH in order to enable IDE to use them:
- cmake is used to build TornadoVM.
- pyInstaller is used in Windows OS to build the TornadoVM executables.
a) Ensure that the commands are installed in the PATH
- In macOS/Linux OS, you can open a command shell and you can verify if your system recognizes cmake, by running:
$ which make
- In Windows OS, open your shell configuration (e.g. x64 Native Tools Command Prompt for VS 2022) and initialize the environment:
$ cd <path-to-TornadoVM-directory>
$ .\bin\windowsMicrosoftStudioTools2022.cmd
You can verify that your system recognizes cmake, by running:
$ where cmake
$ where pyInstaller
If the commands are recognized, skip the next step (Step b).
b) Add commands in your PATH
i) Add cmake in macOS/Linux OS
Assuming that you have downloaded and installed cmake in a custom directory, you can add the directory in your PATH by updating your shell configuration file.
Open your shell configuration file (e.g. .bashrc, .zshrc)
$ vim ~/.zshrc # or ~/.bashrc depending on your shell
Add the following line and replace the <custom-path> with the path to your installation
$ export PATH=<custom-path>/cmake-3.25.2-macos-universal/CMake.app/Contents/bin:$PATH
Save and apply the changes
$ source ~/.zshrc # or source ~/.bashrc
ii) Add cmake and pyInstaller in your PATH (Windows)
You can add the variables to your PATH by searching Edit the system environment variables, clicking Environment Variables…, and editing the PATH with your cmake directory. The commands should have been selected to be installed as native tools when you installed Microsoft VS 2022. An example of the directories where the commands have been installed is as follows:
$ C:\Program Files\Microsoft Visual Studio\2022\Community\Common7\IDE\CommonExtensions\Microsoft\CMake\CMake\bin\
$ <path-to-TornadoVM-directory>\.venv\Scripts
Note: It is recommended to use the python interpreter under the virtual environment (.venv) as the Python SDK for your TornadoVM project, since it contains all dependent modules (i.e., PyInstaller, psutil) to build TornadoVM and run the tests from IntelliJ.
1. Clone & Install TornadoVM from Shell
To initialize IDE project files for building and running TornadoVM from IntelliJ, you must have first built TornadoVM and loaded the file with the environment variables (setvars.sh, setvars.cmd), as explained in the Installation page.
First you need to clone the source code from GitHub:
$ git clone https://github.com/beehive-lab/TornadoVM.git
Then, you can invoke the tornadovm-installer script which will download the dependencies and will install TornadoVM with the defined JDK and backends (e.g., opencl, ptx, spirv):
- In macOS/Linux OS:
$ cd TornadoVM
$ ./bin/tornadovm-installer --jdk graal-jdk-21 --backend opencl
$ source setvars.sh
- In Windows OS:
$ cd TornadoVM
$ python -m venv .venv
$ .venv\Scripts\activate.bat
$ .\bin\windowsMicrosoftStudioTools2022.cmd
$ .\bin\tornadovm-installer --jdk graal-jdk-21 --backend opencl
$ setvars.cmd
2. Generate the IntelliJ Project Files
Then you can generate the IDE project files based on your built TornadoVM instance (i.e., with the JAVA_HOME and the backends), by running:
$ tornado --intellijinit
Generating <path-to-tornadovm>/.build/_internal_TornadoVM_Maven-cleanAndinstall.run.xml
Generating <path-to-tornadovm>/.build/TornadoVM-Build.run.xml
Generating <path-to-tornadovm>/.build/TornadoVM-Tests.run.xml
IntelIj Files Generated ............... [ok]
This command will generate three files. The first two files are used to build TornadoVM from IntelliJ, while the latter is used to run the TornadoVM unit-tests. You will be able to configure those files from IntelliJ in the next step.
3. Configure the generated IDE project files
At first, you need to launch the IntelliJ application and open TornadoVM as a project. Then you can go in the menu (top bar) and navigate through Run and the Edit Configurations, to configure the build configuration file, as follows:
Run > Edit Configurations > Python > TornadoVM-Build
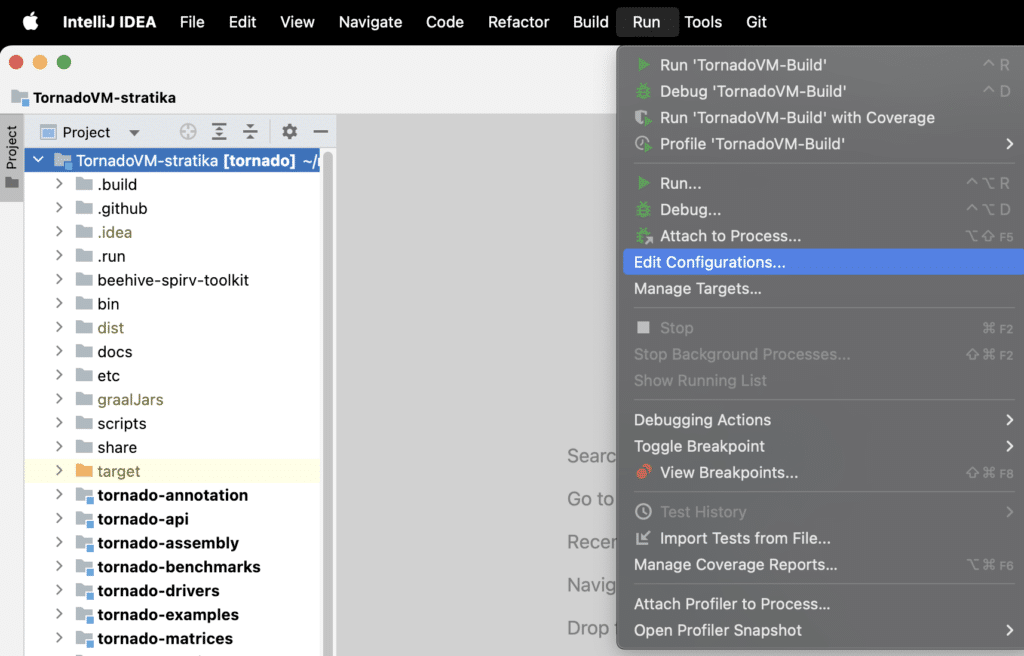
At this point all fields must have been automatically populated with the correct directories and attributes. You must ensure that the Use specified interpreter points to a valid Python interpreter from your system. If not, select one and click Apply.
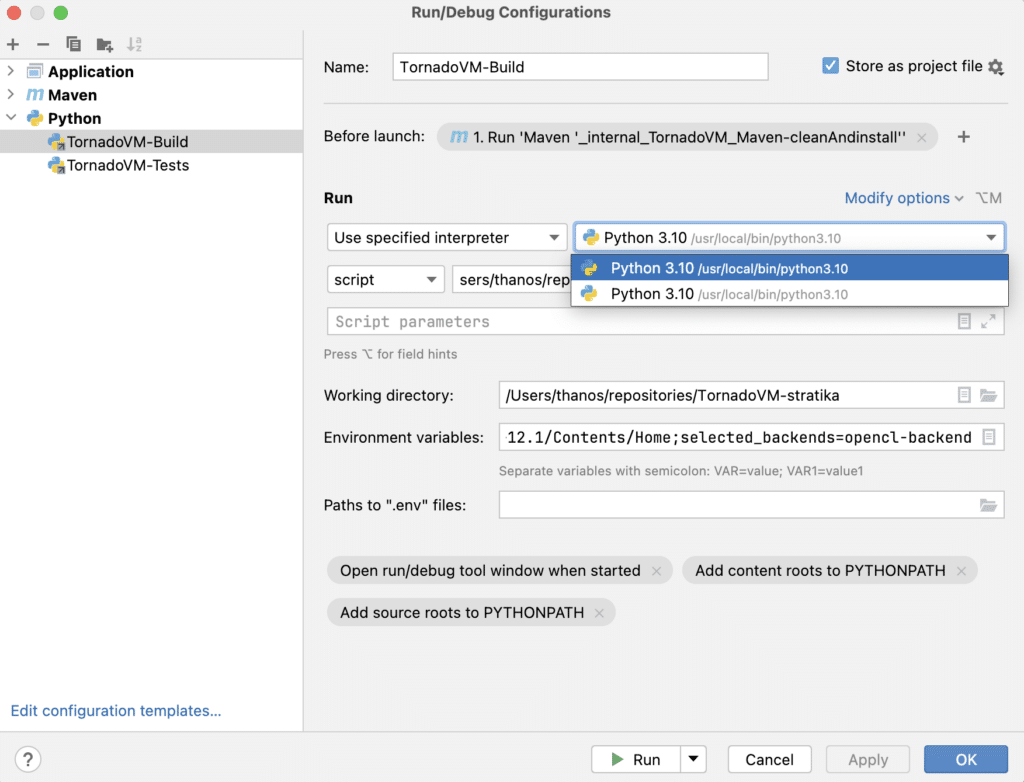
Similarly you can update the selected interpreter for the Python configuration file that is used to run the TornadoVM unit-tests:
Run > Edit Configurations > Python > TornadoVM-Tests
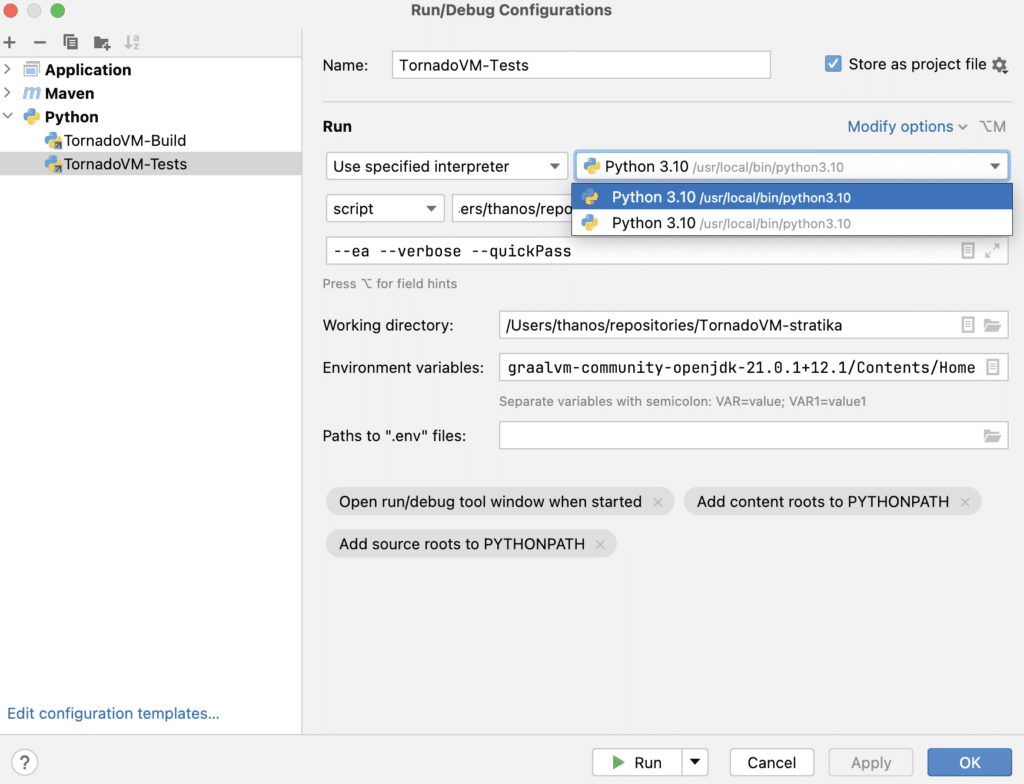
4. Build TornadoVM from IntelliJ
You can select the TornadoVM-Build configuration file and run. This should build TornadoVM with the JAVA_HOME and the backends that you selected in Step 1. If you run in Windows OS, this process will also invoke the pyInstaller package to create the TornadoVM executables.
5. Run TornadoVM Unit-tests from IntelliJ
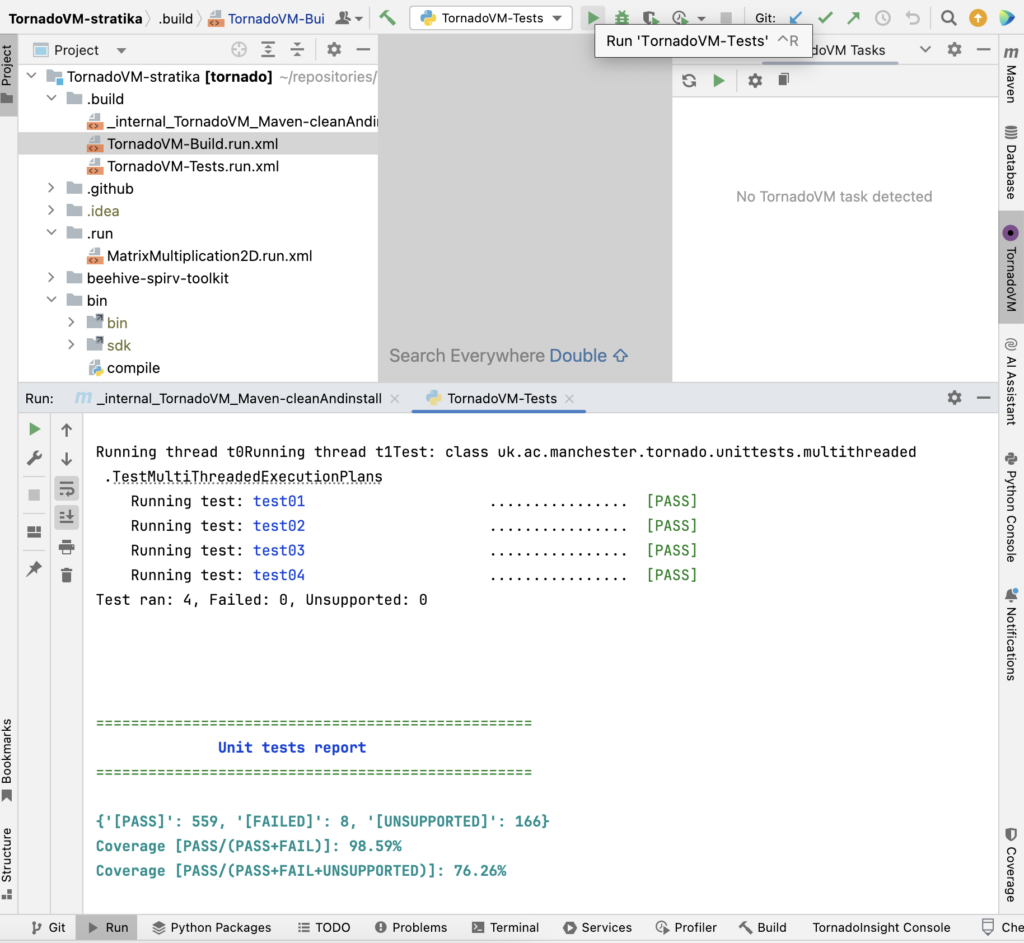
You can select the TornadoVM-Tests configuration file and run. This should run a subgroup of the TornadoVM unit-tests suite on the first device that is recognized in your system. If you open to edit the configurations of this file, you will see that the default arguments contain the quickPass argument which will skip the unit-tests that perform exhaustive testing and require long time to run (~30 minutes).
The outcome of running the unit-tests should be similar to this image:
6. Run TornadoVM Examples/Applications from IntelliJ
To add a new Application you can go in the menu (top bar) and navigate through Run and the Edit Configurations, to create a new application:
Run > Edit Configurations > Application > Add new run configuration...
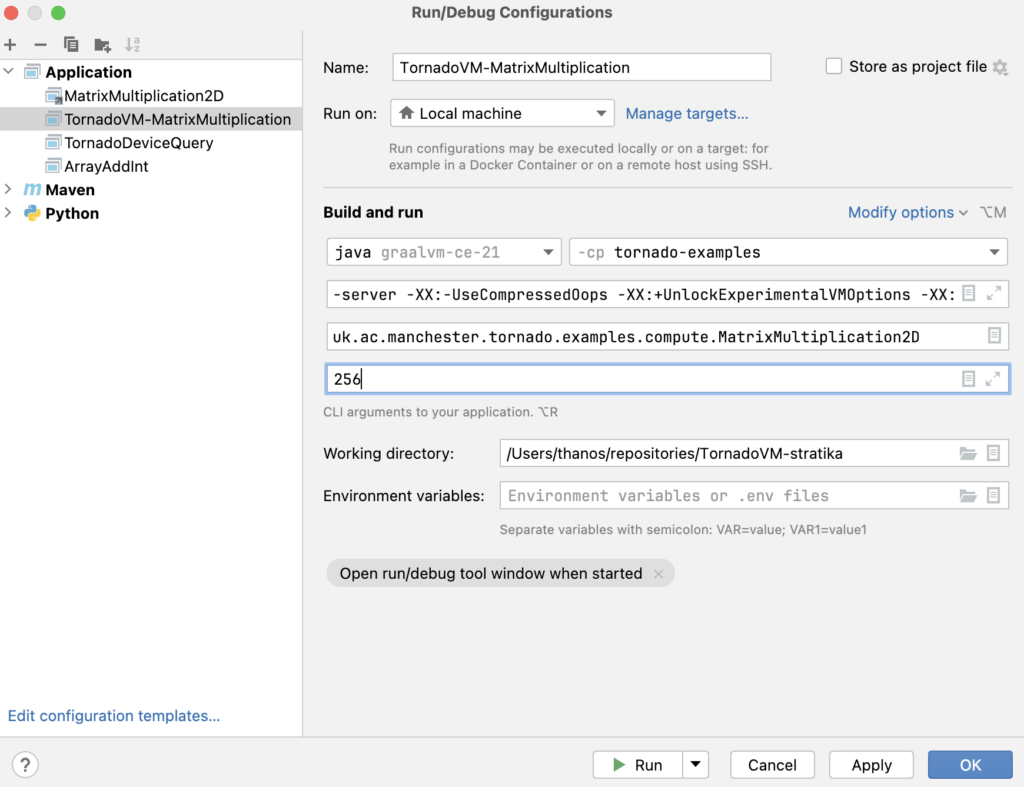
a) Add a name for your application
For instance, you can add TornadoVM-MatrixMultiplication.
b) In the "Build and run" area apply the following configurations:
i) Add VM options
You need to click Modify options and Add VM options. Once you have enabled the VM options you can obtain thee TornadoVM Java flags which enable the execution with TornadoVM, by running in the terminal:
- In macOS/Linux OS:
$ cd <path-to-TornadoVM-directory>
$ source setvars.sh
$ tornado --printJavaFlags
- In Windows OS:
$ cd <path-to-TornadoVM-directory>
$ .\bin\windowsMicrosoftStudioTools2022.cmd
$ setvars.cmd
$ tornado --printJavaFlags
The output of the command depends on the TornadoVM backends you’ve built. For example, if you build with all backends, it should be similar to this:
<path-to-TornadoVM-directory>/etc/dependencies/TornadoVM-graal-jdk-21/graalvm-community-openjdk-21.0.1+12.1/bin/java
-server -XX:-UseCompressedOops -XX:+UnlockExperimentalVMOptions -XX:+EnableJVMCI -XX:-UseCompressedClassPointers --enable-preview -Djava.library.path=<path-to-TornadoVM-directory>/bin/sdk/lib  --module-path .:<path-to-TornadoVM-directory>/bin/sdk/share/java/tornado
-Dtornado.load.api.implementation=uk.ac.manchester.tornado.runtime.tasks.TornadoTaskGraph -Dtornado.load.runtime.implementation=uk.ac.manchester.tornado.runtime.TornadoCoreRuntime -Dtornado.load.tornado.implementation=uk.ac.manchester.tornado.runtime.common.Tornado
-Dtornado.load.annotation.implementation=uk.ac.manchester.tornado.annotation.ASMClassVisitor -Dtornado.load.annotation.parallel=uk.ac.manchester.tornado.api.annotations.Parallel  -XX:+UseParallelGC
@<path-to-TornadoVM-directory>/bin/sdk/etc/exportLists/common-exports
@<path-to-TornadoVM-directory>/bin/sdk/etc/exportLists/opencl-exports
@<path-to-TornadoVM-directory>/bin/sdk/etc/exportLists/spirv-exports
@<path-to-TornadoVM-directory>/bin/sdk/etc/exportLists/ptx-exports --add-modules ALL-SYSTEM,tornado.runtime,tornado.annotation,tornado.drivers.common,tornado.drivers.opencl,tornado.drivers.opencl,tornado.drivers.ptx
Copy the flags starting from -server to the end, and add them in the VM options field.
ii) Configure the JDK for running your applications
Configure the module not specified field to point to the JDK distribution that was used to build TornadoVM. The JDK distribution is defined in Step 1 with the --jdk option. In our example, we used GraalVM JDK 21.
iii) Configure the classpath module
Configure the correct module where your application belongs to. For instance to run the Matrix Multiplication class which belongs to the TornadoVM examples module, we select:
-cp tornado-examples
iv) Configure the main class
You can start typing the name of your class in the field and select it. In our example, the Main class is:
uk.ac.manchester.tornado.examples.compute.MatrixMultiplication2D
v) Configure the arguments of the class
You can add any values that will be selected as arguments for your class. In our example, we can define the length of the matrices to be 256.
vi) Save and run
You can click Apply and Run your application.
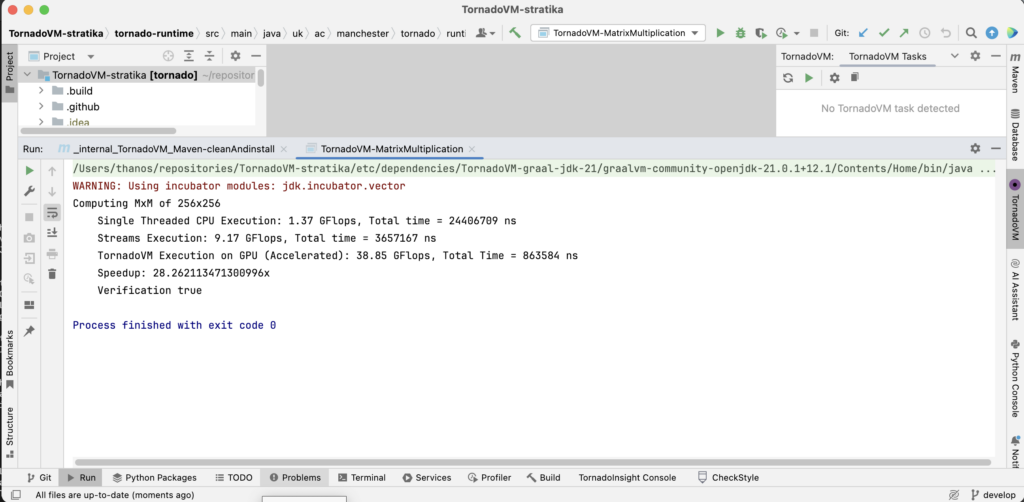
The output should be similar to the following image, which is executed on Apple M1 silicon.
Summary
This blog presented how Java programmers can build and run TornadoVM applications from the IntelliJ IDEA. More information are provided in the TornadoVM documentation. You may find useful to read a previous blog that introduced TornadoInsight, the TornadoVM IntelliJ plugin.
Useful links
- TornadoVM documentation
- GitHub repository
Don’t Forget to Share This Post!




Comments (2)
Java Weekly, Issue 570 | Baeldung
1 year ago[…] Build and Run TornadoVM with IntelliJ IDEA […]
Build and Run TornadoVM with IntelliJ IDEA - AERO at a glance
2 months ago[…] This blog is cross-posted from foojay.io. […]