Control your Arduino with Spring
- March 25, 2023
- 7287 Unique Views
- 6 min read
Have you ever wanted to control your Arduino board from a Raspberry Pi, or your computer, using only Java and not the Arduino language?
In this article, I show how I created a web app to control my Arduino with a Raspberry PI using Spring. And so this is another article about Java on Raspberry PI or perhaps this time I can say Java and Arduino.

Idea
A simple Spring app where I can create a REST interface to control one of the Arduino GPIOs. I can plug a LED and build a simple blink LED example.
Connect the Arduino with a Raspberry Pi and run my Spring application from the Raspberry Pi.
It’s been a while since I wanted to do this test and nothing better than to do it to celebrate Arduino Day.
Every year, Arduino Day is celebrated around the world with lots of workshops, meetups and events. People show off their projects on Social Media with Hashtag #ArduinoDay2023. Arduino Day is the perfect time to recognize the incredible community as well. This year marks the 10th anniversary of Arduino Day, and what a great milestone to celebrate together.
Let’s have a look at a simple architecture for this idea.

Picture 1: Simple Architecture
In simple words, the Raspberry Pi or any computer sends commands to the Arduino that just execute the actions.
It's possible to use Serial Communication, used for communication between the Arduino board and a computer or other devices. All Arduino boards have at least one serial port (also known as a UART or USART), and some have several.
For this, you need to write a program that reads and writes to the serial port. It’s nothing complicated to do, but you can use something simpler and something that is already done, the Firmata.
It is a nice idea to use Firmata if you want all the logic of your program to be on your computer, while the Arduino board only executes orders (actuates hardware pins), and gives back some information (reads hardware pins). You want to make your Arduino more dynamic, and export the brain of the Arduino into your computer. Put in other words, you want to write the firmware logic on your computer, not on the Arduino.
Firmata
In simple words, Firmata is an intermediate protocol that connects an embedded system to a host computer, and the protocol channel uses a serial port by default. The Arduino platform is the standard reference implementation for Firmata and the Arduino IDE comes with support for Firmata.
You can simply upload the Firmata to your Arduino and just use your time to write the client code, the code that will communicate with the Arduino. The Arduino Firmata code is already done for you and you just need to make sure that your code sends the instructions that are compatible with the Firmata code. This client code can be in any language, and there are a lot of libs to help you with that. Here I’ll show an example using Firmata4j.
Fun fact, Firmata is an Italian word and means something like: “Signed”
Firmata4j
firmata4j is a client library of Firmata written in Java. The library allows controlling Arduino and other Arduino compatible boards which run Firmata protocol from your java program.
To connect to the device via serial port it uses a lib for serial communication. Firmata4j works with jSerialComm and jssc, but there is another famous one, RXTX.
Plug your Arduino directly into your Raspberry Pi board, using the USB cable.

Picture 2: full idea Architecture
A Spring app that is running on the Raspberry Pi, it uses the Firmata4j to send commands to the Arduino. The Arduino itself is just running the Firmata code that receives the command and executes that action. In this example, it just blinks the LED.
Setup Arduino
You just need to upload the Firmata code to your Arduino and that is it.
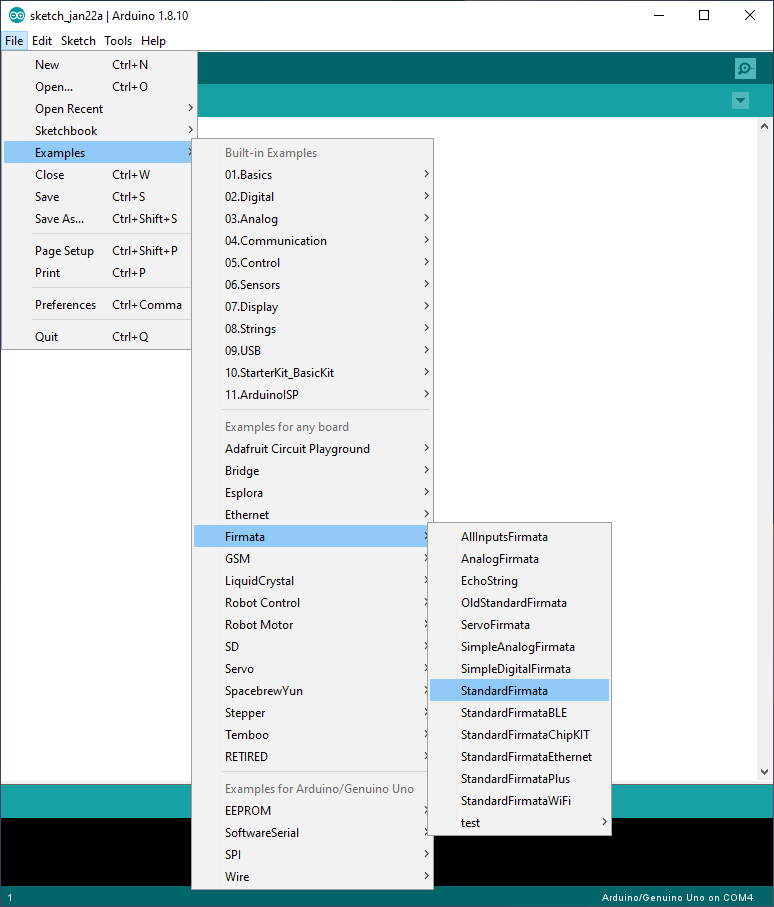
In your Arduino IDE if you can’t see “Firmata” under “Examples” it means that the Firmata library is not installed, and It also surely means that your Arduino IDE is not up to date, since for recent releases, Firmata is automatically included.
You can check under "Sketch" > "Include Library" > "Manage Libraries" > Write "firmata" in the search bar, and you’ll find the Firmata library "Firmata Built-In by Firmata Developers".
Now that you have Firmata on your Arduino IDE, select the StandardFirmata sketch example.

Picture 3: Arduino IDE
You can check the Firmata code or just ignore and upload it to your Arduino board.
That’s all you need to do on the Arduino side.
Code example
Let’s create a simple code that reminds us of an Arduino code.
public static void main(String[] args) throws IOException, InterruptedException {
    try {
        setup();
        loop();
    } finally {
        device.stop();
    }
}

private static final void setup() throws IOException, InterruptedException {
    device.start();
    device.ensureInitializationIsDone();
    System.out.println("Device is ready");
}

private static final void loop() throws IOException, InterruptedException {
    while (true) {
        Pin pin = device.getPin(13);
        pin.setMode(OUTPUT);
        for (int i = 0; i < 10; i++) {
            pin.setValue(1);
            Thread.sleep(500);
            pin.setValue(0);
            Thread.sleep(500);
        }
    }
}
Here is a simple code that just blinks the Arduino LED.
Spring App
Now let's create a simple Spring application where it can make available a REST interface to control one of the Arduino GPIO. Therefore we can turn on and turn off the LED just by calling the REST interface.
@EventListener
public void onApplicationEvent(final ContextRefreshedEvent event) {
    try {
        // You can check your USB port name on the Arduino IDE, on the OS you are using
        device = new FirmataDevice("/dev/ttyACM0");
        device.start();
        device.ensureInitializationIsDone();
    }catch(InterruptedException e){
        e.fillInStackTrace();
    }catch(IOException e){
        e.fillInStackTrace();
    }
    return;
}
I use the @EventListener annotation to run logic after the Spring context has been initialised and I do the device connection.
You can check all the code on GitHub.
https://youtu.be/4B4WHhOf5I4
Video 1: Arduino led blink
Next Steps
I’m using my Arduino Mega, but this code can be used in other Arduino compatible boards as well, including the ESP family and others. Check out the supported board list here.
Looks like that there is no support for RP2040, and this means that you can not use a Raspberry PI Pico yet. There are a lot of Firmata implementations with minor changes, and I found one, ConfigurableFirmata, that looks like it can support a Raspberry PIco. But this could be an entire blog.
Another idea here could be to implement some kind of interface to use to interact with the Arduino and test this implementation with others web frameworks as well, like Micronaut and Quarkus.
It would be nice to try out this with Kotlin and/or Scala.
Conclusion
In this tutorial, you have seen how to use Firmata4j to control an Arduino board from a Raspberry Pi board or directly from your computer.
With Firmata, you can just focus on the client code and forget about what is running inside the Arduino.
Your Java code can also interact with any other library you have on your Raspberry Pi.
It’s great because you don’t have to have 2 programs (1 for Raspberry Pi and 1 for Arduino), you can just write everything in one program, while Firmata4j takes care of the rest.
I didn't show anything very complex and I barely touched the surface of what is possible to do with Firmata.
This example proves that it is possible to control your Arduino with a Spring web application and it is really handy to combine with a Raspberry Pi.
There are other Firmata options and implementations as well, and of course, you can write your code instead of using a Firmata and customise it in the way that you want.
Remember to use the hashtag #JavaOnRaspberryPi on Twitter to show the world Raspberry Pi with Java.
In this case, why not #ArduinoWithJava, and of course don’t forget to celebrate Arduino Day.
Check out #ArduinoDay2023
Links
https://blog.arduino.cc/2023/02/01/arduino-day-turns-10-but-you-are-a-10/
https://github.com/firmata/protocol
https://github.com/firmata/arduino
http://www.firmata.org/wiki/Main_Page
https://github.com/kurbatov/firmata4j
https://github.com/firmata/ConfigurableFirmata
https://github.com/MrYsLab/telemetrix-rpi-pico
https://github.com/execuc/u2if
Don’t Forget to Share This Post!


Comments (0)
No comments yet. Be the first.