Creating a Command Line Tool with JBang and PicoCLI to Generate Release Notes
- July 24, 2024
- 10716 Unique Views
- 6 min read
Lately, I have been playing with JBang and PicoCLI, and I am pretty amazed at what we can do with these tools. I needed to create a script that would go to a specified repository on GitHub, check the commit range, and verify if any tickets were associated with them. Additionally, I wanted to check if the ticket is accepted and if the commit was approved or not. The idea was to integrate this script along with the CI/CD pipeline.
While the traditional approach might involve using bash scripts or Python, as a Java developer, I feel more at home doing this in Java. This is where JBang comes into the picture. And since I want this to be a command-line tool, PicoCLI comes in handy.
In this article, I will show you how to create a script with JBang and PicoCLI to generate release notes.
Step 1: Install JBang
If you don't already have JBang installed, you can install it by following these steps:
On macOS
brew install jbangdev/tap/jbang
On Linux
curl -Ls https://sh.jbang.dev | bash -s - app setup
After installing JBang, you can verify the installation by running:
jbang --version
Step 2: Initialize Your JBang Script
First, we need to initialize our JBang script. You can do this by running the following command:
jbang init release-notes.java
This will create a basic Java file. It starts with a shebang line. In Unix-like environments (macOS, Linux, etc.), the operating system tells the user how to execute the script when running it directly from the terminal. This special line tells your computer's terminal to use JBang to run the script, making it behave like a standalone command. This special line ensures that even without explicitly calling JBang, your script will execute seamlessly, handling dependencies and running the Java code effortlessly.
To open it in your IDE, you can use:
jbang edit --sandbox release-notes.java
This creates a sandbox environment and sets up a Gradle project for you. You can then open it on your favourite IDE.

Step 3: Add Dependencies
JBang's **//DEPS directive makes dependency management a breeze. You just need to specify the dependencies at the top of your Java file:
///usr/bin/env jbang "$0" "$@" ; exit $?

//JAVA 21+
//DEPS org.projectlombok:lombok:1.18.30
//DEPS info.picocli:picocli:4.6.2
//DEPS commons-io:commons-io:2.15.1
//DEPS com.fasterxml.jackson.core:jackson-databind:2.16.1
//DEPS com.fasterxml.jackson.datatype:jackson-datatype-jsr310:2.16.1
//DEPS io.github.openfeign:feign-java11:11.8
//DEPS io.github.openfeign:feign-jackson:11.8
//DEPS ch.qos.logback:logback-classic:1.5.6
When working with JBang, you can easily add dependencies to your script using the //DEPS directive. This format allows you to include external libraries directly in your script, simplifying the process of managing dependencies.
Step 4: Set Up Logging
Let's combine Logback with colourized output for those who love visual feedback. This involves setting up a custom appender to enhance your logging experience.
private static void configureLogback() {
   LoggerContext context = (LoggerContext) LoggerFactory.getILoggerFactory();

   PatternLayoutEncoder encoder = new PatternLayoutEncoder();
   encoder.setContext(context);
   encoder.setPattern("%d{HH:mm:ss.SSS} [%thread] %-5level %logger{36} - %msg%n");
   encoder.start();

   PicoCLIColorizedAppender appender = new PicoCLIColorizedAppender();
   appender.setContext(context);
   appender.setEncoder(encoder);
   appender.start();

   Logger rootLogger = (Logger) LoggerFactory.getLogger(Logger.ROOT_LOGGER_NAME);
   rootLogger.detachAndStopAllAppenders();
   rootLogger.addAppender(appender);
   rootLogger.setLevel(Level.DEBUG);
}
For this, I need a custom appender.
static class PicoCLIColorizedAppender extends ConsoleAppender<ILoggingEvent> {

   @Override
   protected void append(ILoggingEvent event) {
       String formattedMessage = new String(encoder.encode(event));
       String colorizedMessage = getColorizedMessage(event, formattedMessage);
       System.out.print(colorizedMessage);
   }

   private String getColorizedMessage(ILoggingEvent event, String formattedMessage) {
       String template = switch (event.getLevel().toInt()) {
           case Level.DEBUG_INT -> "@|blue %s|@"; // Blue for DEBUG
           case Level.INFO_INT -> "@|green %s|@"; // Green for INFO
           case Level.WARN_INT -> "@|yellow %s|@"; // Yellow for WARN
           case Level.ERROR_INT -> "@|red %s|@"; // Red for ERROR
           default -> "%s";
       };
       return CommandLine.Help.Ansi.AUTO.string(String.format(template, formattedMessage));
   }

   public Encoder<ILoggingEvent> getEncoder() {
       return encoder;
   }

   public void setEncoder(Encoder<ILoggingEvent> encoder) {
       this.encoder = encoder;
   }
}
Step 5: Configure ObjectMapper
Next, we configure the ObjectMapper for JSON serialization and deserialization:
public class release_notes {

   static final ObjectMapper objectMapper = new ObjectMapper()
           .registerModule(new JavaTimeModule())
           .setPropertyNamingStrategy(PropertyNamingStrategies.SNAKE_CASE)
           .setDefaultPropertyInclusion(JsonInclude.Include.NON_NULL)
           .disable(DeserializationFeature.FAIL_ON_UNKNOWN_PROPERTIES);

    //Other code.
}
Step 6: Feign-tastic GitHub Client
We'll leverage Feign to create a GitHub client, making API interactions smooth. This involves defining an interface (GitHubClient) and implementing functions to fetch project details and commits.
public class release_notes {
    static GitHubClient gitHubClient = Feign.builder()
        .decoder(new JacksonDecoder(objectMapper))
        .encoder(new JacksonEncoder(objectMapper))
        .requestInterceptor(request -> request.header("Authorization", "Bearer " + getApiToken()))
        .target(GitHubClient.class, "https://api.github.com");

    // Other code...
}

interface GitHubClient {
    @RequestLine("GET /repos/{owner}/{repo}")
    @Headers("Accept: application/vnd.github+json")
    GithubProject getProject(@Param("owner") String owner, @Param("repo") String repo);

    @RequestLine("GET /repos/{owner}/{repo}/commits?sha={sha}&page={page}")
    @Headers("Accept: application/vnd.github+json")
    List<Commit> getCommitsPage(@Param("owner") String owner, @Param("repo") String repo, @Param("sha") String sha, @Param("page") int page);

    default List<Commit> getCommits(String owner, String repo, String sha) {
        return fetchAllPages(page -> getCommitsPage(owner, repo, sha, page));
    }

    default <T> List<T> fetchAllPages(IntFunction<List<T>> pageFunction) {
        List<T> allResults = new ArrayList<>();
        List<T> curPageData;
        for (int curPageNum = 1; (curPageData = pageFunction.apply(curPageNum)).size() > 0; curPageNum++) {
            allResults.addAll(curPageData);
        }
        return allResults;
    }
}

// Records for GitHub responses
record GithubProject(String defaultBranch, String name, String description, String htmlUrl, OffsetDateTime updatedAt) {}
record Commit(String sha, CommitDetails commit, String htmlUrl) {}
record CommitDetails(String message, Author author) {}
record Author(String email, Instant date) {}
Note that we called a method getApiToken() when creating the client. We need to implement this.
static String apiTokenCache;

static String getApiToken() {
   if (apiTokenCache != null) {
       return apiTokenCache;
   }
   try {
       Process statusProcess = new ProcessBuilder("gh", "auth", "status", "-t")
               .redirectOutput(PIPE)
               .redirectError(PIPE)
               .start();
       String statusOutput = IOUtils.toString(statusProcess.getInputStream(), Charset.defaultCharset());
       String statusError = IOUtils.toString(statusProcess.getErrorStream(), Charset.defaultCharset());

       if (statusError.contains("You are not logged into any GitHub hosts.")) {
           new ProcessBuilder("gh", "auth", "login")
                   .inheritIO()
                   .start()
                   .waitFor();
       } else if (!statusOutput.contains("Logged in to github.com account")) {
           throw new GitHubCliProcessException("Unrecognized GitHub CLI auth status:\n" + statusOutput + statusError);
       }

       Matcher tokenMatcher = GH_CLI_STATUS_TOKEN_REGEX.matcher(statusOutput);
       if (tokenMatcher.find()) {
           apiTokenCache = tokenMatcher.group(1);
           return apiTokenCache;
       } else {
           throw new GitHubCliProcessException("Unable to extract token from output: " + statusOutput);
       }

   } catch (IOException | InterruptedException e) {
       if (e instanceof InterruptedException) {
           Thread.currentThread().interrupt();
       }
       throw new GitHubCliProcessException("GitHub CLI process error: " + e.getMessage(), e);
   }
}
This code fetches your GitHub API token securely. It first checks if a cached token exists. If not, it uses the "gh" command-line tool to get your authentication status. It launches the "gh" login process if you're not logged in. Once logged in, it extracts your API token from the "gh" output and caches it for future use. If there are any errors during this process, it throws an exception.
Important Note: This script relies on the GitHub CLI (gh). If you haven't already installed it, you can find instructions for your operating system.
Step 7: Create the Command Line Application
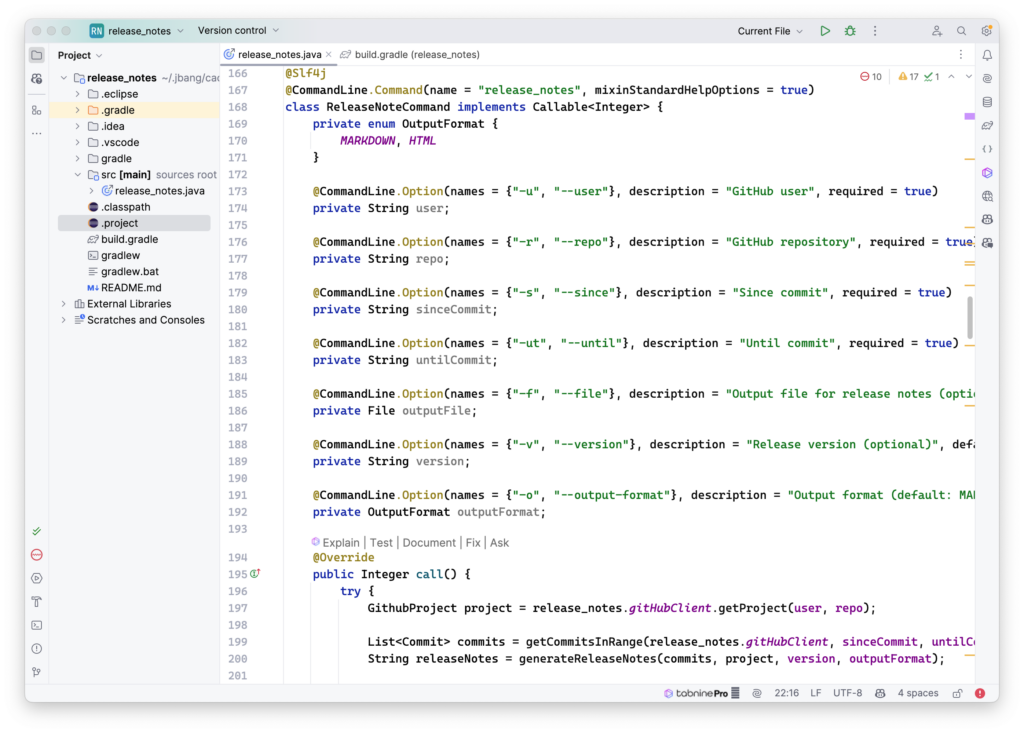
Now, the heart of the tool: PicoCLI takes over command-line argument parsing and execution of the core logic. We'll define options for GitHub user, repository, commit range, output format, and more.
@Slf4j
@CommandLine.Command(name = "release_notes", mixinStandardHelpOptions = true)
class ReleaseNoteCommand implements Callable<Integer> {
   private enum OutputFormat {
       MARKDOWN, HTML
   }

   @CommandLine.Option(names = {"-u", "--user"}, description = "GitHub user", required = true)
   private String user;

   @CommandLine.Option(names = {"-r", "--repo"}, description = "GitHub repository", required = true)
   private String repo;

   @CommandLine.Option(names = {"-s", "--since"}, description = "Since commit", required = true)
   private String sinceCommit;

   @CommandLine.Option(names = {"-ut", "--until"}, description = "Until commit", required = true)
   private String untilCommit;

   @CommandLine.Option(names = {"-f", "--file"}, description = "Output file for release notes (optional)")
   private File outputFile;

   @CommandLine.Option(names = {"-v", "--version"}, description = "Release version (optional)", defaultValue = "v1.0.0")
   private String version;

   @CommandLine.Option(names = {"-o", "--output-format"}, description = "Output format (default: MARKDOWN)", defaultValue = "MARKDOWN")
   private OutputFormat outputFormat;

   @Override
   public Integer call() {
       try {
           GithubProject project = release_notes.gitHubClient.getProject(user, repo);

           List<Commit> commits = getCommitsInRange(release_notes.gitHubClient, sinceCommit, untilCommit, user, repo);
           String releaseNotes = generateReleaseNotes(commits, project, version, outputFormat);

           File outputFileWithExtension;
           if (outputFile != null) {
               String extension = (outputFormat == OutputFormat.HTML) ? ".html" : ".md";
               outputFileWithExtension = new File(outputFile.getAbsolutePath() + extension);
               try (PrintWriter writer = new PrintWriter(outputFileWithExtension, StandardCharsets.UTF_8)) {
                   writer.print(releaseNotes);
                   log.info("Release notes saved to: {}", outputFileWithExtension.getAbsolutePath());
               } catch (IOException e) {
                   log.error("Error writing release notes to file: {}", e.getMessage(), e);
                   return 1;
               }
           } else {
               log.info(releaseNotes);
           }

       } catch (Exception e) {
           log.error("Error fetching commits: {}", e.getMessage(), e);
           return 1;
       }
       return 0;
   }
}
This Java code defines a command-line tool (ReleaseNoteCommand) for generating release notes from a GitHub repository. It uses PicoCLI to handle command-line arguments, such as GitHub user, repository, commit range, output format, and optional version and output file. It fetches commit data using a GitHubClient, processes it to categorize changes (features, bug fixes, other), and then formats the information into either Markdown or HTML release notes.
Finally, it either saves the release notes to a specified file or prints them to the console.
(Note: Some methods used in this code, such as getCommitsInRange, generateReleaseNotes, and helper method, are not shown here but can be found in the complete code here.)
Step 8: Running the Show: Main Method
Finally, implement the main method to execute the command:
import picocli.CommandLine;

import static java.lang.System.exit;

public class release_notes {
    public static void main(String... args) {
        configureLogback();
        int exitCode = new CommandLine(new GitHubCommitChecker()).execute(args);
        exit(exitCode);
    }

    // Other methods...
}
Your CLI Script is Ready!
To put this creation to work, run it with the following command (adjusting the arguments to match your repository):
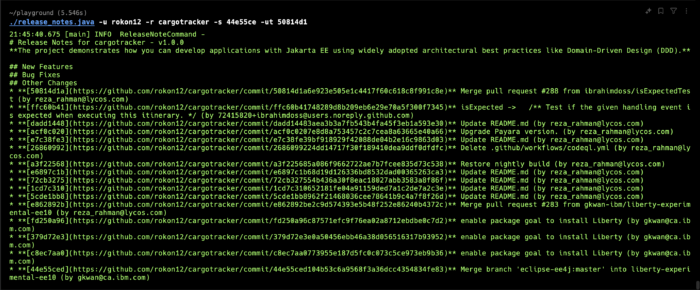
./release_notes.java -u rokon12 -r cargotracker -s 44e55ce -ut 50814d1 -f release -o HTML
This will generate an HTML file in your root directory.
It also prints excellent help functionality. For example:
./release_notes.java
Missing required options: '--user=<user>', '--repo=<repo>', '--since=<sinceCommit>', '--until=<untilCommit>'
Usage: release_notes [-f=<outputFile>] [-o=<outputFormat>] -r=<repo>
                     -s=<sinceCommit> -u=<user> -ut=<untilCommit> [-v=<version>]
  -f, --file=<outputFile>   Output file for release notes (optional)
  -o, --output-format=<outputFormat>
                            Output format (default: MARKDOWN)
  -r, --repo=<repo>         GitHub repository
  -s, --since=<sinceCommit> Since commit
  -u, --user=<user>         GitHub user
      -ut, --until=<untilCommit>
                            Until commit
  -v, --version=<version>   Release version (optional)
It will print on the terminal if we don’t want to save it in any file.

That’s it.
Conclusion
Congratulations! You've built a versatile release notes generator powered by JBang and PicoCLI.
This tool, easily integrated into your CI/CD pipelines, empowers you to create detailed, informative release notes straight from GitHub while enjoying the comfort and familiarity of Java.
Feel free to tailor it further to match your specific workflow.
Let me know if you'd like me to elaborate on any specific code section or aspect!
Redis just got a whole lot better!
We just announced a bunch of new tools and features that a simpler way to build fast, powerful AI apps.
More Info Here!
Don’t Forget to Share This Post!


Comments (5)
Java Weekly, Issue 553 | Baeldung
2 years ago[…] >> Creating a Command Line Tool with JBang and PicoCLI to Generate Release Notes [foojay.io] […]
Creating a Command Line Tool with JBang and PicoCLI to Generate Release Notes | Scriptease
2 years ago[…] Learn how to create a Java command-line tool with JBang and PicoCLI to automate generating release notes from GitHub. — Weiterlesen foojay.io/today/creating-a-command-line-tool-with-jbang-and-picocli-to-generate-release-notes/ […]
Dmitry
2 years agoThanks for your code! What about GitHubCliProcessException? Can not find the declaration.
Dmitry
2 years agoGH_CLI_STATUS_TOKEN_REGEX Please, can you explain, where can I get it from? Thanks a lot!
Dmitry
2 years agoI've just found answers in your repo. https://gist.github.com/rokon12/fd039cdcfa98920ea9e881bf18e33b0b Sorry to bother you.