Managing Data Residency: The Demo
- May 29, 2023
- 2304 Unique Views
- 5 min read
I explained the concepts and theory behind Data Residency in a previous post.
It's time to get our hands dirty and implement it in a simple demo.
The sample architecture
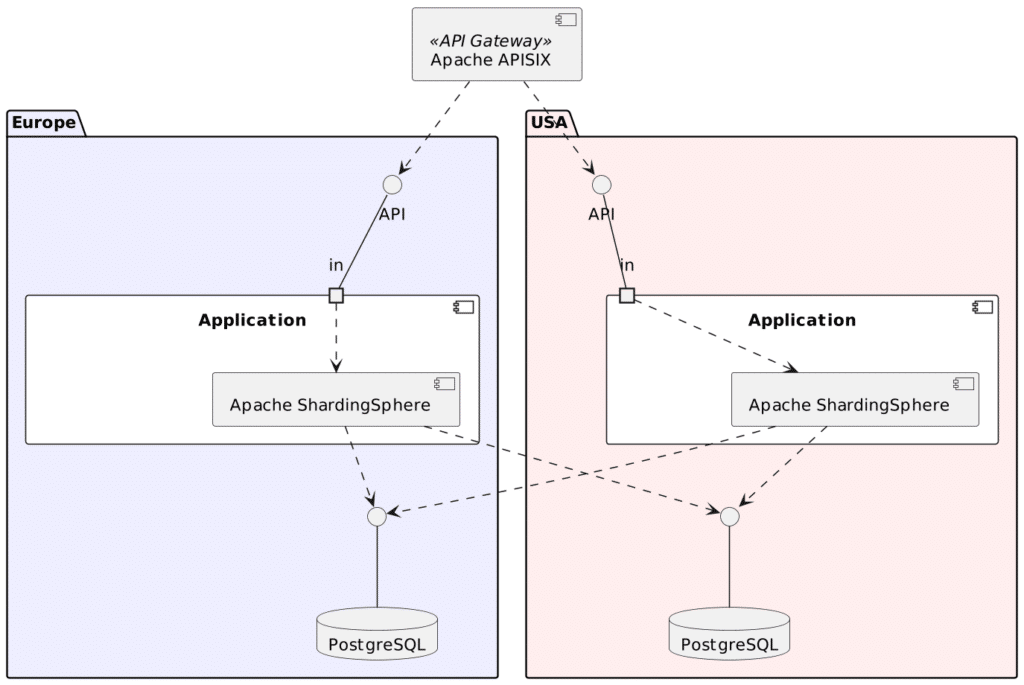
In the last section of the previous post, I proposed a sample architecture where location-based routing happened at two different stages:
- The API Gateway checks for an existing
X-Countryheader. Depending on its value, it forwards the request to the computed upstream; If no value is found or no value matches, it forwards it to a default upstream. - The application uses Apache Shardingsphre to route again depending on the data. If the value computed by the API Gateway is correct, the flow stays "in its lane"; if not, it's routed to the correct database, but with a performance penalty as it's outside its lane.
I simplified some aspects:
- The theory uses two API Gateway instances. For the demo, I used only one.
- Remember that the location isn't set client-side on the first request. It should be returned along the first response, stored, and reused by the client on subsequent calls. I didn't bother with implementing the client.
- I like my demos to be self-contained, so I didn't use any Cloud Provider.
Here's the final component diagram:
The data model is simple:
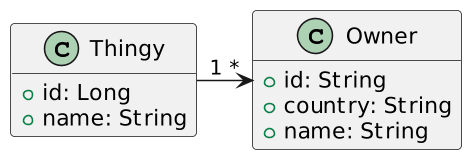
We insert location-specific data on each database:
INSERT INTO europe.owner VALUES ('dujardin', 'fr', 'Jean Dujardin');
INSERT INTO europe.thingy VALUES (1, 'Croissant', 'dujardin');

INSERT INTO usa.owner VALUES ('wayne', 'us', 'John Wayne');
INSERT INTO usa.thingy VALUES (2, 'Lasso', 'wayne');
Finally, we develop a straightforward RESTful API to fetch thingies:
GET /thingies/GET /thingies/{id}
Now that we have set the stage, let's check how to implement routing at the two levels.
Routing on Apache ShardingSphere
Apache ShardingSphere offers two approaches: as a library inside the application, ShardingSphere-JDBC, or as a full-fledged deployable component, ShardingSphere-Proxy. You can also combine both. I chose the former because it's the easiest to set up. For a comparison between them, please check this table.
The first step is to add the dependency to the POM:
<dependency>
    <groupId>org.apache.shardingsphere</groupId>
    <artifactId>shardingsphere-jdbc-core</artifactId>
    <version>5.3.2</version>
</dependency>
ShardingSphere-JDBC acts as an indirection layer between the application and the data sources. We must configure the framework to use it. For Spring Boot, it looks like the following:
spring:
  datasource:
    driver-class-name: org.apache.shardingsphere.driver.ShardingSphereDriver     #1
    url: jdbc:shardingsphere:absolutepath:/etc/sharding.yml                      #2-3
- JDBC-compatible ShardingSphere driver
- Configuration file
- Opposite to what the documentation tells, the full prefix is
jdbc:shardingsphere:absolutepath. I've opened a PR to fix the documentation.
The next step is to configure ShardingSphere itself with the data sources:
dataSources:                                                                  #1
  europe:
    dataSourceClassName: com.zaxxer.hikari.HikariDataSource
    driverClassName: org.postgresql.Driver
    jdbcUrl: "jdbc:postgresql://dbeurope:5432/postgres?currentSchema=europe"
    username: postgres
    password: root
  usa:
    dataSourceClassName: com.zaxxer.hikari.HikariDataSource
    driverClassName: org.postgresql.Driver
    jdbcUrl: "jdbc:postgresql://dbusa:5432/postgres?currentSchema=usa"
    username: postgres
    password: root
rules:                                                                       #2
  - !SHARDING
    tables:
      owner:                                                                 #3
        actualDataNodes: europe.owner,usa.owner                              #4
        tableStrategy:
          standard:
            shardingColumn: country                                          #3
            shardingAlgorithmName: by_country                                #5
    shardingAlgorithms:
      by_country:
        type: CLASS_BASED                                                    #6
        props:
          strategy: STANDARD
          algorithmClassName: ch.frankel.blog.dataresidency.LocationBasedSharding #7
- Define the two data sources,
europeandusa - Define rules. Many rules are available; we will only use sharding to split data between Europe and USA locations
- Sharding happens on the
countrycolumn of theownertable - Actual shards
- Algorithm to use. ShardingSphere offers a couple of algorithms out-of-the-box, which generally try to balance data equally between the sources.
As we want a particular split, we define our own - Set the algorithm type
- Reference the custom algorithm class
The final step is to provide the algorithm's code:
class LocationBasedSharding : StandardShardingAlgorithm<String> {    //1

  override fun doSharding(targetNames: MutableCollection<String>, shardingValue: PreciseShardingValue<String>) =
    when (shardingValue.value) {                                     //2
      "fr" -> "europe"
      "us" -> "usa"
      else -> throw IllegalArgumentException("No sharding over ${shardingValue.value} defined")
    }
}
- Inherit from
StandardShardingAlgorithm, whereTis the data type of the sharding column. Here, it'scountry - Based on the sharding column's value, return the name of the data source to use
With all of the above, the application will fetch thingies in the relevant data source based on the owner's country.
Routing on Apache APISIX
We should route as early as possible to avoid an application instance in Europe fetching US data. In our case, it translates to routing at the API Gateway stage.
I'll use APISIX standalone mode for configuration. Let's define the two upstreams:
upstreams:
  - id: 1
    nodes:
      "appeurope:8080": 1
  - id: 2
    nodes:
      "appusa:8080": 1
Now, we shall define the routes where the magic happens:
routes:
  - uri: /thingies*                          #1
    name: Europe
    upstream_id: 1
    vars: [["http_x-country", "==", "fr"]]   #2
    priority: 3                              #3
  - uri: /thingies*                          #4
    name: USA
    upstream_id: 2
    vars: [["http_x-country", "==", "us"]]
    priority: 2                              #3
  - uri: /thingies*                          #5
    name: default
    upstream_id: 1
    priority: 1                              #3
- Define the route to the Europe-located app
- APISIX matches the HTTP methods, the URI and conditions. Here, the condition is that the
X-Countryheader has thefrvalue - APISIX evaluates matching in priority order, starting with the highest priority. If the request doesn't match, e.g., because the header doesn't have the set value, it evaluates the next route in the priority list.
- Define the route to the USA-located app
- Define a default route
The first request carries no header; APISIX forwards it to the default route, where ShardingSphere finds data in the relevant data source.
Subsequent requests set the X-Country header because the response to the first request carries the information, and the client has stored it. Remember that it's outside the scope of the demo. In most cases, it's set to the correct location; hence, the request will stay "in its lane". If not, the configured routing will still find the data in the appropriate location at the cost of increased latency to fetch data in the other lane.
Observing the flow in practice
It's always a good idea to check that the design behaves as expected. We can use OpenTelemetry for this. For more information on how to set up OpenTelemetry in such an architecture, please refer to End-to-end tracing with OpenTelemetry.
Note that Apache ShardingSphere supports OpenTelemetry but doesn't provide the binary agent. You need to build it from source. I admit I was too lazy to do it.
Let's start with a headerless request:
curl localhost:9080/thingies/1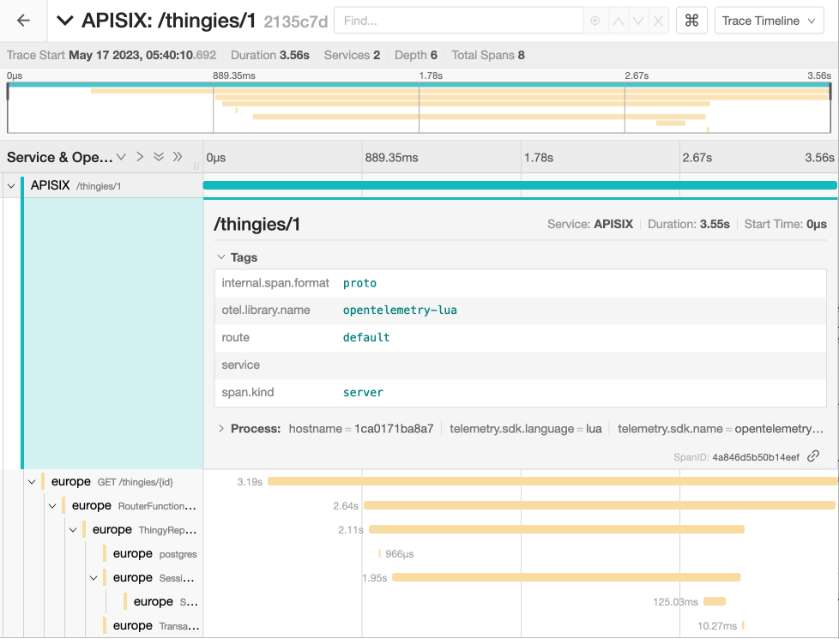
It uses the default route defined in APISIX and returns the correct data, thanks to ShardingSphere. Now, let's set the country to fr, which is correct.
curl -H 'X-Country: fr' localhost:9080/thingies/1APISIX correctly forwards the request to the Europe-located app.
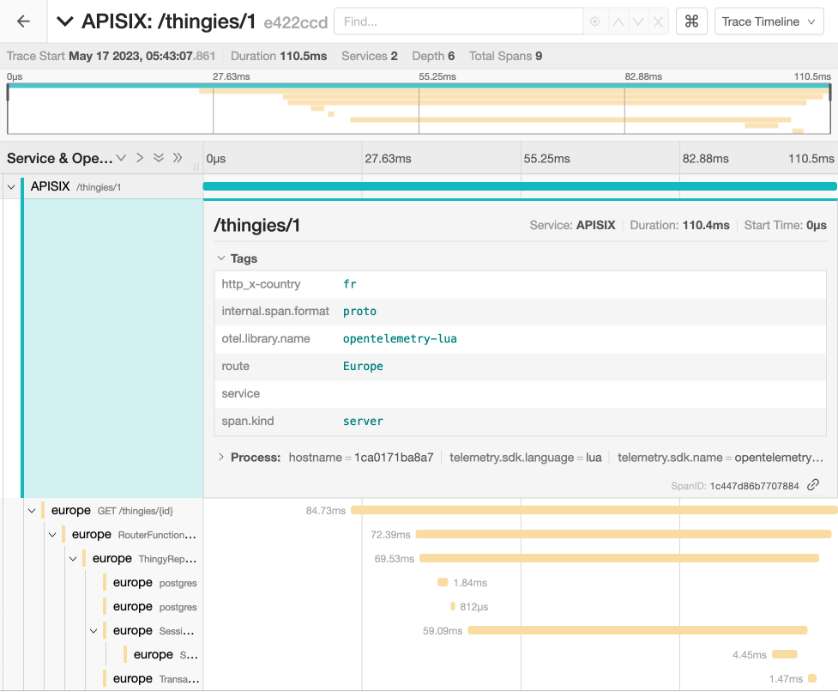
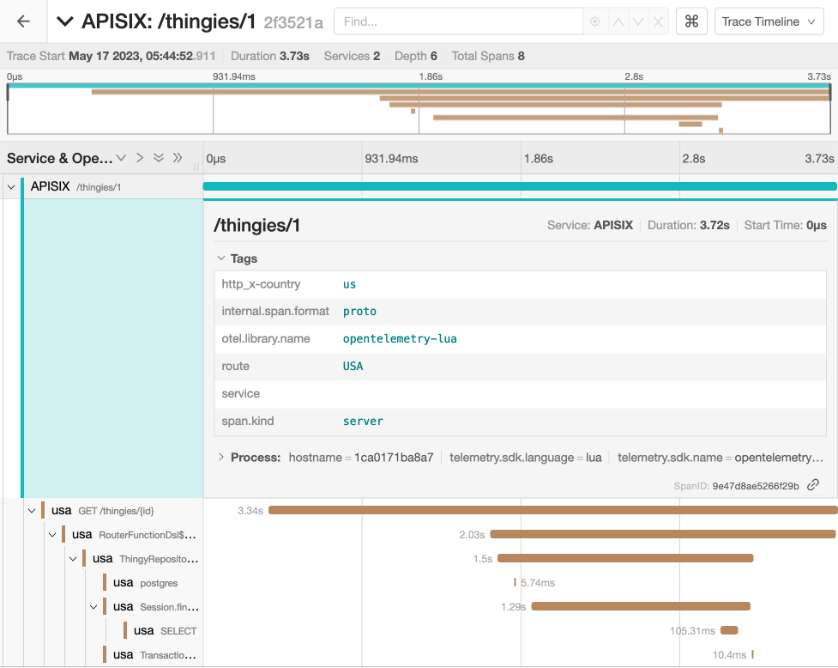
Finally, imagine a malicious actor changing the header to get their hands on data that are located in the US.
curl -H 'X-Country: us' localhost:9080/thingies/1
APISIX forwards it to the USA-located app according to the header. However, Shardingsphere still fetches data from Europe.
Conclusion
In the previous article, I explained the concepts behind Data Residency.
In this article, I implemented it within a simple architecture, thanks to Apache APISIX and Apache ShardingSphere.
The demo simplifies reality but should be an excellent foundation for building your production-grade Data Residency architecture.
The complete source code for this post can be found on GitHub.
To go further:
Originally published at A Java Geek on May 21th, 2023
Don’t Forget to Share This Post!


Comments (0)
No comments yet. Be the first.