

MQTT on Raspberry Pi (Part 1): Send Sensor Data to HiveMQ Cloud with Java and Pi4J
- December 15, 2021
- 11 min read
A few years ago I did my first experiments with an MQTT server (Mosquitto) running on a Raspberry Pi to connect an Arduino and Raspberry Pi for the drumbooth of my son. The full process is described in my book "Getting Started with Java on the Raspberry Pi".
In this series of articles we are going to take a different approach with an online MQTT-compatible service: HiveMQ Cloud. The biggest advantage: no need for an always-on server we must manage ourselves. Yes, Mosquitto runs on a inexpensive Raspberry Pi, but still we require to keep it up-and-running if we use it as the "central hub" to distribute data.
And another big advantage: HiveMQ Cloud is totally free for up to 100 devices! Even for the most enthusiastic maker that's a lot of microcontrollers or computers!
Example code for many programming languages is available on the HiveMQ website. In this and the following posts, we will focus on a few examples with Raspberry Pi and Java.
Setting up a HiveMQ Cloud account
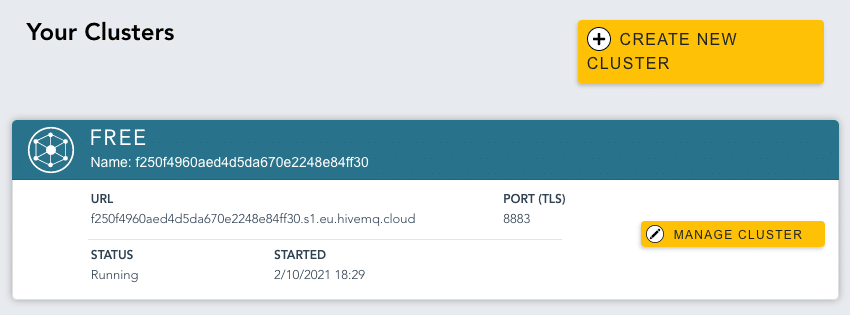
Let's start with our free HiveMQ Cloud account. Go to auth.hivemq.cloud > "Sign Up Now" and create a login. Once logged in, you will be presented with your clusters. By pressing the "Manage Cluster" button, you will be directed to a view containing the details of your HiveMQ Cloud instance.
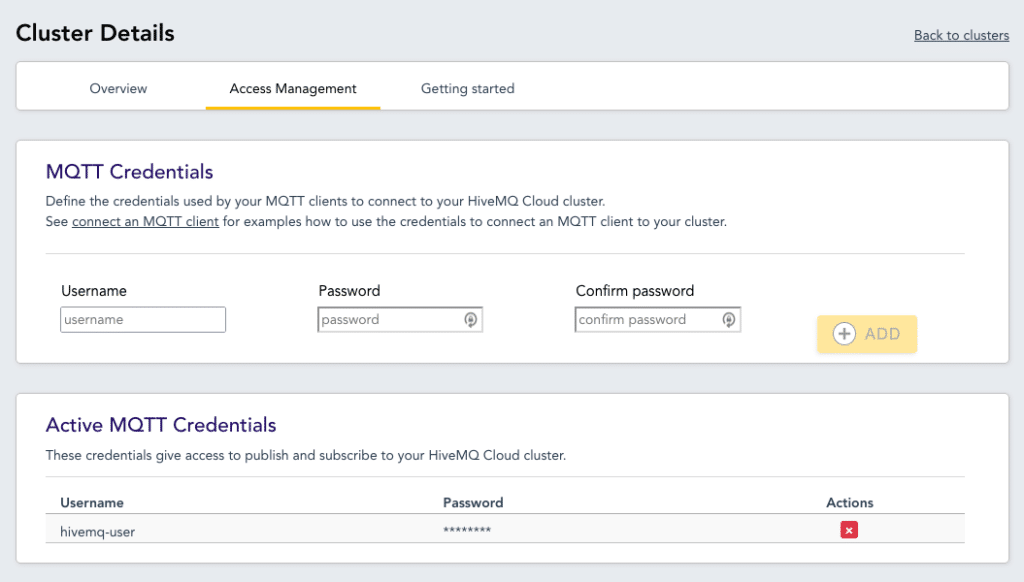
Go to the "Access Management" section and create a user name and password for the credentials we will use in our applications.
About Raspberry Pi
The Raspberry Pi isn't just a small, inexpensive computer-for-everyone. No, the latest version 4 has evolved to a powerful machine that can replace a full-size desktop or notebook for many use-cases.
The initial goal of the Raspberry Pi project was to build an inexpensive PC that is affordable for all. The first version could be connected directly to a television to provide a computer to those who couldn't afford a monitor. Now different versions of the Raspberry Pi are available, depending on your budget, the connections you need, the processor, the amount of memory, etc.
In 2019, the Raspberry Pi 4 was released with a 1.5 GHz 64-bit quad-core ARM processor. This board is available with 1, 2, 4 or 8GB of memory. The prices range between 25 to 90€.
In this series, I will be using a Raspberry Pi 4, but you can do exactly the same with the other types of board. The only thing you need to take care about when using a Raspberry Pi Zero of the first generation (a new one was released in November 2021) or older full-size boards, is to use an ARMv6 compatible Java JDK or runtime. More info is available on "How to install and use Java 11 and JavaFX 11 on Raspberry Pi boards with ARMv6 processor".
The "magic part" of the Raspberry Pi is the 40-pins header which allows you to connect a wide range of electronic components, like LEDs, buttons, sensors, servos, relays, screens... And that's exactly what we want to use in this
post to send sensor data to HiveMQ Cloud.
Java on Raspberry Pi
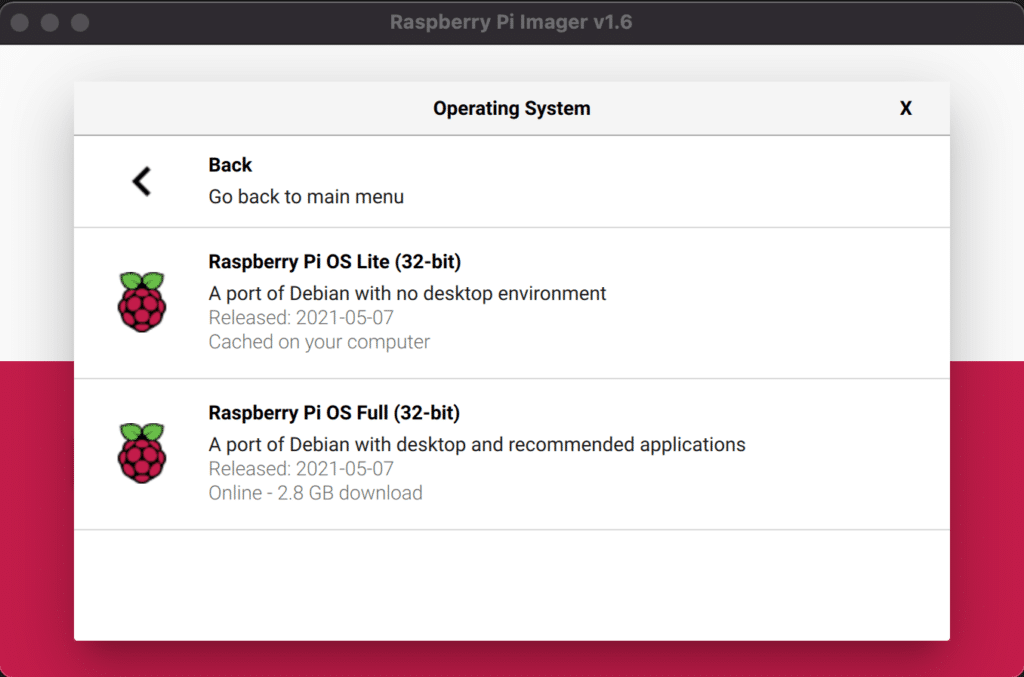
When you start with a new Raspberry Pi, you will need to "burn" an Operating System to an SD card. On the software page of the Raspberry Pi website, you can find the "Imager" tool. With this tool you can burn one of the pre-defined OS-versions, or select an image you downloaded from another site. If you select "Raspberry Pi OS (other)" > "Raspberry Pi OS Full (32-bit)", you will have a full Linux desktop environment with extra programming tools.
And what's even more important for us, Java is also pre-installed! When you open the terminal and check the version with java -versions you will get this result (depending on the build of Raspberry Pi OS):
$ java -version
openjdk version "11.0.12" 2021-07-20
OpenJDK Runtime Environment (build 11.0.12+7-post-Raspbian-2deb10u1)
OpenJDK Server VM (build 11.0.12+7-post-Raspbian-2deb10u1, mixed mode)
This means we are fully prepared to develop and run Java applications on our Raspberry Pi!
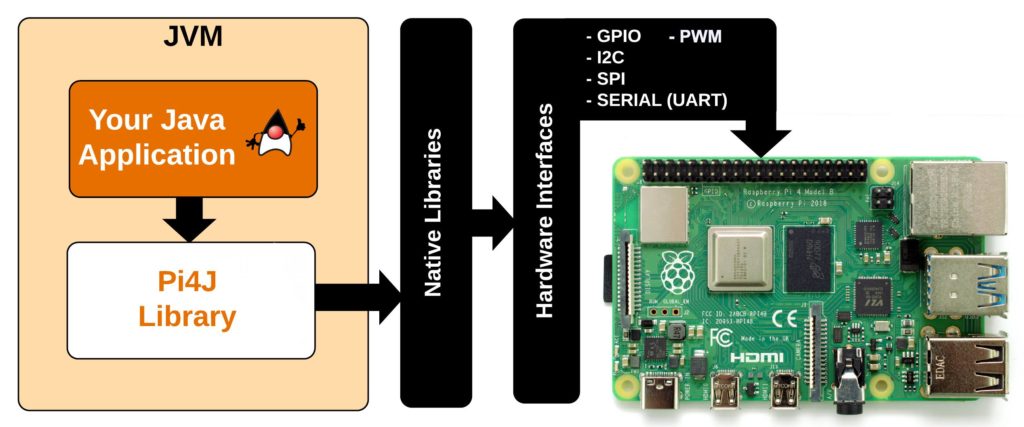
Pi4J
The Pi4J project (started in 2012) aims to unite Java programming with electronics. By using the Pi4J-dependency in a project, electronic components connected to the GPIO-pins (General Purpose Input/Output) of the Raspberry Pi can be controlled as objects in the Java-code. Pi4J uses native libraries to control the GPIOs so you - as a programmer - don’t need to be fully aware of all the “magic” which relates to hardware communication.
History
Early 2021 two new versions of Pi4J were released:
- Version 1.3, released in January 2021, added support for the newest Raspberry Pi boards (4, 400, and Compute 4)
- Version 1.4, released in March 2021, targets Java 11 and removed support for other boards and components
The full history of V1 is available on the Pi4J website.
Since 2019 work was ongoing for a completely new version 2 of Pi4J to bring modules and an improved architecture. This made the project easier to maintain, test and release. In August 2021 the first release of this new version was released, and that's also the version we will be using here.
Documentation
Together with this V2, a new documentation website was published where you can find a lot of information about electronics and how to use Java and JavaFX on the Raspberry Pi.
Java project
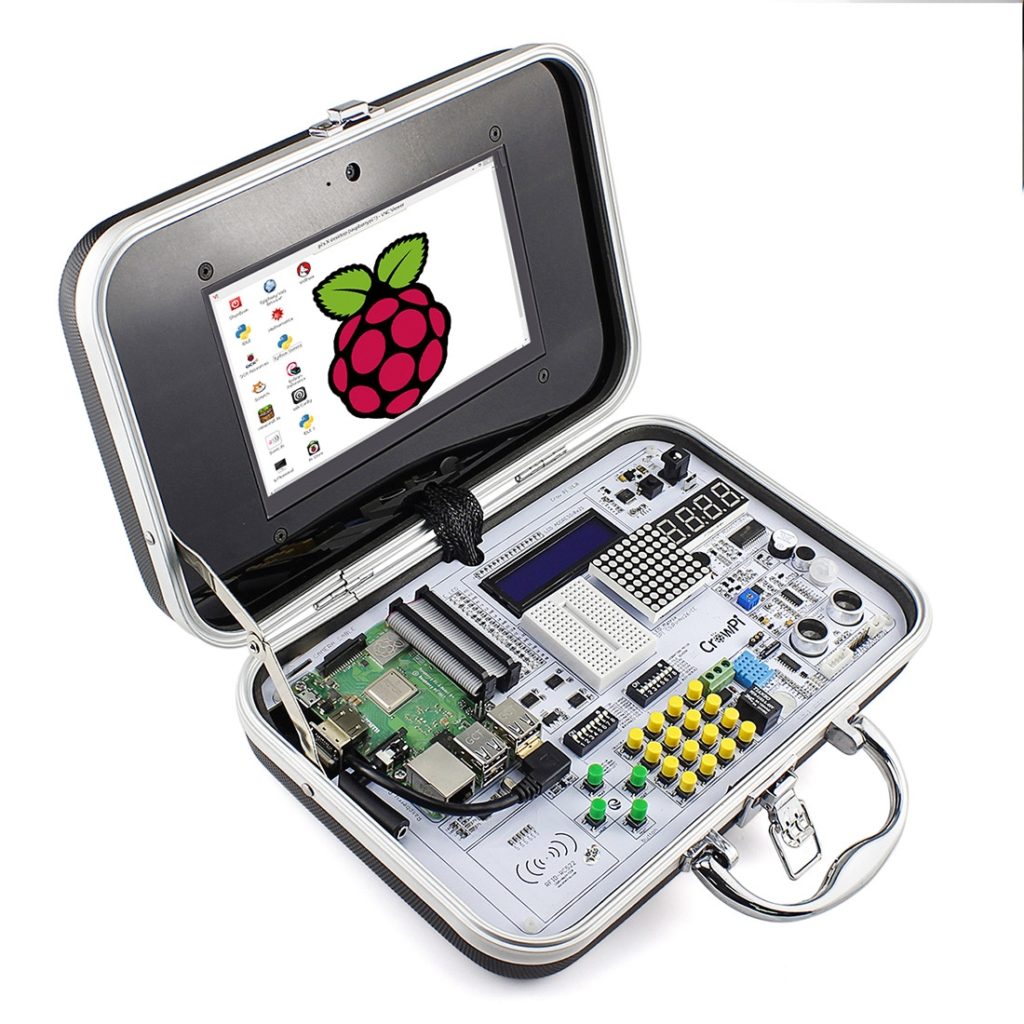
The first application we will create is a data-publisher and the full sources are available on GitHub. We will read from different sensors and send their values to HiveMQ Cloud. Because every "maker" will have his/her own ideas and wishes for a project, we will not focus on components and wiring, but use an easy starter kit that is perfect for this demo project: the CrowPi. This pre-wired kit makes it very easy to get started with electronics programming as all the components are pre-assembled and
wired. So at least that's one thing you don't need to worry about or can mess up ;-).
Based on the CrowPi project by FHNW
Students from the Swiss FHNW University created a full Java-project for the CrowPi to demonstrate how all the components in this kit can be controlled with Java. Part of their documentation has been translated and is available on the Pi4J website, the original German documentation can be found on "CrowPi Goes Java". For each component they created a separate application so it becomes very clear how you can use their code as the foundation for your own project.
The proof-of-concept-application in this article, uses some parts of the "CrowPi Goes Java"-project which are refactored to fit into a stand-alone application to read from different sensors at the same time, or listen to their change events and publish data to HiveMQ.
Maven pom.xml
The Pi4J library uses the modular approach and building a project for the Raspberry Pi generates a directory with all the required files. Because of this the pom-file can look a bit overwhelming.
The dependencies contain:
- the HiveMQ MQTT client to publish the data
- Pi4J core and the plugins required for this project
- SLF4J which is the logging framework used by Pi4J
- Jackson and Jakarta.JSON for the JSON data generation to simplify the data transfer
By using multiple plugins the following steps are taken:
- Compile the Java project
- Define the executable class
- Create the
jarin the distribution directory - Copy a
run.shscript in the distribution directory - Add the runtime dependencies in that same directory
Code
To make the code easy to understand, each functionality has been separated into its own class. HiveMqSender.java is the main class where everything is initialized and the application started.
public class HiveMqSender {

    // Logger helper provided by Pi4J
    private static Console console;
    // Sends data to HiveMQ Cloud
    private static HiveMqManager hiveMqManager;
    // Initializes the sensors and reads the values
    private static SensorManager sensorManager;

    public static void main(String[] args) {
        console = new Console();
        hiveMqManager = new HiveMqManager(console);
        sensorManager = new SensorManager(console, hiveMqManager);

        while (true) {
            try {
                Thread.sleep(500);
            } catch (InterruptedException e) {
                e.printStackTrace();
            }
        }
    }
}
Publishing to HiveMQ topics
In the file HiveMqManager.java we find all the code needed to connect to HiveMQ Cloud and publish messages.
We use an MQTT version 5 client which provides multiple improvements compared to version 3 as described on "Meet the New MQTT 5 Protocol - MQTT 5 Essentials Part 1" and the next articles in that series. And yes, you will also find out in that article, why there is no version 4. 🙂
Thanks to the builder-method we can very easily configure the client and connect. As HiveMQ Cloud requires a secure connection we need to use sslWithDefaulftConfig() and apply the authentication in the connection.
public class HiveMqManager {

    private static final String HIVEMQ_SERVER = "ID_OF_YOUR_INSTANCE.s1.eu.hivemq.cloud";
    private static final String HIVEMQ_USER = "YOUR_USERNAME";
    private static final String HIVEMQ_PASSWORD = "YOUR_PASSWORD";

    private static Console console;
    private static Mqtt5AsyncClient client;

    public HiveMqManager(Console console) {
        this.console = console;

        client = MqttClient.builder()
                .useMqttVersion5()
                .identifier("Java_" + UUID.randomUUID())
                .serverHost(HIVEMQ_SERVER)
                .serverPort(8883)
                .sslWithDefaultConfig()
                .buildAsync();

        client.connectWith()
                .simpleAuth()
                .username(HIVEMQ_USER)
                .password(HIVEMQ_PASSWORD.getBytes())
                .applySimpleAuth()
                .send()
                .whenComplete((connAck, throwable) -> {
                    if (throwable != null) {
                        console.println("Could not connect to HiveMQ: " + throwable.getMessage());
                    } else {
                        console.println("Connected to HiveMQ: " + connAck.getReasonCode());
                    }
                });
    }
}
To make it easy for our sensors to send data, we extend this class with a sendMessage method. To see if our messages published successfully, or what went wrong, we use the whenComplete method.
public void sendMessage(String topic, String message) {
    client.publishWith()
            .topic(topic)
            .payload(message.getBytes())
            .qos(MqttQos.EXACTLY_ONCE)
            .send()
            .whenComplete((mqtt5Publish, throwable) -> {
                if (throwable != null) {
                    console.println("Error while sending message: " + throwable.getMessage());
                } else {
                    console.println("Message sent to '" + topic + "': " + message);
                }
            });
}
Reading data from the sensors
All sensors are initialized in the SensorsManager.java class. Each sensor is implemented as a Component. Some of them are read with an interval with the SendMeasurements started by a TimerTask. Others send changes through listeners, for instance onNoise of the SoundSensor.
import be.webtechie.hivemqsender.hivemq.HiveMqManager;
import be.webtechie.hivemqsender.model.Sensor;
import be.webtechie.hivemqsender.pi4j.components.*;
import com.pi4j.context.Context;
import com.pi4j.util.Console;

import java.util.Timer;
import java.util.TimerTask;

public class SensorManager {

    private static final String TOPIC_MOTION = "crowpi/motion";
    private static final String TOPIC_NOISE = "crowpi/noise";
    private static final String TOPIC_TOUCH = "crowpi/touch";
    private static final String TOPIC_TILT = "crowpi/tilt";
    private static final String TOPIC_SENSORS = "crowpi/sensors";

    private static final String VALUE_TRUE = "{\"value\":true}";
    private static final String VALUE_FALSE = "{\"value\":false}";

    public SensorManager(Console console, HiveMqManager hiveMqManager) {
        Context pi4j = CrowPiPlatform.buildNewContext();

        PirMotionSensorComponent motionSensor = new PirMotionSensorComponent(console, pi4j);
        motionSensor.onMovement(() -> hiveMqManager.sendMessage(TOPIC_MOTION, VALUE_TRUE));
        motionSensor.onStillstand(() -> hiveMqManager.sendMessage(TOPIC_MOTION, VALUE_FALSE));

        SoundSensorComponent soundSensor = new SoundSensorComponent(console, pi4j);
        soundSensor.onNoise(() -> hiveMqManager.sendMessage(TOPIC_NOISE, VALUE_TRUE));
        soundSensor.onSilence(() -> hiveMqManager.sendMessage(TOPIC_NOISE, VALUE_FALSE));

        TouchSensorComponent touchSensor = new TouchSensorComponent(console, pi4j);
        touchSensor.onTouch(() -> hiveMqManager.sendMessage(TOPIC_TOUCH, VALUE_TRUE));
        touchSensor.onRelease(() -> hiveMqManager.sendMessage(TOPIC_TOUCH, VALUE_FALSE));

        TiltSensorComponent tiltSensor = new TiltSensorComponent(console, pi4j);
        tiltSensor.onTiltLeft(() -> hiveMqManager.sendMessage(TOPIC_TILT, "{\"value\":\"left\"}"));
        tiltSensor.onTiltRight(() -> hiveMqManager.sendMessage(TOPIC_TILT, "{\"value\":\"right\"}"));
        tiltSensor.onShake(() -> hiveMqManager.sendMessage(TOPIC_TILT, "{\"value\":\"shaking\"}"));

        HumiTempComponent dht11 = new HumiTempComponent(console, pi4j);
        LightSensorComponent lightSensor = new LightSensorComponent(console, pi4j);
        UltrasonicDistanceSensorComponent distanceSensor = new UltrasonicDistanceSensorComponent(console, pi4j);

        Timer timer = new Timer();
        TimerTask task = new SendMeasurements(hiveMqManager, dht11, lightSensor, distanceSensor);
        timer.schedule(task, 10_000, 5_000);
    }

    private static class SendMeasurements extends TimerTask {
        private final HiveMqManager hiveMqManager;
        private final HumiTempComponent dht11;
        private final LightSensorComponent lightSensor;
        private final UltrasonicDistanceSensorComponent distanceSensor;

        public SendMeasurements(HiveMqManager hiveMqManager,
                                HumiTempComponent dht11,
                                LightSensorComponent lightSensor,
                                UltrasonicDistanceSensorComponent distanceSensor) {
            this.hiveMqManager = hiveMqManager;
            this.dht11 = dht11;
            this.lightSensor = lightSensor;
            this.distanceSensor = distanceSensor;
        }

        @Override
        public void run() {
            var sensor = new Sensor(dht11.getTemperature(), dht11.getHumidity(),
                    lightSensor.readLight(2), distanceSensor.measure());
            hiveMqManager.sendMessage(TOPIC_SENSORS, sensor.toJson());
        }
    }
}
Configuration of Pi4J
As you can see in the previous class, the Pi4J Context is initialized with CrowPiPlatform.buildNewContext(). Pi4J uses a plugin structure so it is easy to maintain and extend with additional functionality. In most cases, we can rely on Pi4J.newAutoContext() for the initialization, but because we explicitly need the functionality of the PiGpio plugin, we use a helper class to make sure Pi4J loads the correct plugins. PiGpio is the native library (written in C) which is used under-the-hood by Pi4J to handle the GPIOs.
public static Context buildNewContext() {
    // Initialize PiGPIO
    var piGpio = PiGpio.newNativeInstance();

    // Build Pi4J context with this platform and PiGPIO providers
    return Pi4J.newContextBuilder()
            .noAutoDetect()
            .add(new CrowPiPlatform())
            .add(
                    PiGpioDigitalInputProvider.newInstance(piGpio),
                    PiGpioDigitalOutputProvider.newInstance(piGpio),
                    PiGpioPwmProvider.newInstance(piGpio),
                    PiGpioI2CProvider.newInstance(piGpio),
                    PiGpioSerialProvider.newInstance(piGpio),
                    PiGpioSpiProvider.newInstance(piGpio)
            )
            .build();
}
Sensor code
Take a look at the full sources of this project or the Pi4J CrowPi project if you are looking for a specific sensor.
In this post we take a look at one of the components: the sound sensor. This is a simple DigitalInput sensor and all its code is implemented in SoundSensorComponent.java. We only need to implement methods to handle the change of the pin between low (silent) and high (sound detected).
The pin is initialized with the following part of the code:
protected DigitalInputConfig buildDigitalInputConfig(Context pi4j, int address, long debounce) {
    return DigitalInput.newConfigBuilder(pi4j)
            .address(address)
            .id("BCM" + address)
            .name("SoundSensor")
            .pull(PullResistance.PULL_UP)
            .debounce(debounce)
            .build();
}
Pi4J also provides a builder-pattern to configure the GPIOs. For this sensor which is a DigitalInput, we need to configure:
- address: the pin to which it is connected = BCM 24 on the CrowPi
- unique ID so Pi4J can handle this during its lifetime
- name: for our own reference, e.g. in logging
- pull up or down: how state changes need to be handled
- debounce: interval between state changes to avoid a too fast "ping-pong" between state changes
CrowPi OS
You can run this project on any Raspberry Pi OS which has Java, but when you run it on a CrowPi, you can get a kickstart by using the CrowPi OS which is part of the Pi4J project (again, thanks to the FHNW University).
A few of the sensors (distance and humidity) in the CrowPi require very strict timing to get reliable data results. This is very difficult to achieve on a Linux system, both with Python or Java. Some tweaking is possible in Linux to improve the results and these are provided by default in CrowPi Os, which is based on Raspberry Pi OS, but with some extra improvements for the CrowPi (thanks again to FHNW University).
But even with these tweaks, the results are not 100% reliable. This kind of sensors are a better fit with a microcontroller like Arduino or Raspberry Pi Pico. A realtime-operating system can also be used as described on
"Raspberry Pi Real-Time OS (RTOS): Which to Choose" by Cherie Tan.
One last remark: this project uses the tilt sensor, which needs to be enabled with a dip switch on the CrowPi board:
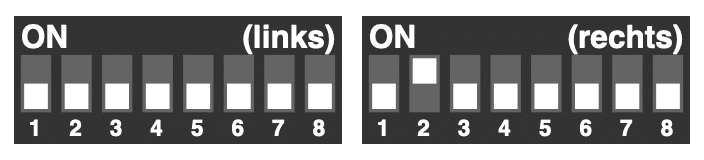
Building and running on Raspberry Pi
You can develop a Java project on your PC and copy the jar-files to the Raspberry Pi. Or copy the sources and compile on the board. Or of course develop on the Raspberry Pi itself (for example with Visual Studio Code). Each has its own pro and contra. On the Pi4J-website in the "Getting Started" section, more info is provided for each approach.
If you just want to run this example application, the easiest approach is probably to install Maven, download the sources and build and run on the Raspberry Pi itself. If you want to take this quick-start, you can clone the code and run it in a few lines:
$ sudo apt install maven
$ git clone https://github.com/FDelporte/HiveMQ-examples.git
$ cd HiveMQ-examples/java-to-hivemq
$ mvn package
$ cd target/distribution
$ sudo bash run.sh
After some startup logging, you will see the scheduled messages and events of different sensors, e.g. below the motion and noise sensors events.
[RxComputationThreadPool-1] INFO com.pi4j.util.Console - Message sent to 'crowpi/sensors': {"temperature":12.0,"humidity":154.0,"light":170.0,"distance":159.57}
[RxComputationThreadPool-2] INFO com.pi4j.util.Console - Message sent to 'crowpi/sensors': {"temperature":12.0,"humidity":154.0,"light":169.16666666666669,"distance":168.88}
[RxComputationThreadPool-3] INFO com.pi4j.util.Console - Message sent to 'crowpi/motion': {"value":true}
[RxComputationThreadPool-4] INFO com.pi4j.util.Console - Message sent to 'crowpi/sensors': {"temperature":12.0,"humidity":154.0,"light":169.16666666666669,"distance":167.44}
[RxComputationThreadPool-1] INFO com.pi4j.util.Console - Message sent to 'crowpi/motion': {"value":false}
[RxComputationThreadPool-2] INFO com.pi4j.util.Console - Message sent to 'crowpi/sensors': {"temperature":12.0,"humidity":154.0,"light":163.33333333333334,"distance":167.77}
[RxComputationThreadPool-3] INFO com.pi4j.util.Console - Message sent to 'crowpi/noise': {"value":false}
[RxComputationThreadPool-4] INFO com.pi4j.util.Console - Message sent to 'crowpi/noise': {"value":true}
WebSocket test page
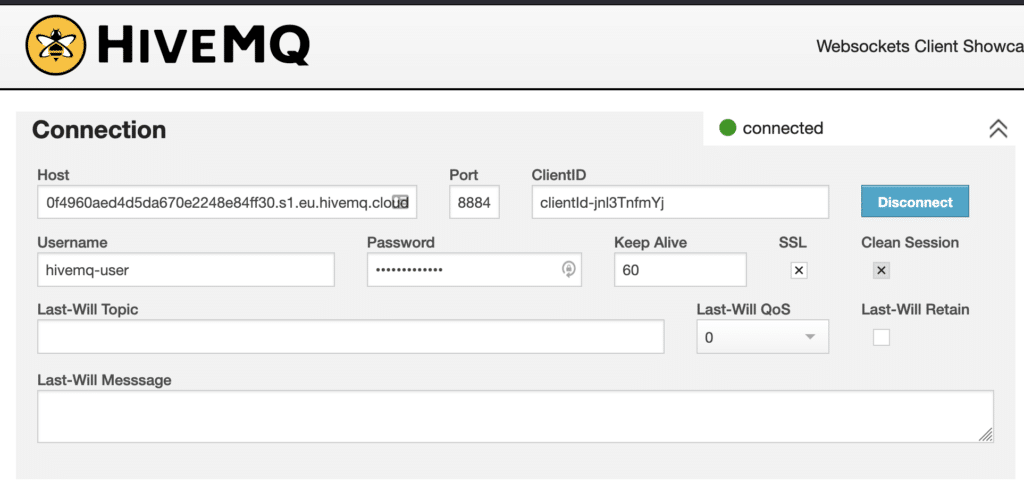
The logging of our application shows data is published to HiveMQ Cloud, but we want to be sure before we continue to create a client... Luckily there is a websocket client we can use to do this test very easily! Head over to hivemq.com/demos/websocket-client/ and fill in all the fields with your credentials. Make sure to select the SSL check box! When all is filled in correctly, and you hit the Connect button, you will get a green connected indication on top.
Now we can define the topics we want to subscribe to, e.g. "crowpi/motion", "crowpi/sensors"... As soon as messages are pushed from our Raspberry Pi, they are shown in this web test page.
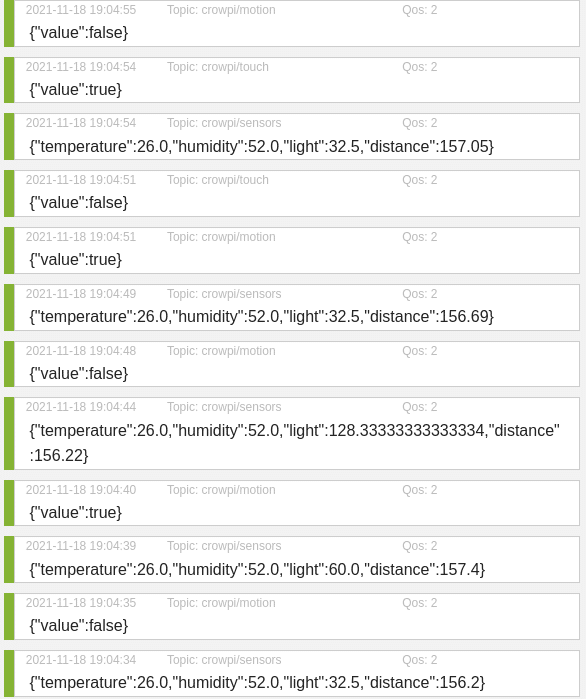
Great! We have data flowing from our Raspberry Pi to HiveMQ Cloud!!!
Conclusion
As always, when you combine Java with Maven, a project like this can be achieved with minimal code and still be easy to understand and manage. Pi4J adds the required tools to hide the complexity of dealing with GPIOs and 'converts' the electronic components to Java objects.
Thanks to the HiveMQ Cloud service, we can publish the data of up to 100 devices to an always-on, maintenance-free message broker for free! Combined with the inexpensive Raspberry Pi, a world of opportunities is open for all makers.
In the next article in this series, we are going to visualize the data of our sensors in a dashboard. And of course, again with Java (and JavaFX) on a Raspberry Pi!
This series has been written on request of HiveMQ and was originally published on the HiveMQ Blog.
- December 15, 2021
- 11 min read
Frank Delporte is a Java Champion, Java Developer, Senior Technical Writer at Azul, Blogger, Author of "Java Programming for Raspberry Pi - A Hands-On Guide to Electronics and IoT Projects", and Open-Source Contributor for Pi4J, Lottie4J, MelodyMatrix,... Frank writes and talks about Java in business production environments, but also in places people don’t always expect it, on the Raspberry Pi, driving GPIO pins, rendering JavaFX UIs, and running on RISC-V single-board computers.


Comments (0)
No comments yet. Be the first.