


Starting Docker Desktop with Spring Boot
- September 30, 2022
- 4 min read
I came across Docker Desktop for the first time about three years ago, when I was working as a Principal Architect (Strategic R & D) on the Microservices Reference Architecture for a product development organization.
At that time, when I was working on my corporate laptop - It became a tedious task to configure virtualization and settings to get it to work. Once I got it running smoothly, I realized that the memory requirements required to run it is quite high. At times, I found it tough to use my laptop for daily development with it running. It was also because I was working on microservices and had almost 6+ spring boot applications running.
Again, In the last month I used Docker Desktop and found it be smoother and running without any issues. This was on my personal laptop. Also, It is attributed to the fact that I was running only one Microservice.
I will take you through step-by-step to install docker desktop and to create a docker image, push it to docker and then to create/start it in a docker container.
Requirements
1. Knowledge of Spring Boot
2. Basics of Docker Container
3. Windows 10 (Updated)
4. Docker for Windows Desktop
5. Eclipse (Spring Boot Project)
GitHub Link to Download Code
https://github.com/sumithpuri/skp-spring-boot-docker-desktop
1. Install Windows Subsystem for Linux
We will first begin by installing the Windows Subsytem for Linux (WSL2). You have to make sure that your Windows 10 has got all the latest updates. Else, you will not be able to locate the features explained.
Press [Windows Key]+I to get to Windows Settings. Search/Click on [Apps & Features] > Click on [Optional Features] > Click on [More Windows Features] > Make Sure that the [Virtual Platform/Virtualization] is already selected. If you do not see any such option, you will have to make sure that you have enabled [Virtualization] in your BIOS.
Once you have made sure that [Virtual Platform/Virtualization] is already installed, Click on [Windows Subsystem for Linux] to install it on your system. You may optionally install the [Hyper-V/Windows Hypervisor Platform].
More details are available at the following link.
2. Install Docker for Windows Desktop
The next step is to download the Docker for Windows Desktop installable. You may download it from the official site, from this link.
Please go through the installation process as it is pretty straightforward once you have all the pre-requisites.
Also, make sure to create an account on [Docker Hub] using your e-mail. This can be used to push images to internet with public or private visibility.
3. Create a Spring Boot Application
The next step is to create a spring boot application. You may also update/edit your existing application to include the dockerfile and build via docker maven plugin.
The example Spring Boot application can be cloned/forked from this link.
4. Include Maven Docker Plugin
<properties>
   <java.version>1.8</java.version>
   <docker.image.prefix>spring-boot-docker</docker.image.prefix>
   <docker.image.exposed.port>8080</docker.image.exposed.port>
   <docker.image.dockerfile.dir>${basedir}</docker.image.dockerfile.dir>
   <docker.image.dockerize.version>v0.6.1</docker.image.dockerize.version>
   <docker.plugin.version>1.2.0</docker.plugin.version>
</properties>
Make sure that your Maven pom.xml that will be used to build the project has the above entries under <properties>.
Below is the snippet for the [dockerfile-maven-plugin] to be added to the section of your maven pom.xml
<!-- dockerfile maven plugin -->
<plugin>
   <groupId>com.spotify</groupId>
   <artifactId>dockerfile-maven-plugin</artifactId>
   <version>1.4.12</version>
   <configuration>
      <repository>${docker.image.prefix}/${project.artifactId}</repository>
      <buildArgs>
         <JAR_FILE>target/${project.build.finalName}.jar</JAR_FILE>
      </buildArgs>
   </configuration>
</plugin>
<!-- dockerfile maven plugin -->
5. Create a Dockerfile
FROM openjdk:8-jdk-alpine
VOLUME /tmp
ARG JAR_FILE
COPY ${JAR_FILE} spring-boot-docker.jar
ENTRYPOINT ["java","-jar","/spring-boot-docker.jar"]
The typical dockerfile for a spring boot application will look like the above.
It contains the image of the jdk, the volume in the container for the data that is generated by container and the other line items for the binary/jar file and the command for running this application in the container.
6. Create/Push Image to Docker
Use the following options while running maven. The plugin is the dockerfile and the goal is build.
It will create and push an image to the docker for desktop that is running on port 2376.
mvn clean install dockerfile:build
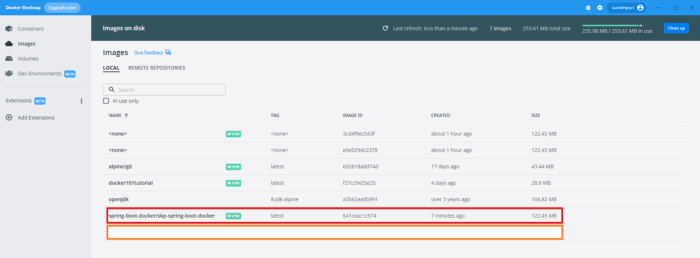
Fig. 1 Create/Push Image to Docker Desktop
7. Create/Start the Docker Container
Next - Move to the folder where you have installed [docker]. It is a good practice to include that in the [PATH] environment variable, if you are going to frequently use docker.
Then you can use the following command to create/start your docker container.
docker run -p 9090:8080 -t spring-boot-docker/skp-spring-boot-docker
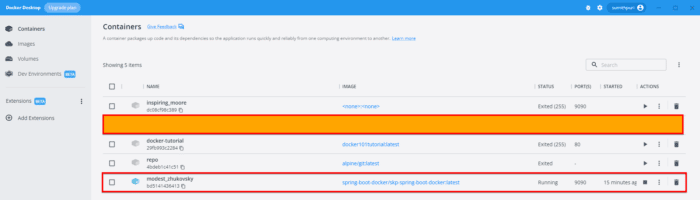
Fig. 2 Create/Start the Docker Container
8. Test the Spring Boot Application
http://localhost:9090/springbootdocker/quote

Fig. 3 Test the Spring Boot Application
For this sample application, you will see that the spring boot applications gives the following output on the browser!
The next part of this article will focus on taking this to AWS Beanstalk/EC2, so that we can deploy this container on the AWS Cloud.
- September 30, 2022
- 4 min read
Software Professional from India at Level of a [Principal Java/J2EE Architect]. [Intro] https://bit.ly/skp-tech-author


Comments (2)
Simon Martinelli
4 years agoSpring Boot can create images without a Dockerfile: [code lang="bash"]mvn spring-boot:build-image[/code]
Sumith Puri
4 years agoThanks to Simon Martinelli for pointing this out! This one mentioned here by Simon still requires a Docker Daemon to be available. Please read further about this over here: <a href="https://www.baeldung.com/spring-boot-docker-images" rel="nofollow ugc">https://www.baeldung.com/spring-boot-docker-images</a> Also, Jib by (Google Container Tools) is the one that doesn't need a Docker Daemon. [Read Here] : <a href="https://medium.com/swlh/build-a-docker-image-using-maven-and-spring-boot-58147045a400" rel="nofollow ugc">https://medium.com/swlh/build-a-docker-image-using-maven-and-spring-boot-58147045a400</a>