

Vaadin, OAuth2, and Keycloak
- January 24, 2023
- 3 min read
This article shows how to configure Vaadin and Spring Security to use OAuth2 with Keycloak.
Keycloak
First, we must start Keycloak and configure a realm. The easiest way is to start Keycloak with Docker.
Caution: This is just for development purposes. Don't use the setup in production.
docker run -d -p 8180:8080 -e KEYCLOAK_ADMIN=admin -e KEYCLOAK_ADMIN_PASSWORD=admin \
       quay.io/keycloak/keycloak:20.0.1 start-dev
Now you can log in to the admin console: http://localhost:8180/admin (user: admin, password: admin)
Next we must create a realm and a user, add roles to the user, and finally, a client.
Create a realm
- Click on the drop-down in the upper left corner and select "Create realm"
- Enter the realm name "vaadin" and save
Create realm roles
- Select "Realm roles" in the menu
- Click "Create role"
- Enter the role name "admin" and save
- Repeat steps 1 to 3 with the role "user"
Create users
- Select "Users" in the menu
- Click on "Create new user"
- Enter the user name "admin"
- Click on "Create"
- Select the tab "Credentials" and set a password
- Disable "Temporary" to prevent having to update the password on the first login
- Click "Save"
- Select the tab "Role mapping"
- Click on "Assign role"
- Choose the previously created roles "admin" and "user"
- Do the same for the user with username "user" but add only the role "user"
Create a client
- Select "Client" in the menu
- Click on "Create client"
- Enter the client id "vaadin"
- Click next and the save
- In the "Access settings" set
- "Valid redirect URIs" to http://localhost:8080/*
- "Web origins" to http://localhost:8080
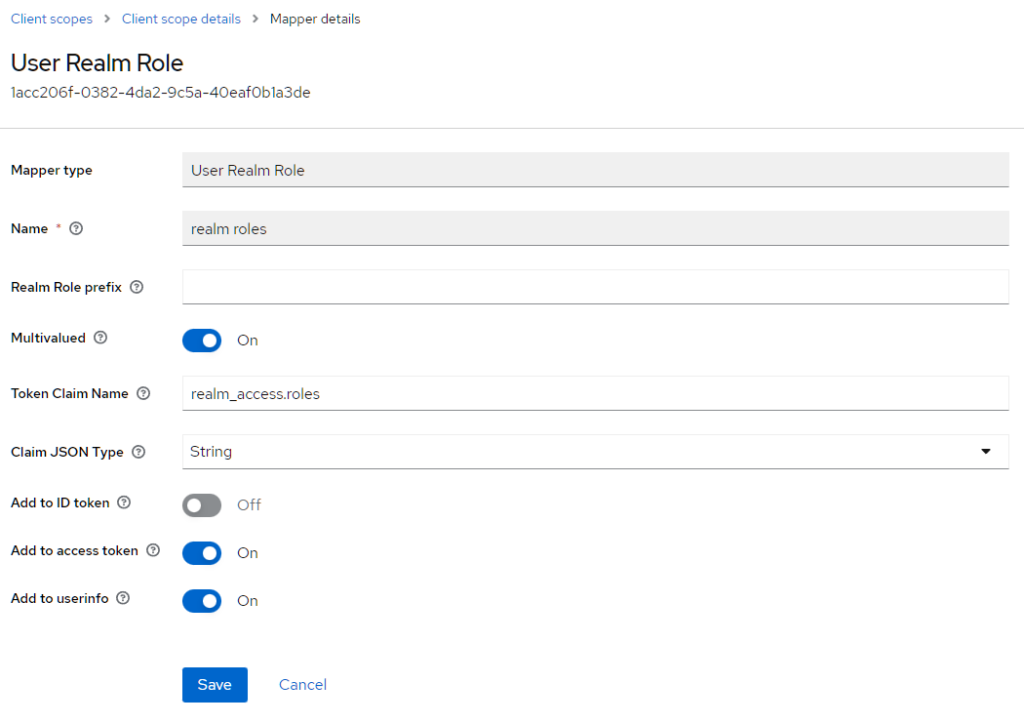
Important: Role Mapping
Now comes a crucial step. We must disable the role mapping to the ID token. When I created the example, the roles were missing in the application, but I found the solution thanks to Thomas Vitale's answer on StackOverflow.
- Select "Client scopes"
- Select the client scope "roles"
- Click on the tab "Mappers"
- Select "realm roles"
- Disable "Add to ID token"
The configuration must look like this:
Vaadin Application with Security Configuration
First, we need to extend VaadinWebSecurity to set up the Vaadin Spring security integration. There we override the configure method.
@Override
protected void configure(HttpSecurity http) throws Exception {
    http.authorizeRequests().requestMatchers(new AntPathRequestMatcher("/images/*.png")).permitAll();

    http.oauth2Login()
            .and()
            .logout()
            .addLogoutHandler(keycloakLogoutHandler)
            .logoutSuccessUrl("/");

    super.configure(http);
}
Starting from line 5, the generic OAuth2 login is configured, and a special LogoutHandler for Keycloak is configured. The LogoutHandler uses the Keycloak REST API to log out.
As we configured to map the roles to the userinfo we now need to map these roles to GrantedAuthority. The roles will be in the claim "realm_access".
@Bean
public GrantedAuthoritiesMapper userAuthoritiesMapperForKeycloak() {
    return authorities -> {
        Set<GrantedAuthority> mappedAuthorities = new HashSet<>();
        var authority = authorities.iterator().next();

        if (authority instanceof OidcUserAuthority oidcUserAuthority) {
            var userInfo = oidcUserAuthority.getUserInfo();

            if (userInfo.hasClaim("realm_access")) {
                var realmAccess = userInfo.getClaimAsMap("realm_access");
                var roles = (Collection<String>) realmAccess.get("roles");
                mappedAuthorities.addAll(roles.stream()
                        .map(role -> new SimpleGrantedAuthority("ROLE_" + role.toUpperCase()))
                        .toList());
            }
        }
        return mappedAuthorities;
    };
}
Finally, we must add the OAuth2 configuration in the application.properties file:
spring.security.oauth2.client.registration.keycloak.client-id=vaadin
spring.security.oauth2.client.registration.keycloak.authorization-grant-type=authorization_code
spring.security.oauth2.client.registration.keycloak.scope=openid
spring.security.oauth2.client.provider.keycloak.issuer-uri=http://localhost:8180/realms/vaadin
spring.security.oauth2.client.provider.keycloak.user-name-attribute=preferred_username
Now you can start the application and open http://localhost:8080.
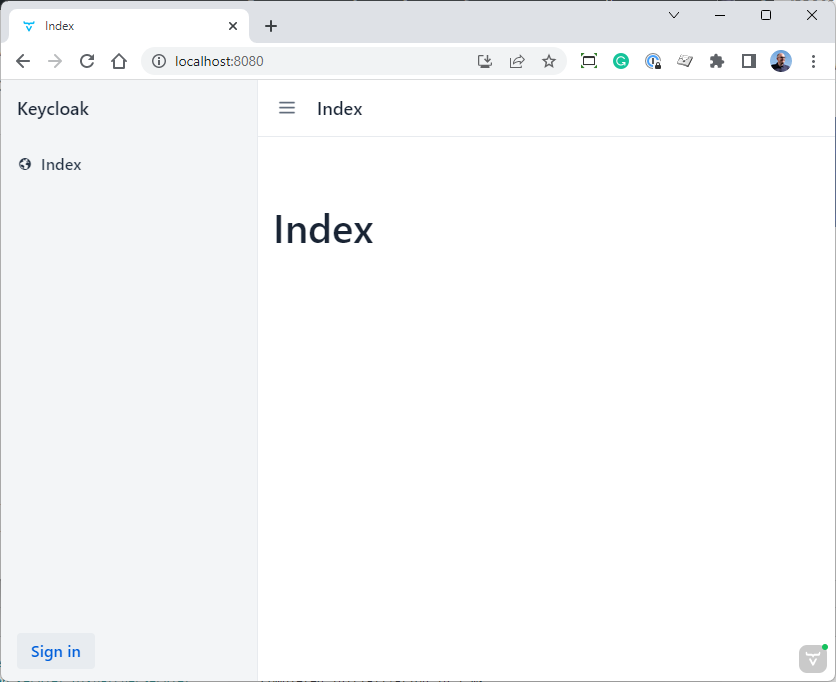
As you can see in the menu on the left, there is only one entry, "Index".
Click on the "Sign in" button in the lower left corner. This will direct you to the Keycloak login screen.
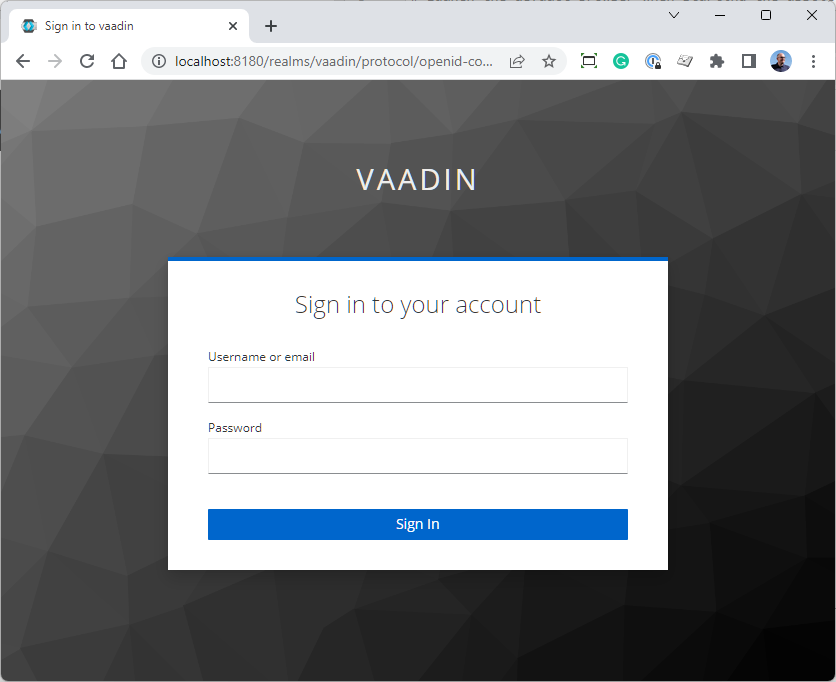
Sign in with admin/admin, and you'll be redirected to the app:

Now you have access to all views.
Conclusion
Setting up Vaadin, Spring Security, and Keycloak is straight forwarded. The only tricky part was the role mapping to get the realm roles as GranteAuthority.
- January 24, 2023
- 3 min read
Simon Martinelli is a Java Champion, Vaadin Champion, and Oracle ACE Pro, with over three decades of experience as a software architect, developer, consultant, and trainer. As the owner of Martinelli LLC, he specializes in optimizing full-stack development with Java and has a deep focus on modern architectures and distributed systems. He frequently shares his expertise by speaking at international conferences, writing articles, and maintaining his blog: https://martinelli.ch. His passion for teaching is reflected in his work as a lecturer at two universities of applied science in Switzerland.


Comments (0)
No comments yet. Be the first.