


DPoP: What It Is, How It Works, and Why Bearer Tokens Aren’t Enough
- March 09, 2026
- 8 min read
DPoP is one of the most exciting developments in the IAM (Identity and Access Management) space in recent years. Yet many backend developers either have not heard of it or are unsure what it actually changes. In this article, I will break down what DPoP is, what problem it solves, and walk through a working implementation with Keycloak and Quarkus.
What is DPoP?
DPoP (Demonstration of Proof-of-Possession) is an OAuth 2.0 security mechanism defined in RFC 9449. Its core purpose is simple: cryptographically bind an access token to the client that requested it. This way, even if a token is intercepted, it cannot be used by another client.
In the traditional Bearer token model, anyone who possesses the token is considered authorized. DPoP changes this model; to use a token, the client must also prove possession of the corresponding private key.
The Problem: Bearer Tokens and the "Finders Keepers" Risk
Bearer tokens are tokens carried in the HTTP Authorization header and accepted by the server without any additional verification of the presenter. RFC 6750 explicitly states that possession of the token is the sole authorization criterion. This means any party that obtains the token can act as if it were the legitimate client.
This is not a theoretical risk. Real-world breaches have shown, time and again, that stolen Bearer tokens translate directly into unauthorized access:
- Codecov Supply Chain Attack (2021): Attackers who infiltrated Codecov's CI/CD process harvested tokens stored in customers' environment variables. These tokens potentially granted access to private repositories of hundreds of organizations, including HashiCorp, which confirmed it was affected.
- GitHub OAuth Token Leak (2022): OAuth tokens belonging to Heroku and Travis CI were stolen, allowing attackers to list private repositories and access repository metadata across dozens of GitHub organizations, including npm.
- Microsoft SAS Token Incident (2023): Microsoft's AI research team accidentally shared an overly permissive SAS token in a GitHub repository. This token made it possible to access 38 TB of internal data.
The common thread across these incidents is that a token was obtained and seamlessly used in a different context by a different actor. What makes this possible is the Bearer token model's core assumption: whoever presents the token = the authorized actor. The model checks who holds the token, not who the token belongs to.
How Does DPoP Work?
DPoP requires the client to send a DPoP Proof JWT with every request. This proof is signed with the client's private key and contains the following claims:
- htm and htu (HTTP method and URL): Restricts the proof to a specific endpoint, preventing a proof generated for one resource from being used against another.
- jti (JWT ID): Each proof carries a unique ID. The server records used jti values and rejects any proof that attempts to reuse one.
- iat (Issued At): Indicates when the proof was generated, allowing the server to enforce a validity window and reject stale proofs.
- ath (Access Token Hash): Specifies which access token the proof is associated with.
The flow works as follows:
1. Client generates an asymmetric key pair.
2. During the token request, the client sends a DPoP proof JWT whose header contains the public key (JWK).
3. The authorization server issues a DPoP-bound access token containing the JWK thumbprint (cnf.jkt).
4. When calling a protected resource, the client sends:
   - Authorization: DPoP <access_token>
   - DPoP: <signed proof JWT>
5. The resource server:
   - Verifies the proof signature
   - Checks that the proof's public key matches the token's cnf.jkt
   - Validates htm, htu, iat, jti
   - Verifies the ath claim binding the proof to the access token
With this model, stealing the token alone is not enough. The attacker cannot generate valid proofs without the private key, limiting any potential misuse to an already captured, unused proof within its narrow validity window. Compare this to the Bearer model, where a stolen token grants unrestricted access until it expires. DPoP does not eliminate token theft, but it makes stolen tokens fundamentally harder to exploit.
Configuring DPoP in Keycloak
For this article, I use Keycloak (v26.5.5) as the identity provider. It is open-source, widely adopted, and provides built-in DPoP support with a straightforward configuration.
DPoP was introduced as a preview feature in Keycloak 23.0.0 and became officially supported in version 26.4, working out of the box without any additional client configuration. If a client sends a DPoP proof during the token request, Keycloak validates it and includes the key thumbprint in the issued token. No extra setup is needed for this default behavior.
However, if you want to enforce DPoP for a specific client, meaning Bearer tokens will no longer be accepted for that client's resources, follow these steps:
Step 1: In the Keycloak Admin Console, navigate to the relevant realm and select the client from the Clients menu.
Step 2: In the Settings tab, locate the Capability config section.
Step 3: Enable the Require DPoP bound tokens switch.
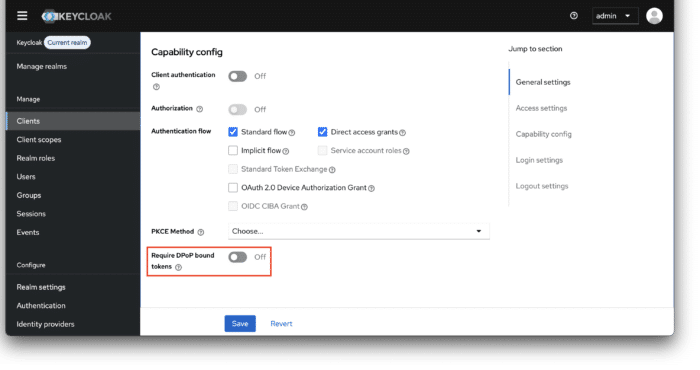
With this option enabled, the client must include a DPoP proof with every token request. Requests without valid proof will be rejected, and Bearer tokens will not be accepted to access this client's resources.
DPoP in Action with Quarkus
To see DPoP in practice, I built a Quarkus application with protected REST endpoints and tested them using a k6 script. The full source code is available on GitHub.
Project Setup
The application uses Quarkus 3.32.2 with the following key extension: OpenId Connect. Quarkus provides extensions for OpenID Connect and OAuth 2.0 access token management, focusing on acquiring, refreshing, and propagating tokens.
<dependency>
    <groupId>io.quarkus</groupId>
    <artifactId>quarkus-oidc</artifactId>
</dependency>
The quarkus.oidc.auth-server-url property specifies the base URL of the OpenID Connect (OIDC) server, which points to the Keycloak instance in this case:
quarkus.http.port=8180
quarkus.oidc.auth-server-url=http://localhost:8080/realms/master
quarkus.oidc.client-id=dpop-demo
quarkus.oidc.token.authorization-scheme=dpop
The key line here is quarkus.oidc.token.authorization-scheme=dpop. This property tells Quarkus OIDC extension to expect the Authorization: DPoP scheme and to perform the full DPoP proof verification process as defined by RFC 9449. This includes validating the proof's signature, htm, htu, ath, and the cnf thumbprint binding between the token and the proof's public key.
Protected Endpoints
The application exposes three endpoints under the /api path, all requiring authentication. Each endpoint returns the caller's name and the token type (Bearer or DPoP) by checking the presence of the cnf claim in the JWT:
@Path("/api")
@Authenticated
public class ProtectedResource {

    private final JsonWebToken jwt;

    public ProtectedResource(JsonWebToken jwt) {
        this.jwt = jwt;
    }

    @GET
    @Path("/user-info")
    @Produces(MediaType.TEXT_PLAIN)
    public String getUserInfo() {
        return buildResponse();
    }

    @POST
    @Path("/user-info")
    @Produces(MediaType.TEXT_PLAIN)
    public String postUserInfo() {
        return buildResponse();
    }

    @POST
    @Path("/list-users")
    @Produces(MediaType.TEXT_PLAIN)
    public String listUsers() {
        return buildResponse();
    }

    private String buildResponse() {
        return "Hello, %s! Token type: %s".formatted(
                jwt.getName(),
                jwt.containsClaim("cnf") ? "DPoP" : "Bearer"
        );
    }
}
Having both GET and POST on /user-info plus a separate /list-users endpoint is intentional. These allow us to demonstrate how DPoP proof claims (htm and htu) restrict token usage to a specific HTTP method and URL.
Replay Protection with a jti Filter
As mentioned above, Quarkus OIDC extension handles the core DPoP verification. However, jti replay protection is not part of that process, since tracking used values requires server-side state, which falls outside the scope of a stateless token validation layer.
I added a minimal @ServerRequestFilter that records each proof's jti and rejects any reuse:
@Singleton
public class DpopJtiFilter {

    private final Set<String> usedJtis = ConcurrentHashMap.newKeySet();

    @ServerRequestFilter
    public Optional<Response> checkJti(ContainerRequestContext ctx) {
        String dpopHeader = ctx.getHeaderString("DPoP");
        if (dpopHeader == null || dpopHeader.isBlank()) {
            return Optional.empty();
        }

        String[] parts = dpopHeader.split("\\.");
        if (parts.length != 3) {
            return Optional.empty();
        }

        try {
            String payloadJson = new String(
                    Base64.getUrlDecoder().decode(parts[1]));
            String jti = extractJti(payloadJson);
            if (jti != null && !usedJtis.add(jti)) {
                return Optional.of(Response.status(Response.Status.UNAUTHORIZED)
                        .type(MediaType.TEXT_PLAIN)
                        .entity("DPoP proof replay detected: jti '%s' has already been used"
                                .formatted(jti))
                        .build());
            }
        } catch (Exception e) {
            // Let Quarkus OIDC handle malformed proofs
        }

        return Optional.empty();
    }

    // ...
}
In this example, I use an in-memory ConcurrentHashMap to keep the demo simple. In a production environment, you would use a distributed store such as Redis or Infinispan to track used jti values across multiple application instances and to apply TTL-based eviction aligned with the proof's validity window.
It is worth noting that Keycloak already performs jti replay protection at the authorization server level. Internally, its DPoPReplayCheck uses the SingleUseObjectProvider, which is backed by Infinispan's replicated cache. When a DPoP proof arrives at the token endpoint, Keycloak hashes the jti combined with the request URI using SHA-1 and stores it with a TTL derived from the proof's iat claim. If the same proof is submitted again, the putIfAbsent call fails and the request is rejected.
However, this protection only covers requests made to Keycloak itself. Once a DPoP-bound token is issued, the resource server is responsible for its own jti tracking. A stolen proof could be replayed against the Quarkus application, and Keycloak would have no visibility into that. This is why I added the jti filter at the resource server level, creating a two-layer defense: Keycloak guards the token endpoint, and the filter guards the application endpoints.
Testing with k6
The repository includes a k6 test script (k6/dpop-test.js) that exercises the full DPoP flow. Run it with:
k6 run k6/dpop-test.js
The script performs seven HTTP calls in sequence. The first request obtains a DPoP-bound token from Keycloak, the next three are happy-path requests (one per endpoint), and the final three test failure scenarios. Let's take a closer look at what happens behind the scenes at both the Keycloak and Quarkus layers:
1. Token Request (Keycloak)
Before any resource access, the script requests a DPoP-bound access token:
- The script generates an EC key pair (P-256) using the WebCrypto API.
- It creates a DPoP proof JWT targeting Keycloak's token endpoint (
htm: POST,htu: .../protocol/openid-connect/token), signed with the private key. The public key is embedded in the proof'sjwkheader. - It sends a
POSTto the token endpoint with theDPoPheader and user credentials (grant_type=password). - Keycloak validates the DPoP proof (signature, structure, claims), then issues an access token containing a
cnf(confirmation) claim with the SHA-256 thumbprint of the client's public key. This binds the token to that specific key pair. Notice thetyp: DPoPand thecnf.jktfield in the issued token:
{
  "typ": "DPoP",
  "azp": "dpop-demo",
  "sub": "830783f9-ab1b-4c41-9c23-fa6a335de1bc",
  "cnf": {
    "jkt": "8iU6dz7Uclsxek7kgyreJc8sc2LjZIbFqtUUFpWKZIc"
  },
  "scope": "email profile",
  "preferred_username": "hakdogan"
}
2. GET /user-info (Happy Path)
- The script creates a fresh DPoP proof for
GET /api/user-infowith a newjti, currentiat, and anathcomputed from the access token's SHA-256 hash. The proof payload looks like this:
{
  "jti": "6f0bf628-309d-489b-9243-38ed169e1d8c",
  "htm": "GET",
  "htu": "http://localhost:8180/api/user-info",
  "iat": 1772897361,
  "ath": "3yFPVhSab16gaSgMAFtZCgm7GXpBMx5t3ZYCeuWqT0w"
}
- It sends
GET /api/user-infowithAuthorization: DPoPandDPoP:. - Quarkus jti filter checks the proof's
jtiagainst the used-jti store. This is a newjti, so the request passes through. - Quarkus OIDC extension validates the DPoP proof as required by RFC 9449 (Section 7.1), which assigns this responsibility to the resource server. It verifies the proof's signature, confirms
htmmatchesGET,htumatches the request URL,athmatches the token hash, and thecnfthumbprint in the token matches the proof's public key. All checks pass. - The endpoint reads the
cnfclaim from the token, identifies it as a DPoP token, and responds:
HTTP 200: Hello, hakdogan! Token type: DPoP
The script repeats this same flow for POST /user-info and POST /list-users, each with a fresh proof matching the target method and URL. Both return 200 with the same response.
3. GET /user-info (Replay Attack)
- The script sends the exact same proof that was used in the happy path request.
- Quarkus jti filter checks the
jtiand finds it already in the used-jti store. The request is rejected before reaching OIDC validation:HTTP 401: DPoP proof replay detected: jti '...' has already been used
Note: The error message above includes the
jtivalue for demonstration purposes, making it easy to observe what the filter caught. In a production environment, avoid exposing internal claim values in error responses. A generic401 Unauthorizedwith no body, or a minimal message like"invalid DPoP proof", is sufficient and prevents information leakage.
4. POST /user-info (Method Mismatch - htm)
- The script creates a new proof with
htm: GETtargeting/api/user-info, but sends it as aPOSTrequest. - Quarkus jti filter passes the request (new
jti). - Quarkus OIDC extension compares the proof's
htm(GET) with the actual request method (POST). They do not match. The request is rejected:
HTTP 401
5. POST /list-users (URL Mismatch - htu)
- The script creates a new proof targeting
POST /api/user-info. - It sends the request to
POST /api/list-usersinstead. - Quarkus jti filter passes the request (new
jti). - Quarkus OIDC extension compares the proof's
htuwith the actual request URL. They do not match. The request is rejected:
HTTP 401
All seven checks pass:
✓ Token request succeeds
✓ GET /user-info returns 200
✓ POST /user-info returns 200
✓ POST /list-users returns 200
✓ Replay attack returns 401
✓ htm mismatch returns 401
✓ htu mismatch returns 401
In contrast, if the same requests were sent as plain Bearer tokens without DPoP proofs, all of them would succeed with 200. The replay, method mismatch, and URL mismatch scenarios would go undetected because there is no proof to validate. This is exactly the gap that DPoP closes.
Conclusion
Bearer tokens follow a simple rule: whoever holds the token is authorized. DPoP changes this by binding each token to a cryptographic key pair and requiring a fresh, signed proof on every request. A stolen token alone is no longer sufficient.
The IAM ecosystem is moving in this direction. Identity providers like Keycloak and frameworks like Quarkus already offer built-in DPoP support, making adoption straightforward. Bearer tokens are not going away, but for access to sensitive resources, adopting DPoP is becoming less of a choice and more of a necessity.
- March 09, 2026
- 8 min read
Since 2005, Huseyin Akdogan has been developing enterprise applications with Java, holding training, writing articles, and consultancy services about Java runtimes such as Spring, Quarkus, and some big data technologies. Also, he is one of the leaders of JUG Istanbul and has been an organizer or a speaker at many meetings. Along with these, he is the author of Elasticsearch Indexing book.


Comments (0)
No comments yet. Be the first.