

Electronics & Quarkus Qute on Raspberry Pi
- September 30, 2020
- 4 min read
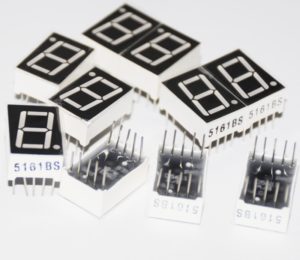
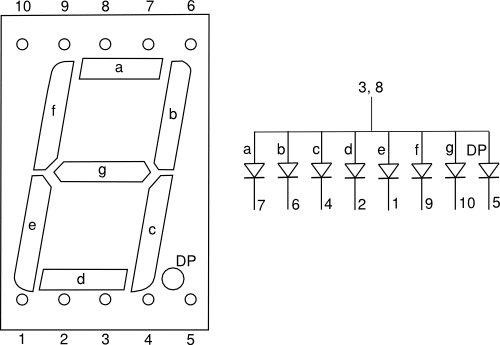
The "Hello World" version of electronics programming is a blinking LED. But, in this post, we will go a few steps further and control 8 LEDs inside a number display.
We will do this by taking a closer look at one of the projects in the list "Spectacular Java Projects on the Raspberry Pi".
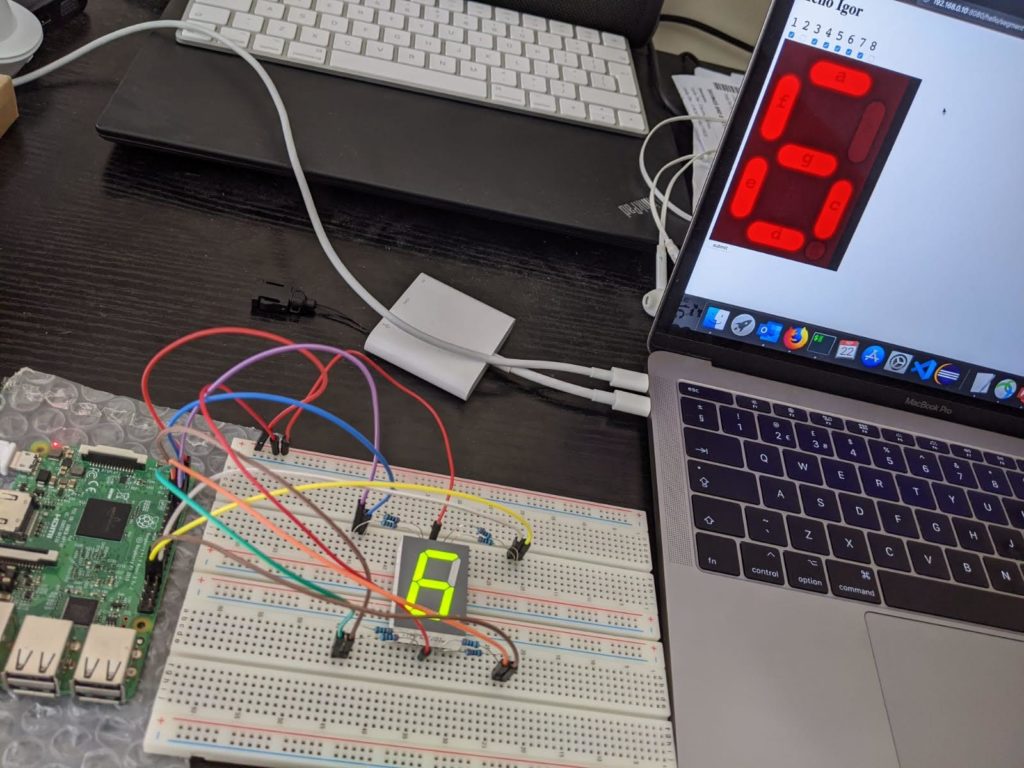
Igor De Souza, Dublin based Principal Big Data Consultant at Oracle, set up an interesting experiment in which he combines a LED number display with the Raspberry Pi and Quarkus.
Building blocks
Quarkus
Quarkus is a full-stack, Kubernetes-native Java framework made for Java virtual machines (JVMs) and native compilation. It optimizes Java specifically for containers and enables it to become an effective platform for serverless, cloud, and Kubernetes environments.
Qute
Qute is a templating engine designed specifically to meet the Quarkus needs. It is based on RESTEasy/JAX-RS but returns HTML pages instead of JSON. The individual pages are created by processing template files.
If you’ve worked with other templating engines before, this will look very familiar to you.
Note: Note: Qute is still an experimental feature.
Pi4J
Pi4J provides a friendly object-oriented I/O API and implementation libraries for Java to access the full I/O capabilities of the Raspberry Pi platform. This project abstracts the low-level native integration and interrupt-monitoring to enable Java programmers to focus on implementing their application business logic.
The application
Using Quarkus, Qute and Pi4J an example application is built to show a 7-segments diplay on the PC which controls such an electronic component connected to a Raspberry Pi.
The full code is shared on GitHub but the main class is pretty small and easy to understand:
package com.igor;
import io.quarkus.qute.Template;
import io.quarkus.qute.TemplateInstance;
import javax.inject.Inject;
import javax.transaction.Transactional;
import javax.ws.rs.Consumes;
import javax.ws.rs.GET;
import javax.ws.rs.POST;
import javax.ws.rs.Path;
import javax.ws.rs.Produces;
import javax.ws.rs.core.MediaType;
import org.jboss.resteasy.annotations.providers.multipart.MultipartForm;
import com.pi4j.io.gpio.GpioController;
import com.pi4j.io.gpio.GpioFactory;
import com.pi4j.io.gpio.GpioPinDigitalOutput;
import com.pi4j.io.gpio.PinState;
import com.pi4j.io.gpio.RaspiPin;
@Path("hello")
public class HelloResource {
@Inject
Template hello;
final GpioController gpio = GpioFactory.getInstance();
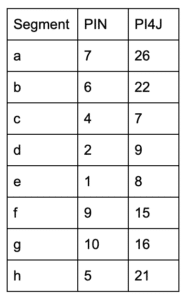
GpioPinDigitalOutput pin01 = gpio.provisionDigitalOutputPin(RaspiPin.GPIO_26, "1", PinState.HIGH);
GpioPinDigitalOutput pin02 = gpio.provisionDigitalOutputPin(RaspiPin.GPIO_22, "2", PinState.HIGH);
// ... repeat for all pins
@GET
@Produces(MediaType.TEXT_HTML)
public TemplateInstance get() {
return hello.data("field1", "Test").data("field2", "Igor");
}
@POST
@Consumes(MediaType.MULTIPART_FORM_DATA)
@Transactional
@Path("/segment")
public TemplateInstance segmentDisplay(@MultipartForm MessageForm messageForm) {
if(messageForm.segment1 == null && messageForm.segment2 == null &&
messageForm.segment3 == null && messageForm.segment4 == null &&
messageForm.segment5 == null && messageForm.segment6 == null &&
messageForm.segment7 == null && messageForm.segment8 == null) {
pin01.setShutdownOptions(true, PinState.HIGH);
pin02.setShutdownOptions(true, PinState.HIGH);
// ... repeat for all pins
pin01.high();
pin02.high();
// ... repeat for all pins
}
display(messageForm);
return hello.data("field1", "Test").data("field2", "Igor")
.data("segment1", messageForm.segment1)
// ... repeat for all pins
.data("segment8", messageForm.segment8);
}
public void display(MessageForm messageForm) {
if (messageForm.segment1 != null && messageForm.segment1.equals("on")) {
pin01.low();
} else {
pin01.high();
}
if (messageForm.segment2 != null && messageForm.segment2.equals("on")) {
pin02.low();
} else {
pin02.high();
}
// ... repeat for all pins
}
}
Alternative approach with a Shift Register
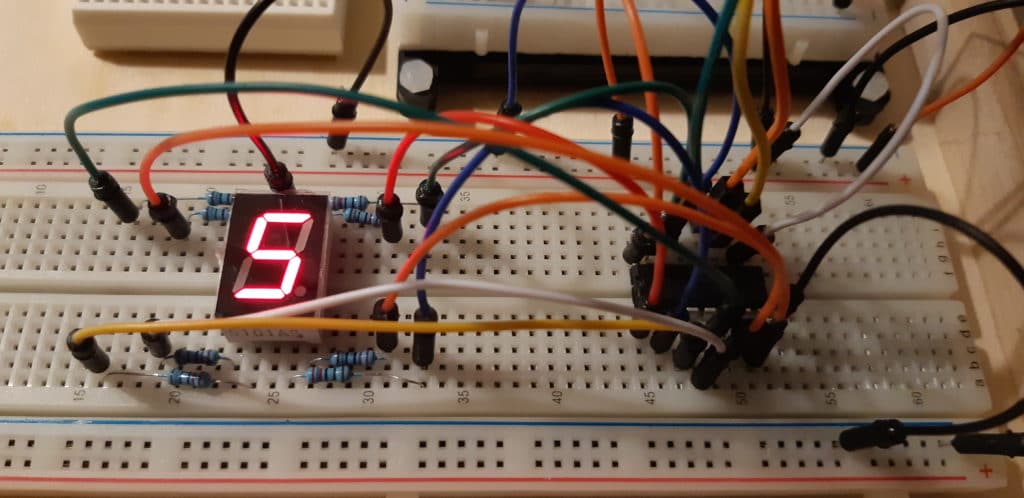
The setup used in the example of Igor has the main advantage that you only need a Raspberry Pi and a LED number display. But it uses a lot of the GPIO pins of the Raspberry Pi which could be a problem in a project where you need other input and output components.
To solve this problem, a shift register SN74HC595 IC can be used which only requires 3 GPIOs to control all 8 LED-segments. On my blog I have this way of working further described in the post "Controlling a LED number display with JavaFX and Python on Raspberry Pi". As you can see in the image below, the number of connections to the Raspberry Pi is reduced, but the wiring on the breadboard becomes a bit more complicated...

Conclusion
Once again, the Raspberry Pi proves to be a real workhorse which can run Java and Quarkus to bring business-power applications to inexpensive but powerfull hardware.
Note: Used with permission and thanks — originally written and published on the blog of Igor De Souza and Frank Delporte.
- September 30, 2020
- 4 min read
Frank Delporte is a Java Champion, Java Developer, Senior Technical Writer at Azul, Blogger, Author of "Java Programming for Raspberry Pi - A Hands-On Guide to Electronics and IoT Projects", and Open-Source Contributor for Pi4J, Lottie4J, MelodyMatrix,... Frank writes and talks about Java in business production environments, but also in places people don’t always expect it, on the Raspberry Pi, driving GPIO pins, rendering JavaFX UIs, and running on RISC-V single-board computers.
Igor currently works as a Software Engineer in a Data Engineer team. With over 20 years of experience with Java and over 10 years in the Big Data world, Igor had the opportunity to work with Hadoop and its ecosystem right when Hadoop was created. In his spare time, he enjoys playing with Raspberry Pi and is an active member of the Maker community, highly engaged with STEM and CoderDojo. Igor Organizes a Facebook group for Brazilian IT in Ireland with over 12k participants. He is currently working on a pet project where he uses a Led Strip to teach basic concepts of data structure e data streaming.


Comments (0)
No comments yet. Be the first.