

Instrumenting Java Code to Find and Handle Unused Classes
- April 08, 2023
- 12 min read
In this article, let's take a look at writing a Java agent and instrumentation code to find unused classes and dependencies in your project.
Knowing which classes and dependencies are not used in your application can save you from considering the bugs and problems in these dependencies and classes if you remove them.
There a multiple tools out there, for gradle and maven (thanks, Marit), that do this statically or dynamically (like the one described in the paper Coverage-Based Debloating for Java Bytecode, thanks, Wolfram).
Statistical tools are based on static program analysis and are usually safer, as they only remove classes that can statically be proven never to be used. But these tools generally struggle with reflection and code generation which frameworks like Spring use heavily.
Dynamic tools typically instrument the bytecode of the Java application and run it to see which parts of the application are used in practice. These tools can deal with recursion and are more precise, removing larger portions of the code.
The currently available tools maybe suffice for your use case, but they are complex software, hard to reason about, and hard to understand. Therefore, this post aims to write a prototypical dynamic tool to detect unused classes.
This is like the profiler of my Writing a Profiler in 240 Lines of Pure Java article, done mainly for educational purposes, albeit the tool might be helpful in certain real-world use cases.
As always, you can find the final MIT-licensed code on GitHub in my dead-code-agent repository.
Main Idea
I make one simplification compared to many of the more academic tools: I only deal with code with class-level granularity.
This makes it far more straightforward, as it suffices to automatically instrument the static initializers of every class (and interface), turning
class A {
    private int field;
    public void method() {...}
}
into
class A {
    static {
       Store.getInstance().processClassUsage("A");
    }
    private int field;
    public void method() {...}
}
to record the first usage of the class A in a global store. Another advantage is that there is minimal overhead when recording the class usage information, as only the first usage of every class has the recording overhead.
Static initializers are called whenever a class is initialized, which happens in the following circumstances:
A class or interface T will be initialized immediately before the first occurrence of any one of the following:
- T is a class and an instance of T is created.
- A
staticmethod declared by T is invoked.- A
staticfield declared by T is assigned.- A
staticfield declared by T is used and the field is not a constant variable (§4.12.4).When a class is initialized, its superclasses are initialized (if they have not been previously initialized), as well as any superinterfaces (§8.1.5) that declare any default methods (§9.4.3) (if they have not been previously initialized). Initialization of an interface does not, of itself, cause initialization of any of its superinterfaces.
When Initialization Occurs – Java Language Specification
Adding code at the beginning of every class's static initializers lets us obtain knowledge on all used classes and interfaces. Interfaces don't have static initializers in Java source code, but the bytecode supports this nonetheless, and we're only working with bytecode here.
We can then use this information to either remove all classes that are not used from the application's JAR or log an error message whenever such a class is instantiated:
class UnusedClass {
    static {
       System.err.println("Class UnusedClass is used " +
                          "which is not allowed");
    }
    private int field;
    public void method() {...}
}
This has the advantage that we still log when our assumption on class usage is broken, but the program doesn't crash, making it more suitable in production settings.
Structure
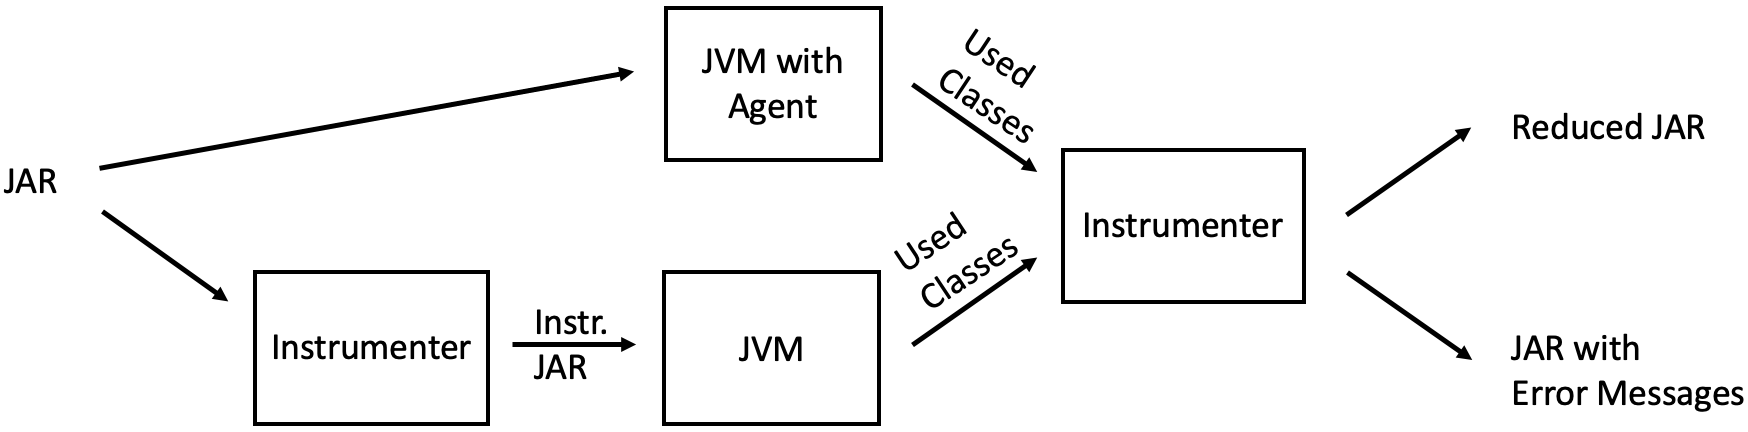
The tool consists of two main parts:
- Instrumenter: Instruments the JAR and removes classes, used both for modifying the JAR to obtain the used classes and to remove unused classes or add error messages (as shown above)
- Instrumenting Agent: This agent is similar to the Instrumenter but is implemented as an instrumenting Java agent. Both instrumentation methods have advantages and disadvantages, which I will explain later.
This leads us to the following workflow:
Usage
Before I dive into the actual code, I'll present you with how to use the tool. Skip this section if you're only here to see how to implement an instrumenting agent 🙂
You first have to download and build the tool:
git clone https://github.com/parttimenerd/dead-code-agent
cd dead-code-agent
mvn package

# and as demo application the spring petclinic
git clone https://github.com/spring-projects/spring-petclinic
cd spring-petclinic
mvn package
# make the following examples more concise
cp spring-petclinic/target/spring-petclinic-3.0.0-SNAPSHOT.jar \
   petclinic.jar
The tool is written in Java 17 (you should be using this version anyways), which is the only system requirement.
Using the Instrumenting Agent to Obtain the Used Classes
The instrumenting agent can be started at JVM startup:
java -javaagent:./target/dead-code.jar=output=classes.txt \
     -jar petclinic.jar
This will record all loaded and used classes in the classes.txt file, which includes lines like:
u ch.qos.logback.classic.encoder.PatternLayoutEncoder
l ch.qos.logback.classic.joran.JoranConfigurator
u ch.qos.logback.classic.jul.JULHelper
u ch.qos.logback.classic.jul.LevelChangePropagator
Telling you that the PatternLayoutEncoder class has been used and has only been loaded but not used. Loaded means, in our context, that the instrumenting agent instrumented this class.
Not all classes can be instrumented. It is impossible to, for example, add static initializers to the class that we loaded before the instrumentation agent started; this is not a problem, as we can start the agent just after all JDK classes have been loaded.
Removing JDK classes is possible with jlink, but instrumenting these classes is out-of-scope for this article, as they are far harder to instrument and most people don't consider these classes.
The instrumentation agent is not called for some Spring Boot classes for reasons unknown to me. This makes the agent approach unsuitable for Spring Boot applications and led me to the development of the main instrumenter:
Using the Instrumenter to Obtain the Used Classes
The instrumenter lets you create an instrumented JAR that records all used classes:
java -jar target/dead-code.jar classes.txt \
          instrument petclinic.jar instrumented.jar
This will throw a few errors, but remember; it's still a prototype.
You can then run the resulting JAR to obtain the list of used classes (like above). Just use the instrumented.jar like your application JAR:
java -jar instrumented.jar
The resulting classes.txt is similar to the file produced by the instrumenting agent.
The two differences are that we cannot observe only loaded but not used classes and don't miss any Spring-related classes.
Hopefully, I will find time to investigate the issue related to Spring's classloaders.
Using the Instrumenter to Log Usages of Unused Classes
The list of used classes can be used to log the usage of classes not used in the recording runs:
java -jar target/dead-code.jar classes.txt \
          instrumentUnusedClasses petclinic.jar logging.jar
This will log the usage of all classes not marked as used in classes.txt on standard error, or exit the program if you pass the --exit option to the instrumenter.
If you, for example, recorded the used classes of a run where you did not access the petclinic on localhost:8080, then executing the modified logging.jar and accessing the petclinic results in output like:
Class org.apache.tomcat.util.net.SocketBufferHandler is used which is not allowed
Class org.apache.tomcat.util.net.SocketBufferHandler$1 is used which is not allowed
Class org.apache.tomcat.util.net.NioChannel is used which is not allowed
Class org.apache.tomcat.util.net.NioChannel$1 is used which is not allowed
...
An exciting feature of the instrumenter is that the file format of the used classes file is not restricted to what the instrumented JARs produce. It also supports wild cards:
u org.apache.tomcat.*
Tells the instrumenter that all classes which have a fully-qualified name starting with org.apache.tomcat. should be considered used.
r org.apache.* used apache
This tells the instrumenter to instrument the JAR to report all usages of Apache classes, adding the (optional) message "used apache."
These two additions make the tool quite versatile.
Writing the Instrumentation Agent
We start with the instrumentation agent and later go into the details of the Instrumenter.
The agent itself consists of three major parts:
- Main class: Entry point for the agent, registers the ClassTransformer as a transformer
- ClassTransformer class: Instruments all classes as described before
- Store class: Deals with handling and storing the information on used and stored classes
A challenge here is that all instrumented classes will use the Store. We, therefore, have to put the store onto the bootstrap classpath, making it visible to all classes. There are multiple ways to do this:
- It is building a runtime JAR directly in the agent using the JarFile API, including the bytecode of the Store and its inner classes.
- Building an additional
dead-code-runtime.jarusing a second maven configuration, including this JAR as a resource in our agent JAR, and copying it into a temporary file in the agent.
Both approaches are valid, but the second approach seems more widely used, and the build system includes all required classes and warns of missing ones.
We build the runtime JAR by creating a new maven configuration that only includes the me.bechberger.runtime package where the Store resides:
<build>
  ...
  <sourceDirectory>
    ${project.basedir}/src/main/java/me/bechberger/runtime
  </sourceDirectory>
  ...
</build>
Main Class
The main class consists mainly of the premain method which deletes the used classes file, loads the runtime JAR, and registers the ClassTransformer:
public class Main {

    public static void premain(String agentArgs,
      Instrumentation inst) {
        AgentOptions options = new AgentOptions(agentArgs);
        // clear the file
        options.getOutput().ifPresent(out -> {
            try {
                Files.deleteIfExists(out);
                Files.createFile(out);
            } catch (IOException e) {
                throw new RuntimeException(e);
            }
        });
        try {
            inst.appendToBootstrapClassLoaderSearch(
                new JarFile(getExtractedJARPath().toFile()));
        } catch (IOException e) {
            throw new RuntimeException(e);
        }
        inst.addTransformer(new ClassTransformer(options), true);
    }
    // ...
}
I'm omitting the AgentOptions class, which parses the options passed to the agent (like the output file).
The premain method uses the getExtractedJARPath method to extract the runtime JAR. This extracts the JAR from the resources:
    private static Path getExtractedJARPath() throws IOException {
        try (InputStream in = Main.class.getClassLoader()
                 .getResourceAsStream("dead-code-runtime.jar")){
            if (in == null) {
                throw new RuntimeException("Could not find " +
                    "dead-code-runtime.jar");
            }
            File file = File.createTempFile("runtime", ".jar");
            file.deleteOnExit();
            Files.copy(in, file.toPath(),
                       StandardCopyOption.REPLACE_EXISTING);
            return file.toPath().toAbsolutePath();
        }
    }
ClassTransformer Class
This transformer implements the ClassFileTransformer to transform all loaded classes.
A transformer of class files. An agent registers an implementation of this interface using the
ClassFileTransformer DOcumentationaddTransformermethod so that the transformer'stransformmethod is invoked when classes are loaded,redefined, orretransformed. The implementation should override one of thetransformmethods defined here. Transformers are invoked before the class is defined by the Java virtual machine.
We could do all the bytecode modification ourselves. This is error-prone and complex, so we use the Javassist library, which provides a neat API to insert code into various class parts.
Our ClassTransformer has to implement the transform method:
public byte[] transform(Module module,
                        ClassLoader loader,
                        String className,
                        Class<?> classBeingRedefined,
                        ProtectionDomain protectionDomain,
                        byte[] classfileBuffer)
Transforms the given class file and returns a new replacement class file.
Parameters:
ClassFileTransformer DOcumentation
module- the module of the class to be transformedloader- the defining loader of the class to be transformed, may benullif the bootstrap loaderclassName- the name of the class in the internal form of fully qualified class and interface names as defined in The Java Virtual Machine Specification. For example,"java/util/List".classBeingRedefined- if this is triggered by a redefine or retransform, the class being redefined or retransformed; if this is a class load,nullprotectionDomain- the protection domain of the class being defined or redefinedclassfileBuffer- the input byte buffer in class file format - must not be modified
Our implementation first checks we're not instrumenting our agent or some JDK code:
if (className.startsWith("me/bechberger/runtime/Store") ||
    className.startsWith("me/bechberger/ClassTransformer") ||
    className.startsWith("java/") ||
    className.startsWith("jdk/internal") ||
    className.startsWith("sun/")) {
            return classfileBuffer;
}
This prevents instrumentation problems and keeps the list of used classes clean. We then use a statically defined ScopedClassPoolFactory to create a class pool for the given class loader, parse the bytecode using javassist and transform it using our transform(String className, CtClass cc) method:
        try {
            ClassPool cp = scopedClassPoolFactory
                 .create(loader, ClassPool.getDefault(),
                         ScopedClassPoolRepositoryImpl
                             .getInstance());
            CtClass cc = cp.makeClass(
                 new ByteArrayInputStream(classfileBuffer));
            if (cc.isFrozen()) {
                // frozen classes cannot be modified
                return classfileBuffer;
            }
            // classBeingRedefined is null in our case
            transform(className, cc);
            return cc.toBytecode();
        } catch (CannotCompileException | IOException |
                 RuntimeException | NotFoundException e) {
            e.printStackTrace();
            return classfileBuffer;
        }
The actual instrumentation is now done with the javassist API:
    private void transform(String className, CtClass cc)
      throws CannotCompileException, NotFoundException {
        // replace "/" with "." in the className
        String cn = formatClassName(className);
        // handle the class load
        Store.getInstance().processClassLoad(cn,
            cc.getClassFile().getInterfaces());
        // insert the call to processClassUsage at the beginning
        // of the static initializer
        cc.makeClassInitializer().insertBefore(
             String.format("me.bechberger.runtime.Store" +
                 ".getInstance().processClassUsage(\"%s\");",
                 cn));
    }
You might wonder why we're also recording the interfaces of every class.
This is because the static initializers of interfaces are not called when the first static initializer of an implemented class is called.
We, therefore, have to walk the interface tree ourselves.
Static initializers of parent classes are called; therefore, we don't have to handle parent classes ourselves.
Instrumenter
The main difference is that the instrumenter also transforms the bytecode, transforming all files in the JAR and writing a new JAR back. This new JAR is then executed, which has the advantage that we can instrument all classes in the JAR (even with Spring's classloader magic).
The central part of the Instrumenter is the ClassAndLibraryTransformer which can be targeted to a specific class transformation use case by setting its different fields:
public class ClassAndLibraryTransformer {
    /** Source JAR */
    private final Path sourceFile;
    /**
     * Include a library in the output JAR.
     * A library is JAR inside this JAR and
     * its name is the file name without version identifier
     * and suffix.
     */
    private Predicate<String> isLibraryIncluded;
    /** Include a class in the output JAR */
    private Predicate<String> isClassIncluded;
    /**
     * Transforms the class file, might be null.
     * Implemented using the javassist library as shown before.
     */
    private BiConsumer<ClassPool, CtClass> classTransformer;

    record JarEntryPair(String name, InputStream data) {
        static JarEntryPair of(Class<?> klass, String path)
          throws IOException {
            // obtain the bytecode from the dead-code JAR
            return new JarEntryPair(path,
                klass.getClassLoader().getResourceAsStream(path));
        }
    }
    /**
     * Supplies a list of class files that should
     * be added to the JAR, like the Store related classes
     */
    private Supplier<List<JarEntryPair>> miscFilesSupplier =
         List::of;
    /** Output JAR */
    private final OutputStream target;
    // ...
}
This class is used for instrumentation and removing classes and nested JARs/libraries, sharing most of the code between both.
The central entry point of this class is the process method, which iterates over all entries of the sourceFile JAR using the JarFile and JarOutputStream APIs:
    void process(boolean outer) throws IOException {
        try (JarOutputStream jarOutputStream =
             new JarOutputStream(target);
            JarFile jarFile = new JarFile(sourceFile.toFile())) {
            jarFile.stream().forEach(jarEntry -> {
                try {
                    String name = jarEntry.getName();
                    if (name.endsWith(".class")) {
                        processClassEntry(jarOutputStream,
                            jarFile, jarEntry);
                    } else if (name.endsWith(".jar")) {
                        processJAREntry(jarOutputStream,
                            jarFile, jarEntry);
                    } else {
                        processMiscEntry(jarOutputStream,
                            jarFile, jarEntry);
                    }
                } catch (IOException e) {
                    // .forEach forces us to wrap exceptions
                    throw new RuntimeException(e);
                }
            });
            if (outer) { // add miscellaneous class files
                for (JarEntryPair miscFile :
                        miscFilesSupplier.get()) {
                    // create a new entry
                    JarEntry jarEntry =
                        new JarEntry(miscFile.name);
                    jarOutputStream.putNextEntry(jarEntry);
                    // add the file contents
                    miscFile.data.transferTo(jarOutputStream);
                }
            }
        }
    }
Processing entries of the JAR file that are neither class files nor JARs consist only of copying the entry directly to the new file:
    private static void processMiscEntry(
      JarOutputStream jarOutputStream,
      JarFile jarFile, JarEntry jarEntry) throws IOException {
        jarOutputStream.putNextEntry(jarEntry);
        jarFile.getInputStream(jarEntry)
               .transferTo(jarOutputStream);
    }
Such files are typically resources like XML configuration files.
Transforming class file entries is slightly more involved: We check whether we should include the class defined in the class file and transform it if necessary:
    private void processClassEntry(
      JarOutputStream jarOutputStream,
      JarFile jarFile, JarEntry jarEntry) throws IOException {
        String className = classNameForJarEntry(jarEntry);
        if (isClassIncluded.test(className) ||
              isIgnoredClassName(className)) {
            jarOutputStream.putNextEntry(jarEntry);
            InputStream classStream =
                jarFile.getInputStream(jarEntry);
            if (classTransformer != null &&
                  !isIgnoredClassName(className)) {
                // transform if possible and required
                classStream = transform(classStream);
            }
            classStream.transferTo(jarOutputStream);
        } else {
            System.out.println("Skipping class " + className);
        }
    }
We ignore here class files related to package-info or module-info, as they don't contain valid classes. This is encapsulated in the isIgnoredClassName method.
The implementation of the transform method is similar to the transform method of the instrumenting agent, using the classTransformer consumer for the actual class modification.
A transforming consumer to log the usage of every unused class looks as follows, assuming that isClassUsed it is a predicate that returns true if the passed class is used and that messageSupplier supplies specific messages that are output additionally:
(ClassPool cp, CtClass cc) -> {
    String className = cc.getName();
    if (isClassUsed.test(className)) {
        return;
    }
    try {
        String message = messageSupplier.apply(className);
        cc.makeClassInitializer().insertBefore(
            String.format("System.err.println(\"Class %s " +
                          "is used which is not allowed%s\");" +
                          "if (%s) { System.exit(1); }",
                className,
                message.isBlank() ? "" : (": " + message),
                exit));
    } catch (CannotCompileException e) {
        throw new RuntimeException(e);
    }
};
The last thing that I want to cover is the handling of nested JARs in the processJAREntry(JarOutputStream jarOutputStream, JarFile jarFile, JarEntry jarEntry) method. Nested JARs are pretty standard with Spring and bundle libraries with your application. To quote the Spring documentation:
Java does not provide any standard way to load nested jar files (that is, jar files that are themselves contained within a jar). This can be problematic if you need to distribute a self-contained application that can be run from the command line without unpacking.
To solve this problem, many developers use “shaded” jars. A shaded jar packages all classes, from all jars, into a single “uber jar”. The problem with shaded jars is that it becomes hard to see which libraries are actually in your application. It can also be problematic if the same filename is used (but with different content) in multiple jars. Spring Boot takes a different approach and lets you actually nest jars directly.
The Executable JAR Format – Spring Documentation
Our method first checks that we should include the nested JAR and, if so, extract it into a temporary file. We extract the JAR because the JarFile API can only work with files. We then use the ClassAndLibraryTransformer recursively:
    private void processJAREntry(JarOutputStream jarOutputStream,
      JarFile jarFile, JarEntry jarEntry) throws IOException {
        String name = jarEntry.getName();
        String libraryName = Util.libraryNameForPath(name);
        if (!isLibraryIncluded.test(libraryName)) {
            System.out.println("Skipping library " + libraryName);
            return;
        }
        Path tempFile = Files.createTempFile("nested-jar", ".jar");
        tempFile.toFile().deleteOnExit();
        // copy entry over
        InputStream in = jarFile.getInputStream(jarEntry);
        Files.copy(in, tempFile,
                   StandardCopyOption.REPLACE_EXISTING);
        ClassAndLibraryTransformer nestedJarProcessor;
        // create new JAR file
        Path newJarFile = Files.createTempFile("new-jar",
                                               ".jar");
        newJarFile.toFile().deleteOnExit();
        try (OutputStream newOutputStream =
              Files.newOutputStream(newJarFile)) {
            nestedJarProcessor =
                new ClassAndLibraryTransformer(tempFile,
                    isLibraryIncluded, isClassIncluded,
                    classTransformer,
                    newOutputStream);
                    nestedJarProcessor.process(false);
        }
        // create an uncompressed entry
        JarEntry newJarEntry = new JarEntry(jarEntry.getName());
        newJarEntry.setMethod(JarEntry.STORED);
        newJarEntry.setCompressedSize(Files.size(newJarFile));
        CRC32 crc32 = new CRC32();
        crc32.update(Files.readAllBytes(newJarFile));
        newJarEntry.setCrc(crc32.getValue());
        jarOutputStream.putNextEntry(newJarEntry);
        Files.copy(newJarFile, jarOutputStream);
    }
Nesting JAR files come with a few restrictions, but most notable is the limitation of ZIP compression:
The
The Executable JAR Format – Spring DocumentationZipEntryfor a nested jar must be saved by using theZipEntry.STOREDmethod. This is required so that we can seek directly to individual content within the nested jar. The content of the nested jar file itself can still be compressed, as can any other entries in the outer jar.
Therefore, the code creates a JarEntry that is just stored and not compressed. But this requires us to compute and set the CRC and file size ourselves; this is done automatically for compressed entries.
All other code can be found in the GitHub repository of the project. Feel free to adapt the code and use it in your own projects.
Conclusion
Dynamic dead-code analyses are great for finding unused code and classes, helping to reduce the attack surface.
Implementing such tools in a few lines of Java code is possible, creating an understandable tool that offers less potential of surprise for users.
The tool developed in this article is a prototype of a dead-code analysis that could be run in production to find all used classes in a real-world setting.
Writing instrumentation agents using the JDK instrumentation APIs combined with the javassist library allows us to write a somewhat functioning agent in hours.
I hope this article helped you to understand the basics of finding unused classes dynamically and implementing your own instrumentation agent.
Thanks to Wolfram Fischer from SAP Security Research Germany for nerd-sniping me, leading me to write the tool and this article. This article is part of my work in the SapMachine team at SAP, making profiling easier for everyone. This article first appeared on my personal blog mostlynerdless.de and the SAP Community.
- April 08, 2023
- 12 min read
A JVM developer working on profilers and their underlying technology, e.g. JEP Candidate 435, in the SapMachine team at SAP.


Comments (1)
Mahesh
2 years agoThis is a good tool but do you know how may I pass -Dspring.profiles.active=development as without this my jar is unable to load.