Running your Database on OpenShift and CodeReady Containers
- September 06, 2022
- 2788 Unique Views
- 5 min read
Let's take an introductory run-through of setting up your database on OpenShift, using your own hardware and RedHat's CodeReady Containers.
CodeReady Containers is a great way to run OpenShift K8s locally, ideal for development and testing. The steps in this blog post will require a machine, laptop or desktop, of decent capability; preferably quad CPUs and 16GB+ RAM.
Download and Install RedHat's CodeReady Containers
Download and install RedHat's CodeReady Containers as described in Red Hat OpenShift 4 on your laptop: Introducing Red Hat CodeReady Containers
First configure CodeReady Containers, from the command line
❯ crc setup
…
Your system is correctly setup for using CodeReady Containers, you can now run 'crc start' to start the OpenShift cluster
Then start it, entering the Pull Secret copied from the download page. Have patience here, this can take ten minutes or more.
❯ crc start

INFO Checking if running as non-root
…
Started the OpenShift cluster.

The server is accessible via web console at:
  https://console-openshift-console.apps-crc.testing
…
The output above will include the kubeadmin password which is required in the following oc login … command.
❯ eval $(crc oc-env)
❯ oc login -u kubeadmin -p <password-from-crc-setup-output> https://api.crc.testing:6443

❯ oc version

Client Version: 4.7.11
Server Version: 4.7.11
Kubernetes Version: v1.20.0+75370d3
Open in a browser the URL https://console-openshift-console.apps-crc.testing
Log in using the kubeadmin username and password, as used above with the oc login … command. You might need to try a few times because of the self-signed certificate used.
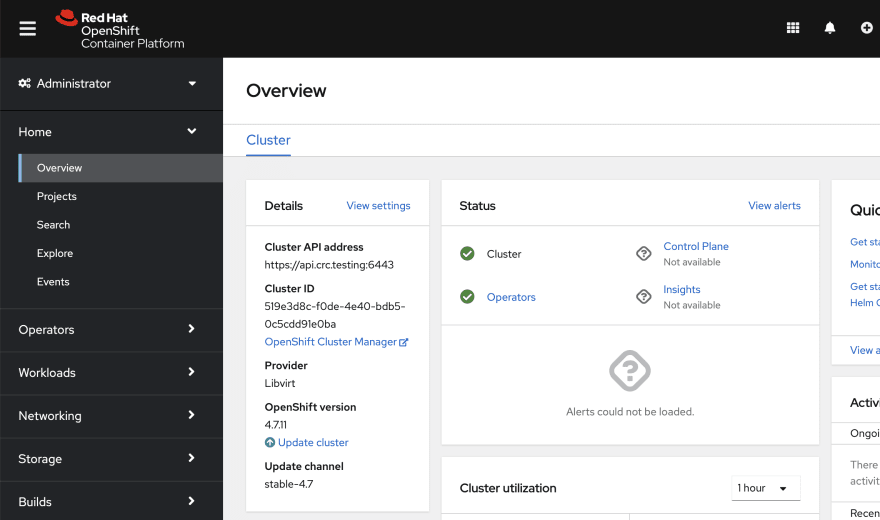
Once OpenShift has started and is running you should see the following webpage

Some commands to help check status and the startup process are
❯ oc status

In project default on server https://api.crc.testing:6443

svc/openshift - kubernetes.default.svc.cluster.local
svc/kubernetes - 10.217.4.1:443 -> 6443

View details with 'oc describe <resource>/<name>' or list resources with 'oc get all'.
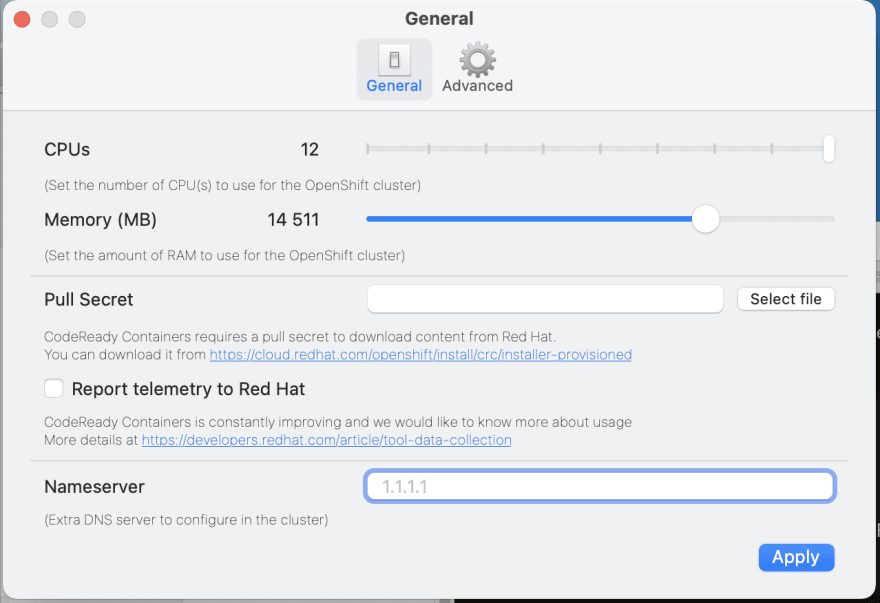
Before continuing, go to the CodeReady Containers Preferences dialog. Increase CPUs and Memory to >12 and >14GB correspondingly.

Create the OpenShift Local Volumes
Cassandra needs persistent volumes for its data directories. There are different ways to do this in OpenShift, from enabling local host paths in Rancher persistent volumes, to installing and using the OpenShift Local Storage Operator, and of course persistent volumes on the different cloud provider backends.
This blog post will use vanilla OpenShift volumes using folders on the master k8s node.
Go to the "Terminal" tab for the master node and create the required directories.
The master node is found on the /cluster/nodes/ webpage.
Click on the node, named something like crc-m89r2-master-0, and then click on the "Terminal" tab.
In the terminal, execute the following commands:
sh-4.4# chroot /host
sh-4.4# mkdir -p /mnt/cass-operator/pv000
sh-4.4# mkdir -p /mnt/cass-operator/pv001
sh-4.4# mkdir -p /mnt/cass-operator/pv002
sh-4.4#
Persistent Volumes are to be created with affinity to the master node, declared in the following yaml. The name of the master node can vary from installation to installation. If your master node is not named crc-gm7cm-master-0 then the following command replaces its name. First download the cass-operator-1.7.0-openshift-storage.yaml file, check the name of the node in the nodeAffinity sections against your current CodeReady Containers instance, updating if necessary.
❯ wget https://thelastpickle.com/files/openshift-intro/cass-operator-1.7.0-openshift-storage.yaml

# The name of your master node
❯ oc get nodes -o=custom-columns=NAME:.metadata.name --no-headers

# If it is not crc-gm7cm-master-0
❯ sed -i '' "s/crc-gm7cm-master-0/$(oc get nodes -o=custom-columns=NAME:.metadata.name --no-headers)/" cass-operator-1.7.0-openshift-storage.yaml
Create the Persistent Volumes (PV) and Storage Class (SC).
❯ oc apply -f cass-operator-1.7.0-openshift-storage.yaml

persistentvolume/server-storage-0 created
persistentvolume/server-storage-1 created
persistentvolume/server-storage-2 created
storageclass.storage.k8s.io/server-storage created
To check the existence of the PVs.
❯ oc get pv | grep server-storage

server-storage-0   10Gi   RWO    Delete   Available   server-storage     5m19s
server-storage-1   10Gi   RWO    Delete   Available   server-storage     5m19s
server-storage-2   10Gi   RWO    Delete   Available   server-storage     5m19s
To check the existence of the SC.
❯ oc get sc

NAME             PROVISIONER                    RECLAIMPOLICY   VOLUMEBINDINGMODE      ALLOWVOLUMEEXPANSION   AGE
server-storage   kubernetes.io/no-provisioner   Delete          WaitForFirstConsumer   false                  5m36s
More information on using the can be found in the RedHat documentation for OpenShift volumes.
Deploy the Cass-Operator
Now create the cass-operator. Here we can use the upstream 1.7.0 version of the cass-operator. After creating (applying) the cass-operator, it is important to quickly execute the oc adm policy … commands in the following step so the pods have the privileges required and are successfully created.
❯ oc apply -f https://raw.githubusercontent.com/k8ssandra/cass-operator/v1.7.0/docs/user/cass-operator-manifests.yaml

namespace/cass-operator created
serviceaccount/cass-operator created
secret/cass-operator-webhook-config created
W0606 14:25:44.757092   27806 warnings.go:70] apiextensions.k8s.io/v1beta1 CustomResourceDefinition is deprecated in v1.16+, unavailable in v1.22+; use apiextensions.k8s.io/v1 CustomResourceDefinition
W0606 14:25:45.077394   27806 warnings.go:70] apiextensions.k8s.io/v1beta1 CustomResourceDefinition is deprecated in v1.16+, unavailable in v1.22+; use apiextensions.k8s.io/v1 CustomResourceDefinition
customresourcedefinition.apiextensions.k8s.io/cassandradatacenters.cassandra.datastax.com created
clusterrole.rbac.authorization.k8s.io/cass-operator-cr created
clusterrole.rbac.authorization.k8s.io/cass-operator-webhook created
clusterrolebinding.rbac.authorization.k8s.io/cass-operator-crb created
clusterrolebinding.rbac.authorization.k8s.io/cass-operator-webhook created
role.rbac.authorization.k8s.io/cass-operator created
rolebinding.rbac.authorization.k8s.io/cass-operator created
service/cassandradatacenter-webhook-service created
deployment.apps/cass-operator created
W0606 14:25:46.701712   27806 warnings.go:70] admissionregistration.k8s.io/v1beta1 ValidatingWebhookConfiguration is deprecated in v1.16+, unavailable in v1.22+; use admissionregistration.k8s.io/v1 ValidatingWebhookConfiguration
W0606 14:25:47.068795   27806 warnings.go:70] admissionregistration.k8s.io/v1beta1 ValidatingWebhookConfiguration is deprecated in v1.16+, unavailable in v1.22+; use admissionregistration.k8s.io/v1 ValidatingWebhookConfiguration
validatingwebhookconfiguration.admissionregistration.k8s.io/cassandradatacenter-webhook-registration created

❯ oc adm policy add-scc-to-user privileged -z default -n cass-operator

clusterrole.rbac.authorization.k8s.io/system:openshift:scc:privileged added: "default"

❯ oc adm policy add-scc-to-user privileged -z cass-operator -n cass-operator

clusterrole.rbac.authorization.k8s.io/system:openshift:scc:privileged added: "cass-operator"
Let's check the deployment happened.
❯ oc get deployments -n cass-operator

NAME            READY   UP-TO-DATE   AVAILABLE   AGE
cass-operator   1/1     1            1           14m
Let's also check the cass-operator pod was created and is successfully running. Note that the kubectl command is used here, for all k8s actions the oc and kubectl commands are interchangable.
❯ kubectl get pods -w -n cass-operator

NAME                             READY   STATUS    RESTARTS   AGE
cass-operator-7675b65744-hxc8z   1/1     Running   0          15m
Troubleshooting: If the cass-operator does not end up in Running status, or if any pods in later sections fail to start, it is recommended to use the OpenShift UI Events webpage for easy diagnostics.
Setup the Cassandra Cluster
The next step is to create the cluster. The following deployment file creates a 3 node cluster. It is largely a copy from the upstream cass-operator version 1.7.0 file example-cassdc-minimal.yaml but with a small modification made to allow all the pods to be deployed to the same worker node (as CodeReady Containers only uses one k8s node by default).
❯ oc apply -n cass-operator -f https://thelastpickle.com/files/openshift-intro/cass-operator-1.7.0-openshift-minimal-3.11.yaml

cassandradatacenter.cassandra.datastax.com/dc1 created
Let's watch the pods get created, initialise, and eventually becoming running, using the kubectl get pods … watch command.
❯ kubectl get pods -w -n cass-operator

NAME                             READY   STATUS    RESTARTS   AGE
cass-operator-7675b65744-28fhw   1/1     Running   0          102s
cluster1-dc1-default-sts-0       0/2     Pending   0          0s
cluster1-dc1-default-sts-1       0/2     Pending   0          0s
cluster1-dc1-default-sts-2       0/2     Pending   0          0s
cluster1-dc1-default-sts-0       2/2     Running   0          3m
cluster1-dc1-default-sts-1       2/2     Running   0          3m
cluster1-dc1-default-sts-2       2/2     Running   0          3m
Use the Cassandra Cluster
With the Cassandra pods each up and running, the cluster is ready to be used. Test it out using the nodetool status command.
❯ kubectl -n cass-operator exec -it cluster1-dc1-default-sts-0 -- nodetool status

Defaulting container name to cassandra.
Use 'kubectl describe pod/cluster1-dc1-default-sts-0 -n cass-operator' to see all of the containers in this pod.
Datacenter: dc1
===============
Status=Up/Down
|/ State=Normal/Leaving/Joining/Moving
--  Address      Load       Tokens       Owns (effective)  Host ID                               Rack
UN  10.217.0.73  84.42 KiB  1            83.6%             672baba8-9a05-45ac-aad1-46427027b57a  default
UN  10.217.0.72  70.2 KiB   1            65.3%             42758a86-ea7b-4e9b-a974-f9e71b958429  default
UN  10.217.0.71  65.31 KiB  1            51.1%             2fa73bc2-471a-4782-ae63-5a34cc27ab69  default

The above command can be run on `cluster1-dc1-default-sts-1` and `cluster1-dc1-default-sts-2` too.
Next, test out cqlsh. For this authentication is required, so first get the CQL username and password.
# Get the cql username
❯ kubectl -n cass-operator get secret cluster1-superuser -o yaml | grep " username" | awk -F" " '{print $2}' | base64 -d && echo ""

# Get the cql password
❯ kubectl -n cass-operator get secret cluster1-superuser -o yaml | grep " password" | awk -F" " '{print $2}' | base64 -d && echo ""

❯ kubectl -n cass-operator exec -it cluster1-dc1-default-sts-0 -- cqlsh -u <cql-username> -p <cql-password>

Connected to cluster1 at 127.0.0.1:9042.
[cqlsh 5.0.1 | Cassandra 3.11.7 | CQL spec 3.4.4 | Native protocol v4]
Use HELP for help.
cluster1-superuser@cqlsh>
Keep It Clean
CodeReady Containers are very simple to clean up, especially because it is a packaging of OpenShift intended only for development purposes. To wipe everything, just "delete"
❯ crc stop
❯ crc delete
If, on the other hand, you only want to delete individual steps, each of the following can be done (but in order).
❯ oc delete -n cass-operator -f https://thelastpickle.com/files/openshift-intro/cass-operator-1.7.0-openshift-minimal-3.11.yaml

❯ oc delete -f https://raw.githubusercontent.com/k8ssandra/cass-operator/v1.7.0/docs/user/cass-operator-manifests.yaml

❯ oc delete -f cass-operator-1.7.0-openshift-storage.yaml
Don’t Forget to Share This Post!


Comments (0)
No comments yet. Be the first.