Template to Get Started with Pi4J and JavaFX on Raspberry Pi
- January 13, 2022
- 3645 Unique Views
- 3 min read
The Pi4J project wants to be the starting point for everyone who wants to use Java on the Raspberry Pi, being it a headless, JavaFX-user interface and/or GPIO-controller project.
Pi4J is intended to provide a friendly object-oriented I/O API and implementation libraries for Java Programmers to access the full I/O capabilities of the Raspberry Pi platform. This project abstracts the low-level native integration and interrupt monitoring to enable Java programmers to focus on implementing their application business logic.
Dieter Holz (FHNW University) and Robert von Burg (strolch.li) created a template project which is now part of the Pi4J example repositories. This project makes it even easier to get started and aims to:
- Provide a clear step-by-step how to prepare your Raspberry Pi
- Provide multiple test and start applications
- Explain the use of a MVC-model (Model-View-Controller) to clearly split data, actions and user interface
- Explain the use of JUnit test
Sources and info
Please check the README of the sources of the project for a full description of the setup process of the Raspberry Pi and to fully understand the example applications and the MVC-model. This page is only intended to give you a quick overview.
Example applications
HelloFX
A simple application to test if the JavaFX libraries are installed correctly.
Should not be used as a template for one's own JavaFX applications.
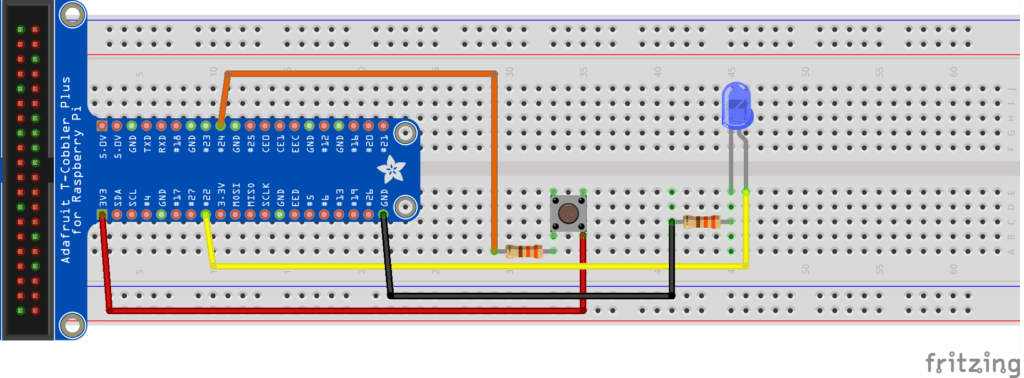
Wiring
The two other example applications use an LED and a button.
These must be wired as is shown in the following diagram:
MinimalPi4J
The MinimalPi4j application is a Pi4j only application without a GUI. This application is also only used to test the setup and can be deleted after testing.
Pressing the button should generate a message in the console.
Once the Pi4J setup has been tested, MinimalPi4J can be deleted.
TemplateApp
This application shows the interaction between a JavaFX based Graphical User Interface (GUI) and the Raspberry Pi connected sensors and actuators, the Physical User Interface (PUI).
This application is to be used as a template for one's own applications. This includes the existing test cases.
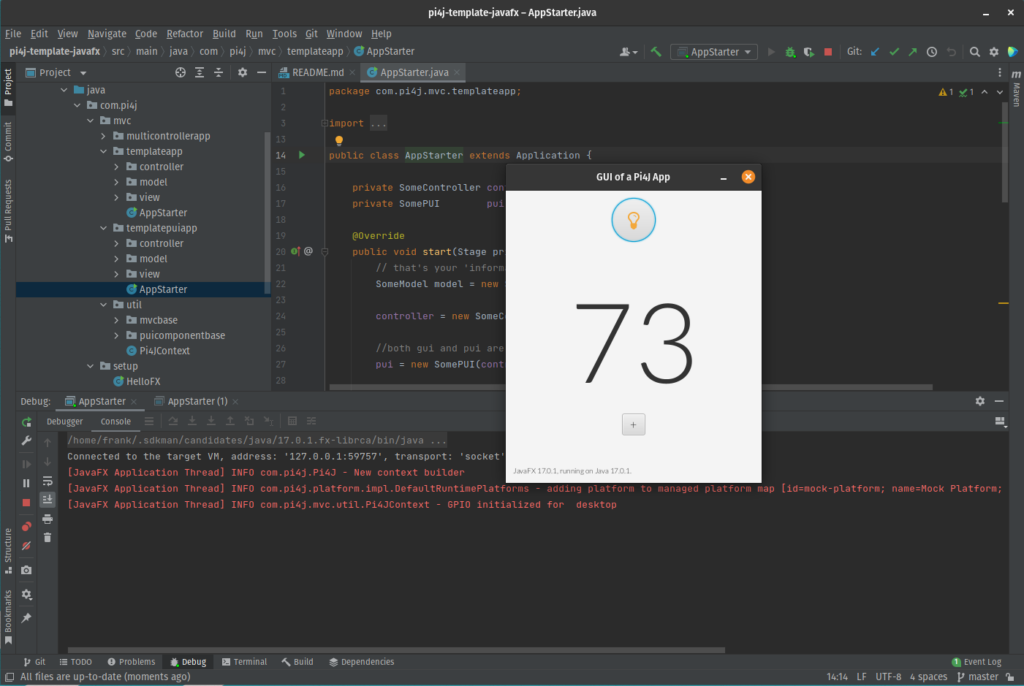
You should first get to know and understand the example. For your own applications you should then copy the the TemplateApp and modify it for your project, however without violating the rules of the MVC concept.
TemplatePUIApp
The MVC concept should also be used for applications without a GUI.
When developing PUI only applications, or when adding the GUI later, then one should use the TemplatePUIApp as template.
The MVC concept
The classic Model-View-Controller concept contains in addition to the starter class at least 3 more classes.
The interaction is clearly defined:
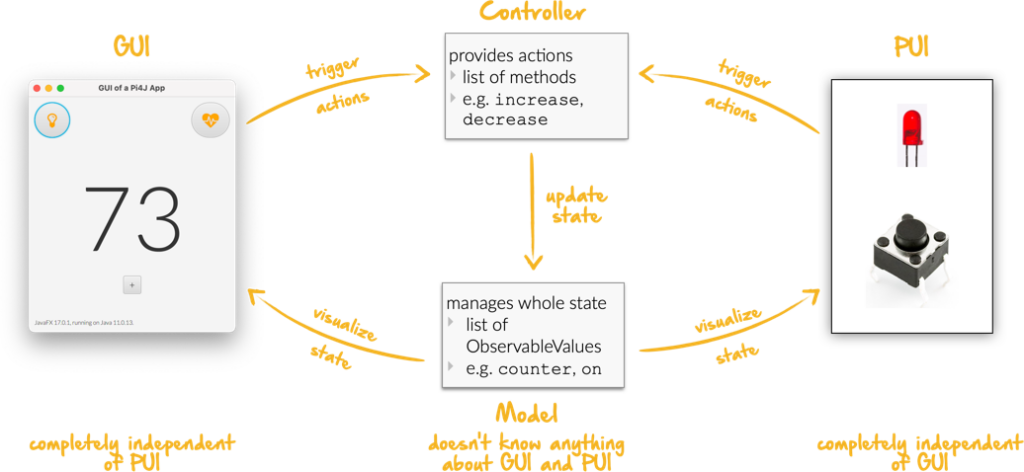
This way the GUI and PUI are completely separated from each other, i.e a GUI button to turn an LED on has no direct access to the LED component of the PUI. Instead the GUI button triggers a corresponding action in the controller which then sets the on state property in the model. The PUI listening on this state then turns the actual LED on or off.
GUI and PUI work with the same identical controller and thus also the same identical model.
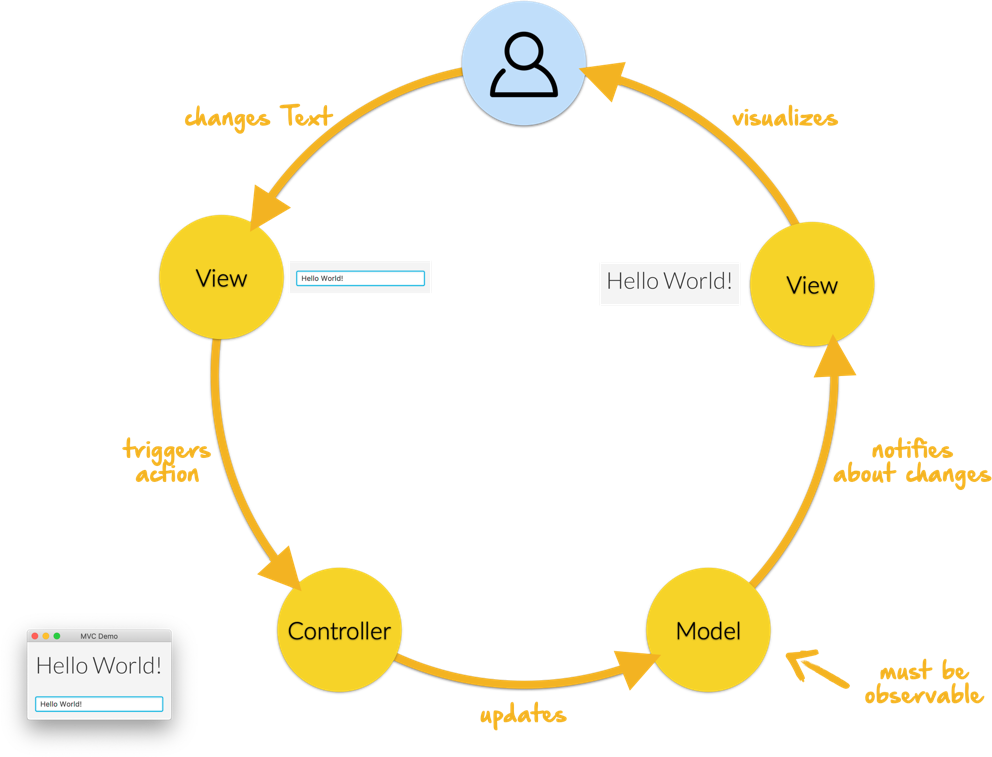
In the MVC concept, every user interaction traverses the exact same cycle:
Conclusion
You can use the same architecture (MVC) to implement a JavaFX-based GUI, a PUI attached to a Raspberry Pi, and integrate both in a clean, modular way.
Don’t Forget to Share This Post!


Comments (2)
jb83
3 years agoHello, three pictures are not showing (they point to bad urls). The three pictures are named: Wiring, Model-View-Controller concept, and MVC concept.
Frank Delporte
3 years agoHi, thanks for pointing out! Seems the original images moved in the repo. They are now copied here into Foojay so this shouldn't happen again...