When Speed Matters: Real-time Stream Processing with Hazelcast and Redpanda
- July 25, 2023
- 6073 Unique Views
- 6 min read
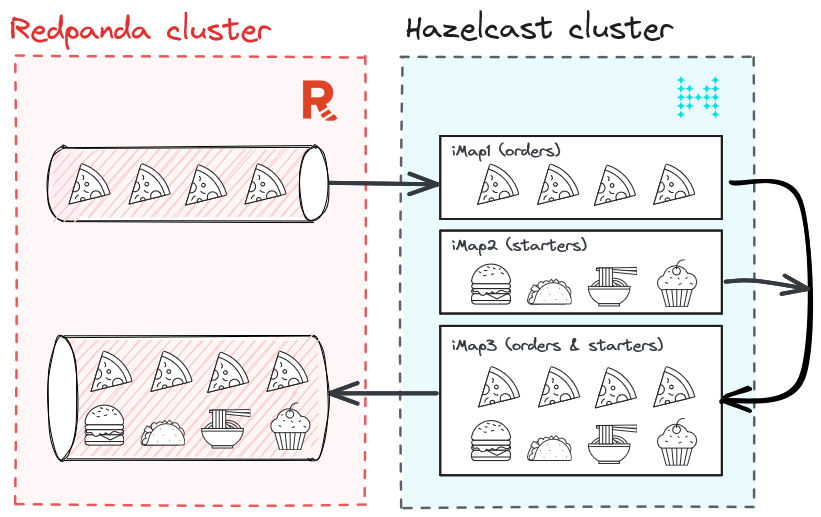
- Pizza in motion: the solution architecture for a pizza delivery service
- Tutorial: real-time stream processing with Redpanda and Hazelcast
- Setting up Redpanda
- Setting up Hazelcast
- Step 1: Start the Redpanda cluster
- Step 2: Run Hazelcast
- Step 3: Run SQL on Hazelcast
- Step 4: Ingest into Hazelcast iMap (pizzastream)
- Step 5: Enrich the stream with recommendations data (recommender)
- Step 6: Combine both Maps using SQL
- Step 7: Send the combined data stream to Redpanda
In this tutorial, we explore the powerful combination of Hazelcast and Redpanda to build high-performance, scalable, and fault-tolerant applications that react to real-time data.
Redpanda is a streaming data platform designed to handle high-throughput, real-time data streams. Compatible with Kafka APIs, Redpanda provides a highly performant and scalable alternative to Apache Kafka. Redpanda's unique architecture enables it to handle millions of messages per second while ensuring low latency, fault tolerance, and seamless scalability.
Hazelcast is a unified real-time stream data platform that enables instant action on data in motion by uniquely combining stream processing and a fast data store for low-latency querying, aggregation, and stateful computation against event streams and traditional data sources. It allows you to build resource-efficient, real-time applications quickly. You can deploy it at any scale from small edge devices to a large cluster of cloud instances.
In this post, we will guide you through setting up and integrating these two technologies to enable real-time data ingestion, processing, and analysis for robust streaming analytics. By the end, you will have a solid understanding of how to leverage the combined capabilities of Hazelcast and Redpanda to unlock the potential of streaming analytics and instant action for your applications.
So, let's dive in and get started!
Pizza in motion: the solution architecture for a pizza delivery service
First, let’s understand what we are going to build. Most of us love pizza, so let’s use a pizza delivery service as an example. Our pizza delivery service receives orders from multiple users in real time; these orders contain a timestamp, user_id, pizza_type and quantity. We’ll generate orders using Python, ingest them into Redpanda, then use Hazelcast to process them.
But what if you want to enrich pizza orders with contextual data? For example, recommending specific starters for specific types of pizzas. How can you do this in real time?
There are actually multiple options, but for this blog post, we’ll show you how to use Hazelcast to enrich pizza orders coming from Redpanda with starters stored in iMap in Hazelcast.
Here’s a quick diagram of what this solution looks like.

Tutorial: real-time stream processing with Redpanda and Hazelcast
Before diving in, let's make sure we have all the necessary prerequisites in place. You can download the demo from this GitHub repository.
Setting up Redpanda
For the scope of this tutorial, we will set up a Redpanda cluster with Docker Compose. So, make sure you have Docker Compose installed locally.
Create the docker-compose.yml file in a location of your choice and add the following content to it.
version: "3.7"
name: redpanda-quickstart
networks:
redpanda_network:
driver: bridge
volumes:
redpanda-0: null
services:
redpanda-0:
command:
- redpanda
- start
- --kafka-addr internal://0.0.0.0:9092,external://0.0.0.0:19092
# Address the broker advertises to clients that connect to the Kafka API.
# Use the internal addresses to connect to the Redpanda brokers'
# from inside the same Docker network.
# Use the external addresses to connect to the Redpanda brokers'
# from outside the Docker network.
- --advertise-kafka-addr internal://redpanda-0:9092,external://localhost:19092
- --pandaproxy-addr internal://0.0.0.0:8082,external://0.0.0.0:18082
# Address the broker advertises to clients that connect to the HTTP Proxy.
- --advertise-pandaproxy-addr internal://redpanda-0:8082,external://localhost:18082
- --schema-registry-addr internal://0.0.0.0:8081,external://0.0.0.0:18081
# Redpanda brokers use the RPC API to communicate with eachother internally.
- --rpc-addr redpanda-0:33145
- --advertise-rpc-addr redpanda-0:33145
# Tells Seastar (the framework Redpanda uses under the hood) to use 1 core on the system.
- --smp 1
# The amount of memory to make available to Redpanda.
- --memory 1G
# Mode dev-container uses well-known configuration properties for development in containers.
- --mode dev-container
# enable logs for debugging.
- --default-log-level=debug
image: docker.redpanda.com/redpandadata/redpanda:v23.1.11
container_name: redpanda-0
volumes:
- redpanda-0:/var/lib/redpanda/data
networks:
- redpanda_network
ports:
- 18081:18081
- 18082:18082
- 19092:19092
- 19644:9644
console:
container_name: redpanda-console
image: docker.redpanda.com/redpandadata/console:v2.2.4
networks:
- redpanda_network
entrypoint: /bin/sh
command: -c 'echo "$CONSOLE_CONFIG_FILE" > /tmp/config.yml; /app/console'
environment:
CONFIG_FILEPATH: /tmp/config.yml
CONSOLE_CONFIG_FILE: |
kafka:
brokers: ["redpanda-0:9092"]
schemaRegistry:
enabled: true
urls: ["http://redpanda-0:8081"]
redpanda:
adminApi:
enabled: true
urls: ["http://redpanda-0:9644"]
ports:
- 8080:8080
depends_on:
      - redpanda-0
The above file contains the configuration necessary to spin up a Redpanda cluster with a single broker. If needed, you can use a three-broker cluster. But, a single broker would be more than enough for our use case.
Please note that using Redpanda on Docker is only recommended for development and testing purposes. For other deployment options, consider Linux or Kubernetes.
To generate the data, we use a Python script:
import asyncio
import json
import os
import random
from datetime import datetime

from kafka import KafkaProducer
from kafka.admin import KafkaAdminClient, NewTopic

BOOTSTRAP_SERVERS = (
    "localhost:19092"
    if os.getenv("RUNTIME_ENVIRONMENT") == "DOCKER"
    else "localhost:19092"
)

PIZZASTREAM_TOPIC = "pizzastream"
PIZZASTREAM_TYPES = [
    "Margherita",
    "Hawaiian",
    "Veggie",
    "Meat",
    "Pepperoni",
    "Buffalo",
    "Supreme",
    "Chicken",
]

async def generate_pizza(user_id):

    producer = KafkaProducer(bootstrap_servers=BOOTSTRAP_SERVERS)
    while True:
        data = {
            "timestamp_": datetime.now().strftime("%Y-%m-%d %H:%M:%S"),
            "pizza": random.choice(PIZZASTREAM_TYPES),
            "user_id": user_id,
            "quantity": random.randint(1, 10),
        }
        producer.send(
            PIZZASTREAM_TOPIC,
            key=user_id.encode("utf-8"),
            value=json.dumps(data).encode("utf-8"),
        )
        print(
            f"Sent a pizza stream event data to Redpanda: {data}"
        )
        await asyncio.sleep(random.randint(1, 5))

async def main():
    tasks = [
        generate_pizza(user_id)
        for user_id in [f"user_{i}" for i in range(10)]
    ]
    await asyncio.gather(*tasks)

if __name__ == "__main__":
    # Create kafka topics if running in Docker.
    if os.getenv("RUNTIME_ENVIRONMENT") == "DOCKER":
        admin_client = KafkaAdminClient(
            bootstrap_servers=BOOTSTRAP_SERVERS, client_id="pizzastream-producer"
        )
        # Check if topics already exist first
        existing_topics = admin_client.list_topics()
        for topic in [PIZZASTREAM_TOPIC]:
            if topic not in existing_topics:
                admin_client.create_topics(
                    [NewTopic(topic, num_partitions=1, replication_factor=1)]
                )
    asyncio.run(main())
Setting up Hazelcast
Start a Hazelcast local cluster. This will run a Hazelcast cluster in client/server mode and an instance of Management Center running on your local network.
brew tap hazelcast/hz
brew install [email protected]
hz -V
Now that we understand what we are going to build, and have prerequisites set up, let’s jump right into the solution.
Step 1: Start the Redpanda cluster
Let’s start the Redpanda cluster by running the following command in a terminal. Make sure you are in the same location where you saved the docker-compose.yml file.
docker compose up -d
An output similar to the following confirms that the Redpanda cluster is up and running.
[+] Running 4/4
⠿ Network redpanda_network                 Created  0.0s
⠿ Volume "redpanda-quickstart_redpanda-0"  Created  0.0s
⠿ Container redpanda-0                     Started  0.3s
⠿ Container redpanda-console               Started  0.6s
Step 2: Run Hazelcast
You can run the following command to start a Hazelcast cluster with one node.
hz start
To add more members to your cluster, open another terminal window and rerun the start command.
Step 3: Run SQL on Hazelcast
We will use the SQL shell—the easiest way to run SQL queries on a cluster. You can use SQL to query data in maps and Kafka topics. The results can be sent directly to the client or inserted into maps or Kafka topics. You can also use Kafka Connector which allows you to stream, filter, and transform events between Hazelcast clusters and Kafka. You can do so by running the following command:
bin/hz-cli sql
Step 4: Ingest into Hazelcast iMap (pizzastream)
Using the SQL command, we create pizzastream Map:
CREATE OR REPLACE MAPPING pizzastream(
timestamp_ TIMESTAMP,
pizza VARCHAR,
user_id VARCHAR,
quantity DOUBLE
)
TYPE Kafka
OPTIONS (
'keyFormat' = 'varchar',
'valueFormat' = 'json-flat',
'auto.offset.reset' = 'earliest',
'bootstrap.servers' = 'localhost:19092');
Step 5: Enrich the stream with recommendations data (recommender)
For this step, we create another Map:
CREATE or REPLACE MAPPING recommender (
__key BIGINT,
user_id VARCHAR,
extra1 VARCHAR,
extra2 VARCHAR,
extra3 VARCHAR )
TYPE IMap
OPTIONS (
'keyFormat'='bigint',
'valueFormat'='json-flat');
We add some values into the Map:
INSERT INTO recommender VALUES
(1, 'user_1', 'Soup','Onion_rings','Coleslaw'),
(2, 'user_2', 'Salad', 'Coleslaw', 'Soup'),
(3, 'user_3', 'Zucchini_fries','Salad', 'Coleslaw'),
(4, 'user_4', 'Onion_rings','Soup', 'Jalapeno_poppers'),
(5, 'user_5', 'Zucchini_fries', 'Salad', 'Coleslaw'),
(6, 'user_6', 'Soup', 'Zucchini_fries', 'Coleslaw'),
(7, 'user_7', 'Onion_rings', 'Soup', 'Jalapeno_poppers'),
(8, 'user_8', 'Jalapeno_poppers', 'Coleslaw', 'Zucchini_fries'),
(9, 'user_9', 'Onion_rings','Jalapeno_poppers','Soup');
Step 6: Combine both Maps using SQL
Based on the above two Maps, we send the following SQL query:
SELECT
    pizzastream.user_id AS user_id,
    recommender.extra1 as extra1,
    recommender.extra2 as extra2,
    recommender.extra3 as extra3,
     pizzastream.pizza AS pizza
FROM pizzastream
JOIN recommender
ON recommender.user_id = recommender.user_id
AND recommender.extra2 = 'Soup';
Step 7: Send the combined data stream to Redpanda
To send the results back to Redpanda, we create a Jet job in Hazelcast that stores the SQL query results into a new Map, then into Redpanda:
CREATE OR REPLACE MAPPING recommender_pizzastream(
timestamp_ TIMESTAMP,
user_id VARCHAR,
extra1 VARCHAR,
extra2 VARCHAR,
extra3 VARCHAR,
pizza VARCHAR
)
TYPE Kafka
OPTIONS (
'keyFormat' = 'int',
'valueFormat' = 'json-flat',
'auto.offset.rest' = 'earliest',
'bootstrap.servers' = 'localhost:19092'
);

CREATE JOB recommender_job AS SINK INTO recommender_pizzastream SELECT
    pizzastream.timestamp_ as timestamp_,
    pizzastream.user_id AS user_id,
    recommender.extra1 as extra1,
    recommender.extra2 as extra2,
    recommender.extra3 as extra3,
    pizzastream.pizza AS pizza
FROM pizzastream
JOIN recommender
ON recommender.user_id = recommender.user_id
AND recommender.extra2 = 'Soup';
Conclusion
In this post, we explained how to build a pizza delivery service with Redpanda and Hazelcast.
Redpanda adds value by ingesting pizza orders as high-throughput streams, storing them reliably, and allowing Hazelcast to consume them in a scalable manner. Once consumed, Hazelcast enriches pizza orders with contextual data (recommending starters to users instantly) and sends enriched data back to Redpanda.
Hazelcast allows you to quickly build resource-efficient, real-time applications. You can deploy it at any scale, from small-edge devices to a large cluster of cloud instances. A cluster of Hazelcast nodes shares the data storage and computational load, which can dynamically scale up and down. Referring back to the pizza example, that means that this solution is reliable, even when there are significantly higher volumes of users ordering pizzas, like after a superbowl ad.
We look forward to your feedback and comments about this blog post! Share your experience with us in the Hazelcast community Slack and the Hazelcast GitHub repository. Hazelcast also runs a weekly live stream on Twitch, so give us a follow to get notified when we go live.
To start exploring Redpanda, download the Redpanda Community Edition on GitHub or try Redpanda Cloud for free. Then go ahead and browse the Redpanda blog for tutorials and join the Redpanda Community on Slack if you have any questions. See you there!
Don’t Forget to Share This Post!


Comments (0)
No comments yet. Be the first.