Creating a JavaFX World Clock from Scratch (Part 2)
- December 24, 2020
- 5485 Unique Views
- 8 min read
"The only way to learn mathematics is to do mathematics." – Paul Halmos[1]
Introduction
Welcome to Creating a JavaFX World Clock from Scratch Part 2!
This is the second installment of a series of blog entries on how I created a "sci-fi" looking world clock using JavaFX.
If you have not read Part 1[2] please see the introduction section of the Creating a JavaFX World Clock from Scratch (Part 1)[2].
In Part 2, I will show you how I animate the clock face's hands using basic trigonometry. If you want to skip the tutorial and go straight to the source code head over to GitHub WorldClock [4]
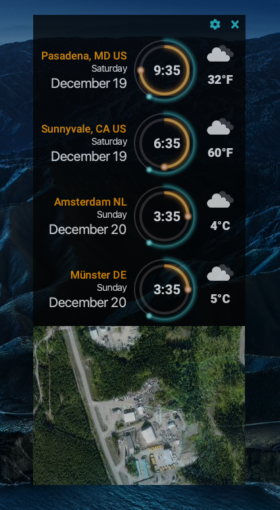
Creating a JavaFX World Clock from Scratch (Part 2)
Scene Builder
First lets give a quick recap of Part 1. In the first part I discussed my design workflow, then later I mention tools such as a WYSIWYG graphical editor called Scene Builder[5]. Scene Builder is a tool to allows you to style shapes and to layout nodes onto the JavaFX scene graph.
I want to give a shout out to the folks from GluonHQ[3] who maintain and provide the Scene Builder tool free of charge. Lets help Gluon keep this tool free by testing, contributing or requesting for support or services at Gluon Services. [1]
Gluon Scene Builder
Finally, If you remember in part 1 I pointed out the hour hand shapes (arc & circle) having hard coded values for their angles and position attributes purely for prototyping purposes. In order to animate the arms around the clock face we will begin to make these values dynamic.
Before I show you the code, I want to show you the world clock face and its hour hand parts again. Just focus on the hour hand arc and hour hand tip which is a JavaFX Arc [3] and Circle [4] shape node respectively.
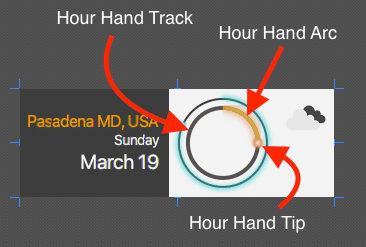
Parts of the hour hand of the world clock
Hour Hand Arc
An Arc shape is really a wedge (pizza slice). As we previously described the fill color is set to be transparent and the stroke width set to 4 pixels with a stroke color of orange. This gives it the appearence of a curved piece cut from a circle. Next, we will look at the Arc's attributes that will determine how long the arc will be and how to move it around the clock circle.
To change the length of the arc position around the clock face you will need to modify the following attributes of the JavaFX Arc shape:
| Attribute | Value | Description |
|---|---|---|
| startAngle | 0.0 | Start angle (in degrees). Zero is at the 3'o clock position moving counter clockwise |
| length | 90.0 | Extent angle (in degrees). The angle offset from the start angle going counter clockwise |
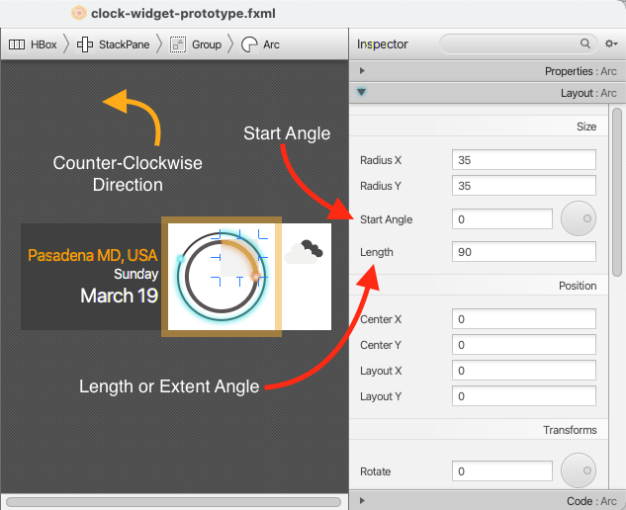
Drawing the Hour Hand
Since the Arc shape is drawn in a counter clockwise rotation we have to do some math to make the arc appear in a clockwise direction. For example if it were moving from the 12:00 postion to the 3:00 position the start angle is 0° and the length (extent angle) would be 90° as shown below.
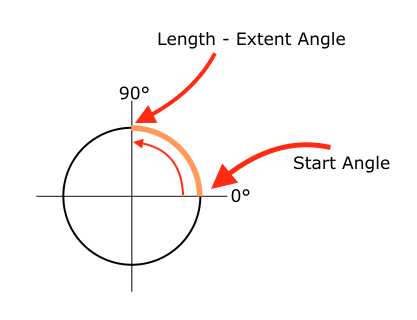
0 to 90 degrees in a Counter Clockwise direction
The hour hand has 12 positions and given a circle is 360° degrees (or 2π radians) each hour would be 360÷12 equalling 30° degrees. To represent 1:00 the hour hand arc should appear as a 30° (length) arc looking like its a moving in a clockwise direction from 12:00 to 1:00 when really its startAngle is 60° and length (extent angle) is 30°.
To make things a little easier let's look at a couple of simple math equations. These equations will later be converted to Java lambdas (functions).
Start Angle Based on the Hour
The following is the formula to calculate the start angle based on the hour passed in:
degrees = ( 12 - hour ) * 30// one hour is 30 degrees.startAngle = (degrees + 90) % 360
In the second equation you'll notice the 90 degrees added, this simulates the hour hand starting from the 12:00 o'clock position as opposed to the 3:00 position (which is zero degrees). Also, the modulus 360° is to ensure the angle between 0° to 359°.
The equation is translated to Java code as a lambda of type Function<Integer, Integer>. The Function interface accepts a value and returns a value respectively. In this case the hour is passed in and the start angle is calculated and returned.
/**
 * Start Angle of arc to draw the hour hand (start).
 */
private Function<Integer, Integer> startAngleHour = ( hours ) -> {
    // 360 ÷ 12 = 30 degrees for each hours tick on the clock
    int degrees = (12 - hours) * 30;
    // add 90 degress to position start at the 12'o clock position.
    // JavaFX arc goes counter clockwise starting zero degrees at the 3 o'clock
    return (degrees + 90) % 360;
};
The following code snippet is how to call the lambda function to calculate the startAngle:
int startAngle = startAngleHour.apply(1); // 60 degrees
After, creating a convenience function to calculate the startAngle I also created a function to calculate the length (extent angle) of the arc based on the hour of the clock (1-12).
Length or Extent Angle Based on the Hour
The following is the formula to calculate the length (extent angle) based on the hour passed in:
degrees = ( 12 - hour ) * 30extentAngle = (360 - degrees) % 360
As before the first formula is to determine degrees from the 12 o'clock position. The second formula is to move the arc to a start position by being subtracted from 360 (degrees).
The equation is translated to Java code as a lambda of type Function<Integer, Integer> shown in the listing below:
/**
 * Extent angle of the arc to draw the hour hand (end)
 */
private Function<Integer, Integer> extentAngleHour = ( hours ) -> {
    // 360 ÷ 12 = 30 degrees for each hours tick on the clock
    int degrees = (12 - hours) * 30;
    // make the extent angle counter clockwise to the 12'o clock position
    return (360 - degrees) % 360;
};
With the lambda function (extentAngleHour) ready to be used, the following code statement illustrates how to invoke the function to calculate the extentAngle.
int extentAngle = extentAngleHour.apply(1); // 30 degreesThe following is an example of step-by-step calculations using the above equations to determine the startAngle and extentAngle at 1:00, 2:00, and 3:00 o'clock.
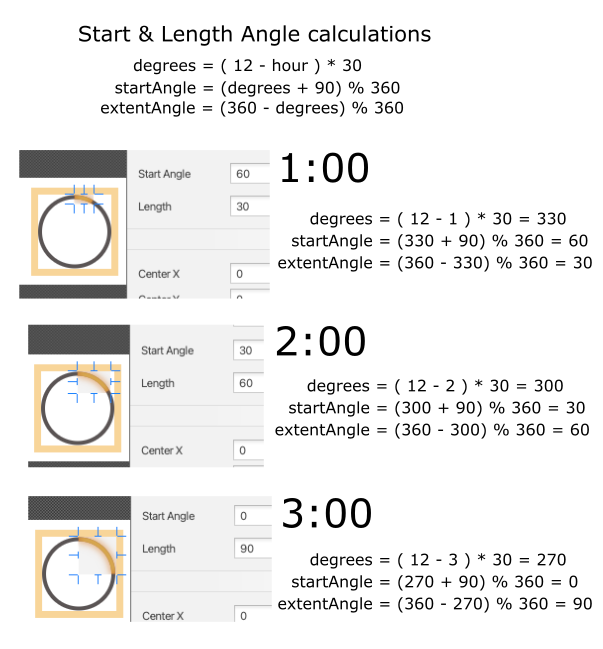
Calculating Start and Length angles for Hour Hand Arc
Now that you know how to calculate and draw the arc now we need to get a reference to the JavaFX Arc and Circle nodes in order to update values dynamically.
If you remember in Scene Builder the nodes have their fx:id set with a name such as hourHandArc and hourHandTip. In the controller java file these variables will be defined using the FXML annotation as shown below:
@FXML
private Arc hourHandArc;
@FXML
private Circle hourHandTip;
Using the above annotation (@FXML) is JavaFX's dependency injection mechanism to reference nodes in the scene graph. This allows the application to obtain instance objects such as the Arc and Circle nodes to be injected (assigned) during runtime. This makes the nodes available to methods in the controller (WorldClockController.java) class.
After referencing the Arc the controller code can now update the positions on every clock tick as shown below.
// draw orange glowing hour hand arc
int hourStartAngle = startAngleHour.apply(hour);
int hourExtentAngle = extentAngleHour.apply(hour);
hourHandArc.setStartAngle(hourStartAngle);
hourHandArc.setLength(hourExtentAngle);
Similar to a time lapse an animation of the hour hand is shown below. It doesn't show the hour hand tip, more on that next.

Hour Hand Animation without the tip
Now that you know how to position and draw arcs to appear to move, let's look at basic trigonometry to move the hour hand tip around the clock face.
Hour Hand Tip
To change the (X, Y) position of the Circle shape around the clock face you will need to modify the following attributes of the JavaFX Circle shape:
| Attribute | Value | Description |
|---|---|---|
| translateX | 35.0 | moves right 35 pixels |
| translateY | 0.0 | moves zero pixels on the Y axis |
To move the hour hand tip (circle) in a clockwise direction I will be using Math's cosine and sine to determine on a unit circle its X, Y coordinate (point on the circle). Also, multiplying by the radius amount will project the point onto the hour hand track circle.
- X coordinate on the unit circle - cosine (angle)
- Y coordinate on the unit circle - sine(angle)
- X, Y projected coordinate point on the larger circle based on the radius. Projected by
X * radiusandY * radiusrespectively.
Calculating the position of the tip:
/**
 * Positions the ball or tip at the start of the arc
 * The angle in degrees creating a point on the unit circle multiplied by the radius.
 */
private BiFunction<Integer, Double, double[]> tipPointXY = ( angDegrees, radius ) -> {
    double [] pointXY = new double[2];
    pointXY[0] = Math.cos(Math.toRadians(angDegrees)) * radius;
    pointXY[1] = Math.sin(Math.toRadians(angDegrees)) * radius;
    return pointXY;
};
To use the function tipPointXY() it will return an array of type double containing two values where hourTipPoint[0] is the X coordinate and hourTipPoint[1] is the Y coordinate respectively.
// draw orange glowing hour hand tip
 double [] hourTipPoint = tipPointXY.apply(hourStartAngle , 35.0);
 hourHandTip.setTranslateX(hourTipPoint[0]);
 hourHandTip.setTranslateY(hourTipPoint[1] * -1);
You should notice the method call to setTranslateY(hourTipPoint[1] * -1) where its value is multiplied by -1. This is to convert to the screen coordinate system where the Y coordinate going in a southerly direction are positive values.
Shown below is the hour hand arc and tip moving around the clock face.

Hour Hand Animation with tip
To see the full listing of the code to move the clock arms see WorldClockController.java[6] on GitHub.
There you have it! A way to animate the clock face. In Part 3 of this blog series I will be creating a UI form to configure the world clock such as changing timezones and locations (I will finally remove my pesky hardcoded cities).
Conclusion
In Part 2, you got a chance to use some math and trig skills to determine how to position parts of the hour hand.
After learning how to convert the math to usable functions, you get a chance to see JavaFX's FXML annotations to reference nodes on the scene graph.
Lastly, you were able to see animations of the hour hand move about the clock face.
As always comments are welcome. Happy coding!
Don’t Forget to Share This Post!


Comments (0)
No comments yet. Be the first.