Creating a JavaFX World Clock from Scratch (Part 6)
- June 25, 2021
- 5283 Unique Views
- 5 min read
Wherever you go, no matter what the weather, always bring your own sunshine. -- Anthony J. D'Angelo
Hello, and welcome to the last part of this series of articles on creating a JavaFX World Clock from scratch!
In this part, I will show you how to make WebService calls (RESTful) to retrieve weather data based on geographic locations.
If you remember, in Part 5 you learned how to use the JavaFX WebView and the popular mapping library Leaflet JS enabling the user to discover geographic locations. In Part 6, I will show you how I used Java 11’s Http Client to retrieve and display weather content. If you are new to this series, you can visit Part 1-5.

JFX World Clock Part 6
Getting started
If you want to jump right into the code just head over to https://github.com/carldea/worldclock
Requirements
- Java 16 - An OpenJDK with JavaFX (bundled with JavaFX modules)
- Azul Zulu with JavaFX
- Bellsoft Liberica with JavaFX (full version)
- JavaFX 16 – (optional) https://openjfx.io/openjfx-docs/#install-javafx
- Maven 3.6.3 or greater
- (optional) SDKMan
- Register to OpenWeatherMap.org to get your free API key.
I recommend using an OpenJDK build that already contains the JavaFX modules. Because the Java and JavaFX modules are bundled together there is no need to download OpenJFX modules from Maven Central as dependencies.
Before we begin, I want to mention some additional prerequisites or steps that need to be taken in order to execute the JavaFX World Clock application successfully. The application needs to obtain an API key provided by OpenWeatherMap.org. You’ll need to follow the instructions below.
Add API key (appid) to a resource file
Because the World Clock app uses a weather service, the app will need to obtain an appid from a file you'll need to create locally. After registering and obtaining your API key you’ll need to add the API key into a text file named openweathermap-appid.txt. The file must be located in the project’s directory at: src/main/resources/com/carlfx/worldclock/.
The appid (API key) file is private (local) and will be ignored by GitHub (not checked into GitHub). An entry will exist to ignore the appid file via the .gitignore file. So, when you build the application local to you the appid file will be included into your build.
Testing the application
$ mvn javafx:run
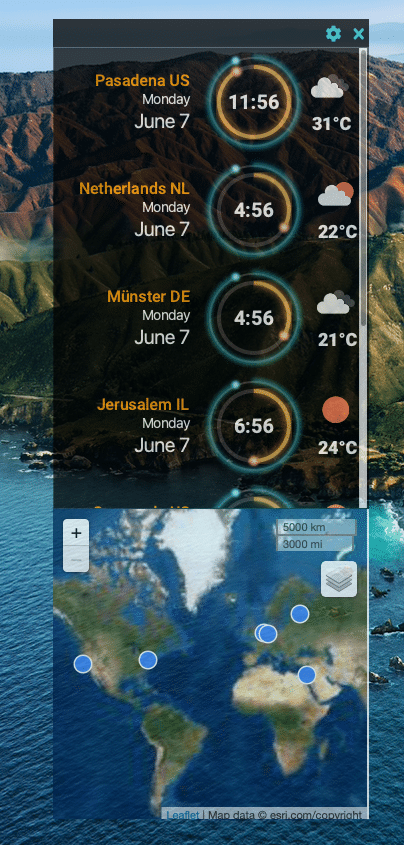
Assuming you have valid locations having geo coordinates (lat/lon) for a given clock face row you should see a weather icon and it’s associated temperature displayed as shown below.
OpenWeatherMap Icons
OpenWeatherMap's API for the Daily Weather forecast
In order to make REST API calls to fetch for weather information the API key will need to be applied to the http url request parameter like the following.
https://api.openweathermap.org/data/2.5/weather?units=metric&lat={lat}&lon={lon}&appid={API key}
For more info on OpenWeatherMap APIs visit the link below:
https://openweathermap.org/current#geo
Using Java 11’s HttpClient
In the listing below I created a utility method to use Java 11’s standard HttpClient API to fetch JSON data from the weather service. Because it returns a CompletableFuture this call will defer its results (JSON String) at a later time. As you’ll see later, the caller of this function will be able to apply or chain additional functions to the future to do further processing such as when fetching is complete.
public CompletableFuture<String> fetch(String uri) {
    HttpClient client = HttpClient.newHttpClient();
    HttpRequest request = HttpRequest.newBuilder()
            .uri(URI.create(uri))
            .timeout(java.time.Duration.ofMillis(3000))
            .build();
    return client.sendAsync(request, HttpResponse.BodyHandlers.ofString())
            .thenApply(HttpResponse::body);
}
Fetching the Current Weather forecast
For convenience I’ve created a getWeatherOutlook() method that will prepare the URL to be passed to the fetch() function described above. As you can see in the listing below having a final step of using the function .whenComplete(). It is responsible for parsing and populating the UI (updateWeatherUI).
CompletableFuture<String> fetchWeather = getWeatherOutlook(location);
firstWeatherJsonFetch.whenComplete(updateWeatherUI);
You’ll notice the lambda updateWeatherUI is passed into the .whenComplete(). The signature takes a BiConsumer<String, Throwable>. What’s nice about this function is that you can handle both a success and failure of the call from the HTTP request. Later, I will show you the updateWeatherUI lambda function, where it parses JSON using the Jackson library and subsequently populating the UI.
The function getWeatherOutlook()
I created a business-y function getWeatherOutlook() that takes a Location object’s GPS coordinates, obtains the API key(appid) and prepares a GET request call to OpenWeatherMap.org.
/**
 * An async fetch to get current weather as a JSON string.
 * @param location Location containing the latitude and longitude.
 * @return CompletableFuture<String> a future with a JSON response.
 */
private CompletableFuture<String> getWeatherOutlook(Location location) {
    if (location.getLatLong() == null || (location.getLongitude() == 0f) && location.getLatitude() == 0f) {
        return CompletableFuture.failedFuture(new Throwable("No lat long defined"));
    }

    double lat = location.getLatitude();
    double lon = location.getLongitude();
    DecimalFormat df = new DecimalFormat("###.######");
    try {
        String appId = new String(Files.readAllBytes(Paths.get(getClass().getResource("openweathermap-appid.txt").toURI())));
        if (appId == null) {
            return CompletableFuture.failedFuture(new Throwable("Error. No API token (appid) set a file called openweathermap-appid.txt."));
        }
        return fetch("https://api.openweathermap.org/data/2.5/weather?units=metric&lat=%s&lon=%s&appid=%s".formatted(df.format(lat), df.format(lon), appId));
    } catch (IOException | URISyntaxException e) {
        return CompletableFuture.failedFuture(new Throwable("Error. No API token (appid) set a file called openweathermap-appid.txt."));
    }
}
Updating the UI after fetch is complete
After fetching the JSON response from the webservice it's time to update the UI. In the listing below is a BiConsumer<String, Throwable> lambda function updateWeatherUI that is passed into the .whenComplete() function of the CompletableFuture (async call). The following will parse JSON and begin to update the UI elements.
BiConsumer<String, Throwable> updateWeatherUI =  (dayForecastJson, err) -> {
    try {
        // Parse weather JSON to obtain icon and weather temp info.
        ObjectMapper mapper = new ObjectMapper();
        Map<String, Object> dayForecast = mapper.readValue(dayForecastJson, Map.class);
        List<Map<String, Object>> weatherInfo = (List<Map<String, Object>>) dayForecast.get("weather");
        Map<String, Object> weatherIconInfo = weatherInfo.size() > 0 ? weatherInfo.get(0) : null;
        Map<String, Object> tempInfo = (Map<String, Object>) dayForecast.get("main");
        // Load weather icon asynchronously
        Image weatherIcon = new Image("https://openweathermap.org/img/wn/%[email protected]".formatted(weatherIconInfo.get("icon")), true);
        weatherIconImageView.setImage(weatherIcon);

        // Apply Tooltip
        if (weatherToolTip != null) {
            Tooltip.uninstall(weatherIconImageView, weatherToolTip);
        }
        weatherToolTip = new Tooltip(weatherIconInfo.get("description").toString());
        Tooltip.install(weatherIconImageView, weatherToolTip);
        // Apply Text of temp in celsius
        String tempType = location.getTempType() == Location.TEMP_STD.CELSIUS || location.getTempType() == null ? "°C" : "°F";
        String tempText = "%d%s".formatted( Math.round(Float.parseFloat(tempInfo.get("temp").toString())), tempType);
        temperatureText.setText(tempText);
    } catch (JsonProcessingException e) {
        e.printStackTrace();
    }
How it works?
As you can see above the code will parse the weather info and do the following:
- Parse JSON to obtain Weather info
- Load Weather Icon image
- Set the ImageView to display the new image
- Apply a tooltip showing the weather description on mouse hover
- Set the JavaFX temperature text node.
In step 1, it will parse the json string using Jackson into a Map of Maps instead of creating many POJO classes. Steps 2 & 3, the code creates and sets the icon image of the weather icon by using the Image's constructor that does loads the image in the background.
In step 4, ImageView will get a Tooltip applied using the function
Tooltip.install(weatherIconImageView, weatherToolTip);
Some JavaFX UI components don't have a setTooltip() function such as ImageView, so this function is used to apply tooltips to non form input type controls.
Lastly, (step 5) is applying the temperature info into a simple JavaFX Text node.
Well, there you have it a sci-fi looking, JavaFX World Clock created from scratch! While I did use one 3rd party dependency (Jackson) and an API key from a weather service, it at least is easy to maintain with low complexity.
Conclusion
It was fun working with Java 11’s HttpClient API to make web requests. I found it a little challenging but very important to get familiar with Java’s CompletableFutures API. CompletableFutures are often used when making Http requests asynchronously (non-blocking calls to a web service). By making asynchronous calls this most inevitably enhance the user experience of UI applications.
While I’ve only touched the surface (so to speak) on the daily forecast APIs from OpenWeatherMap.org, I did notice other APIs that provided even more weather data. All in all, I had a lots of fun sharing this project with others.
Are we there yet?
Well, it all depends… This is just a fun side project. There’s always enhancements and bug fixes, but as a cool project and useful app, this serves my needs at the moment. At some point I would like to put it out on an App store or Market place.
Happy coding and any comments are always welcome!
Don’t Forget to Share This Post!


Comments (0)
No comments yet. Be the first.