

Increasing Event Streaming with Kafka and Azul
- March 29, 2022
- 9 min read
- Assumptions
- Requirements
- Install Azul Platform Prime and Core (OpenJDK 17)
- Setting Environment Variables
- Step 1: Switch to Azul Platform Core (Open a terminal window)
- Step 2: Install Kafka
- Step 3: Start ZooKeeper and Broker Service
- Step 4: Create a Topic to Publish Events
- Step 5: Write some events into the Topic (Producer of events)
- Step 6: Terminate the Kafka Environment
Welcome to getting started with Azul Platform Prime and Apache Kafka!
In this article you will learn how to switch between two different Java runtime environments to run an Apache Kafka instance.
In later articles, this will allow you to compare runtime performance benchmarks.
Before we begin, let’s supply some context on Azul’s Platform offerings and Apache Kafka.
What is Azul Platform Prime and Platform Core?
Azul offers two Java runtime environments Platform Prime and Platform Core. Platform Prime (formerly known as Zing) is a high-performance implementation of the JVM (Java Virtual Machine) while Platform Core refers to Azul’s solution that includes the Zulu build of OpenJDK with dedicated support.
While both JDKs are derived from the standard OpenJDK, the difference is that Platform Prime has more features, including advanced JIT (just in time) compilation, garbage collection and faster startup capabilities, than the Zulu build of OpenJDK in Azul’s Platform Core (formally known as Zulu). For more details, go to https://www.azul.com/modern-cloud-enterprise.
What’s great about the two build distributions is that they are Java TCK (Test Compatibility Kit licensed) tested JDKs (Java Development Kits) which means your Java application code is guaranteed to run seamlessly on both Java runtime environments (JREs) respectively. Because of this you can easily make the switch to any Java runtime environment without changing any code!
To clarify naming conventions the current names of the Azul build distributions are as follows:
- Azul Platform Prime builds of OpenJDK – Builds of the OpenJDK including Azul’s advanced features such as Falcon, C4 Garbage Collector, CNC, and ReadyNow!
- Azul Zulu builds of OpenJDK – Based on the standard builds of the OpenJDK and featured in Platform Core
Overall, Platform Prime ultimately will reduce your infrastructure costs by increasing performance across JVMs with less resources.
What is Kafka?
In short, Kafka is a highly scalable distributed event streaming framework originally created by LinkedIn.com and later donated to community and open-sourced at the Apache Software Foundation.
Apache Kafka is an open-source distributed event streaming platform used by thousands of companies for high-performance data pipelines, streaming analytics, data integration, and mission-critical applications. According to the Kafka website:
More than 80% of all Fortune 100 companies trust and use Kafka.
What is Event Streaming?
Event streaming is the practice of capturing data (events) that is then stored, processed, or routed to different technologies as needed and is a common way to develop message-oriented applications.
At a high-level architectural view, it is like the traditional messaging-oriented middleware (MOMs) that can persist messages (events) having payloads (state) that get transmitted (streamed) to message queues (topics). This fundamental architectural pattern is often called the producer and consumer model.
Where events (messages) are published topics from producers and consumers will receive the events to be processed.
Kafka Architecture Overview
Instead of the traditionally centralized event streaming architectures, Kafka takes a distributed approach to event streaming. Kafka uses Apache ZooKeeper as a load balancer to manage brokers within a cluster.
A Kafka cluster can have many brokers that supply high availability and redundancy for producers and consumers. Each broker holds zero or more topics, and each topic can be split up into one-to-many partitions.
For increased performance and availability, the partitions are replicated across brokers. What’s great about brokers is they each do not have to be in the same geographic region.
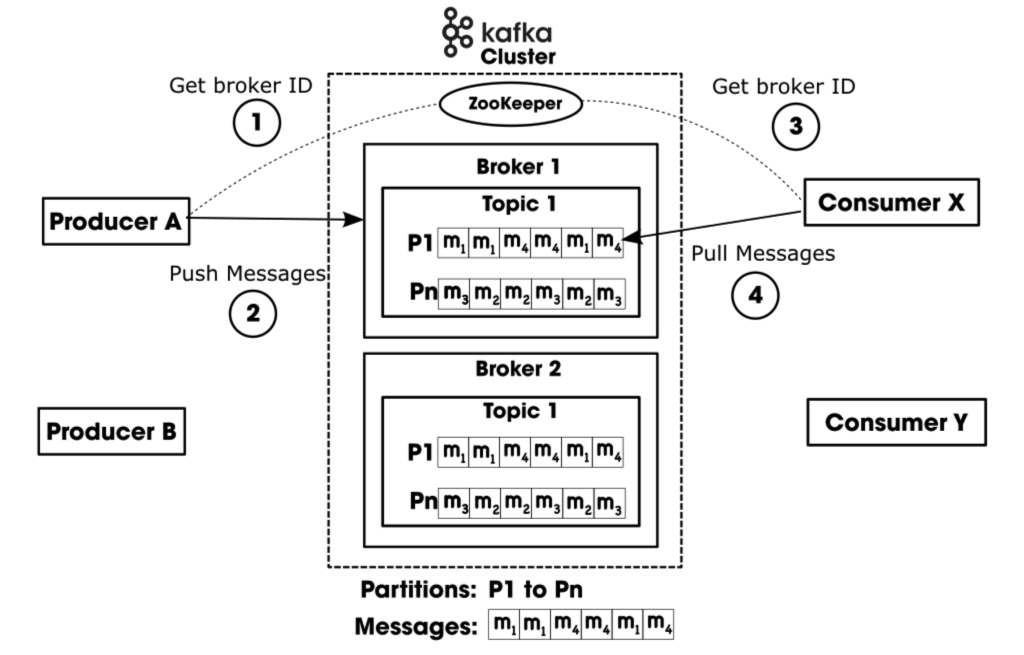
Microservice applications (producers) can push messages (events) to topics and other applications (consumers) can pull messages from topics. The consumers of topics can process, transform, and enrich data streams. It can also dynamically create a new stream of data for other consumers.
An exciting thing about Kafka is it’s not only a reliable fault tolerant messaging framework, but also supplies flexible Java APIs that enable developers to talk to different data sources (Connect API) To transform data streams (Stream API). These APIs are just to name a few.
Getting Started with Launching Kafka on Azul
Before getting started the following are assumptions or skills that you should be familiar with. Also, in this section is how to get the software needed to download before we begin.
Assumptions
This article assumes the reader is familiar with common Linux/Unix commands. In this tutorial we will be using a Linux based OS.
Requirements
The following are downloads needed to get started:
- Azul Platform Prime
- Azul Zulu build of the OpenJDK (referred to as Platform Core below)
- Apache Kafka
Install Azul Platform Prime and Core (OpenJDK 17)
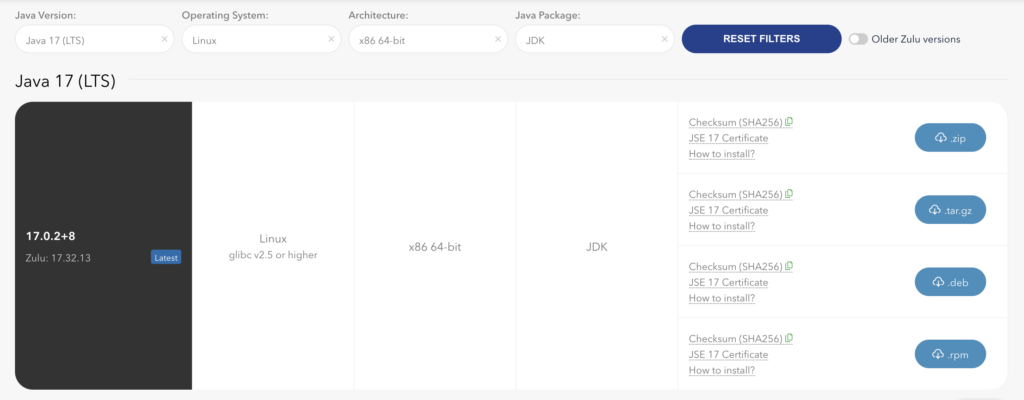
In this example let’s go to Azul.com to download JDK 17 for the Linux OS preferably a tar.gz version of both Azul Platform Prime and Platform Core.
Choosing the tar distribution file will make the tutorial easier to follow since the others are more specific to a particular Linux distribution package manager.
The following is the JDK version to download:
- Java Version: Java 17
- Operating System: Linux
- x86 64-bit
The following is the download page of the Azul Zulu Prime Builds of OpenJDK:
The following is the download page of the Azul Zulu Builds of OpenJDK:
After downloading the binaries you’ll want to decompress the files to a local directory.
To keep things together let’s create a ${HOME}/sdks directory where Zulu Prime and Zulu Core will live. Below let’s create an sdks directory under your home directory.
# Create a SDKs directory for both Prime and Core Java Distributions
$ mkdir ~/sdks
# Move downloaded JDKs into the SDKs directory and change into it.
$ mv ~/Downloads/zing22.01.0.0-3-jdk17.0.2-linux_x64.tar.gz ~/sdks
$ mv ~/Downloads/zulu17.32.13-ca-jdk17.0.2-linux_x64.tar.gz ~/sdks
$ cd ~/sdks
# *NOTE: Replace <…> with correct version information. Shown below is
generalized format of the naming convention.
# Decompress tar files
$ tar xzvf zing<prime_version>-<jdk_version>.tar.gz
$ tar xzvf zulu<core_version>-<jdk_version>.tar.gz
# Remove tar files to save space
$ rm zing<prime_version>-<jdk_version>.tar.gz
$ rm zulu<core_version>-<jdk_version>.tar.gz
# Create a symbolic link named current_java
$ ln -sfn ~/sdks/zulu<core_version>-<jdk_version> ~/sdks/current_jdk
Setting Environment Variables
Now that Azul Prime and Core are installed, we want to switch between the two by setting our JAVA_HOME and PATH environment variables. Open a terminal window and enter the following commands:
# Copy (preserve) the current PATH variable
$ export TEMP_PATH=$PATH
# Export AZUL_CORE variable to the prime jdk under sdks
$ export AZUL_CORE=~/sdks/zulu<core_version>-<jdk_version>
# Set AZUL_PRIME variable to the prime jdk under sdks
$ export AZUL_PRIME=~/sdks/zing<zing_version>-<jdk_version>
# Set JAVA_HOME to a symbolic link current_jdk
$ export JAVA_HOME=~/sdks/current_jdk
# Set PATH by adding JAVA_HOME/bin to PATH
$ export PATH=$JAVA_HOME/bin:$TEMP_PATH
The following is using Zulu Prime JDK 17:
# Copy (preserve) the current PATH variable
export TEMP_PATH=$PATH

# Export AZUL_CORE variable to the prime jdk under sdks
export AZUL_CORE=~/sdks/zulu17.32.13-ca-jdk17.0.2-linux_x64

# Set AZUL_PRIME variable to the prime jdk under sdks
export AZUL_PRIME=~/sdks/zing22.01.0.0-3-jdk17.0.2-linux_x64

# Set JAVA_HOME to a symbolic link current_jdk
export JAVA_HOME=~/sdks/current_jdk

# Set PATH by adding JAVA_HOME/bin to PATH
export PATH=$JAVA_HOME/bin:$TEMP_PATH
In your current terminal window’s session, the above environment variables will be set, however if you want them to persist them when you create new sessions, you’ll need to add them to your .bashrc or .bash_profile in your home directory.
Once added to your .bashrc file, you’ll need to source it as shown below:
$ source ~/.bashrc
# Or
$ . ~/.bashrc
If you do not want to change (disturb) your .bashrc file, you can easily create a local shell file to be sourced such as the following:
# Add Environment variables to a shell file using the vi editor
$ vi setup.sh
.. copy and paste the above exports
# Save and exit vi (esc, colon, wq)
# For every new session (terminal window) source the file setup.sh.
$ source setup.sh
If you are on an Ubuntu system, you may want to install vim instead of vi using the following command:
$ sudo apt-get install vim
Not sure if you noticed earlier when setting the JAVA_HOME environment to a symbolic link named current_jdk inside the sdks directory. Because we already created environment variables AZUL_COREand AZUL_PRIME it’s super easy to switch the symbolic link to point to those paths.
Switching between Azul Platform Prime and Core Java Runtimes
Now that your environment variables are setup you will need to create a Linux/Unix symbolic links to switch between Java environments.
Essentially, symbolic links are files that can alias or point to another file or directory.
So, when we want to run the Kafka examples on Platform Prime or Core it’s easy to change the link to point to the proper directory.
# Create a symbolic link named current_java
# Set link to point to AZUL_CORE
$ ln -sfn $AZUL_CORE ~/sdks/current_jdk
# Verify Platform Core is set as the current JDK
$ java –version
openjdk version "17.0.2" 2022-01-18 LTS
OpenJDK Runtime Environment Zulu17.32+13-CA (build 17.0.2+8-LTS)
OpenJDK 64-Bit Server VM Zulu17.32+13-CA (build 17.0.2+8-LTS, mixed mode,
sharing)
# Set link to point to AZUL_PRIME
$ ln -sfn $AZUL_PRIME ~/sdks/current_jdk
# Verify Platform Prime is set as the current JDK
$ java -version
java version "17.0.2" 2022-01-25 LTS
Java Runtime Environment Zing22.01.0.0+2 (build 17.0.2+8-LTS)
Zing 64-Bit Tiered VM Zing22.01.0.0+2 (build 17.0.2-zing_22.01.0.0-b3-
product-linux-X86_64, mixed mode)
Installing and running Kafka
The next set of instructions is a simplified version of the Getting started from Apache Kafka’s site at https://kafka.apache.org/quickstart
Step 1: Switch to Azul Platform Core (Open a terminal window)
# (Optional) If this session has not set environment variables yet.
$ cd ~/sdks
$ source setup.sh
# Switch to standard build of OpenJDK
$ ln -sfn $AZUL_CORE ~/sdks/current_jdk
You only need to source setup.sh once per new terminal session. For convenience you can add them and source your .bashrc file for later terminal sessions.
Step 2: Install Kafka
Download the latest Kafka release and extract it under <HOME>/sdks directory.
The following commands will decompress the Kafka tar (tgz) file as a directory with the same name as the file (excluding the file extension).
# Start the ZooKeeper service
# Note: Soon, ZooKeeper will no longer be required by Apache Kafka.
$ tar -xzf kafka_2.13-3.0.0.tgz
$ cd kafka_2.13-3.0.0
After the file is decompressed you may remove the tar file to save space.
Step 3: Start ZooKeeper and Broker Service
Run the following commands to start all services in the correct order:
# Start the ZooKeeper service
# Note: Soon, ZooKeeper will no longer be required by Apache Kafka.
$ bin/zookeeper-server-start.sh config/zookeeper.properties
Open another terminal session and run (be sure the new terminal has environment variables set):
# Start the Kafka broker service
$ bin/kafka-server-start.sh config/server.properties
Once all services have successfully launched, you will have a basic Kafka environment running and ready to use.
Step 4: Create a Topic to Publish Events
Kafka is a distributed event streaming platform that lets you read, write, store, and process events (Also called records or messages in the documentation) across many machines.
Before you can write your first events, you must create a topic. Open another terminal session and run:
$ bin/kafka-topics.sh --create \
--partitions 1 \
--replication-factor 1 \
--topic quickstart-events \
--bootstrap-server localhost:9092
Since we are creating a simple Kafka instance, we will just create one topic with one partition and a replication factor of one. The single instance will be listening on localhost and port 9092.
To display the newly created topic specify the –describe switch.
$ bin/kafka-topics.sh --describe \
--topic quickstart-events \
--bootstrap-server localhost:9092
$ bin/kafka-topics.sh --describe --topic quickstart-events --bootstrap-server
localhost:9092
All of Kafka’s command line tools have added options: run the kafka-topics.sh command without any arguments to display usage information. For example, it can also show you details such as the partition count of the new topic:
$ bin/kafka-console-producer.sh \
--topic quickstart-events \
--bootstrap-server localhost:9092
Topic:quickstart-events PartitionCount:1 ReplicationFactor:1 Configs:
Topic: quickstart-events Partition: 0 Leader: 0 Replicas: 0 Isr:
0
You can stop the producer’s client with Ctrl-C at any time.
Step 5: Write some events into the Topic (Producer of events)
Open another terminal session and run the console consumer client to read the events you just created:
$ bin/kafka-console-consumer.sh \
--topic quickstart-events \
--from-beginning \
--bootstrap-server localhost:9092
This is my first event
This is my second event
Here you enter text and hit the enter key to publish the message onto the topic. You can stop the consumer client with Ctrl-C at any time.
Step 6: Terminate the Kafka Environment
Now that you reached the end of the quickstart, feel free to tear down the Kafka environment—or continue playing around.
- Stop the producer and consumer clients with Ctrl-C if you haven’t done so already.
- Stop the Kafka broker with Ctrl-C.
- Lastly, stop the ZooKeeper server with Ctrl-C.
If you also want to remove any data of your local Kafka environment including any events you have created along the way, run the command:
$ rm -rf /tmp/kafka-logs /tmp/zookeeper
Running Kafka on Azul Platform Prime
Now, that you’ve run the examples using Platform Core (Standard builds of the OpenJDK) let’s switch Java runtime environments to run Kafka on Azul’s Platform Prime!
With one of the open terminals switch Java runtimes to use the environment variable AZUL_PRIME like the following (assuming environment variables have been set):
$ ln -sfn $AZUL_PRIME ~/sdks/current_jdk
Repeat steps 2-6 to confirm that Kafka runs on Azul Platform Prime.
Success!
Conclusion
You got a chance to learn about Azul’s two Java runtime environments Platform Prime (Zulu Prime build of the OpenJDK) and Platform Core (Zulu build of the OpenJDK). Platform Prime being the advanced JVM, and Platform Core’s runtime is from a standard build of the OpenJDK.
Next, you got a chance to learn about Kafka’s distributed event framework. Here, you learned how to launch a simple Kafka service, with one producer and one consumer generating events and processing events, respectively. Finally, you were able to repeat the steps using Azul’s platform prime.
Switching your Java Runtime environment is simple once you’ve setup your environment variables and change the symbolic link current_jdk you are good to go!
- March 29, 2022
- 9 min read
Carl Dea is a Lead Developer and Software Engineer at Deloitte. He has authored Java books and has been developing software for 20+ years with many clients, from Fortune 500 companies to nonprofit organizations. He has written software ranging from mission-critical applications to e-commerce applications. Carl has been using Java since the very beginning (when Applets were cool) and is a JavaFX enthusiast (fanboy) dating back to when it used to be called F3/JavaFX script. He greatly loves sharing and advocating Java based technologies.


Comments (0)
No comments yet. Be the first.