JavaFX: Gluon Status Update, Dual Screen on Raspberry Pi Sample, IntelliJ New JavaFX Project Wizard
- June 04, 2021
- 6108 Unique Views
- 3 min read
Last week, Johan Vos of Gluon, released a video with a status update of JavaFX. In this post we are going to take a deeper look into one of the announcements: dual screen support on Raspberry Pi.
Announcements by Gluon
Since Java switched to a 6-month release cycle, JavaFX has done the same, so next version will be number 17. Keep in mind, although Java and JavaFX are on the same version-number, you can still use Java 11 and combine it with the JavaFX 17 runtime if you want to benefit from its improvements. Up till now, there were no breaking changes in either of the frameworks which force you to use a Java-version higher than 11.
Below you can find the full video, but these are the highlights:
- More committers and 126 issues fixed in JavaFX 17
- >100K SDK downloads from gluonhq.com in April
- JavaFX on embedded: JVM on ARM32 or JVM and Statically compiled and GraalVM on ARM64
- Hardware acceleration using OpenGL on embedded
- Demo of dual screen support on Raspberry Pi
- JavaFX native on Android and iPhone mobile
- Gluon Cloud connects Java applications with cloud services
- Gluon CloudLink synchronizes and secures data in the cloud
- And one more thing... JavaFX in the browser as JavaScript + WebGL, yes really!
A dual screen experiment on Raspberry Pi
Besides the JavaFX-in-browser, the dual-screen support for Raspberry Pi is a very nice feature that I wanted to try out myself. You can try the same, as this is already available for everyone in the latest 17-ea version of JavaFX you can download from the Gluon website.
For a quick demo, I combined a Pi4J JavaFX minimal sample application (ready-to-go Maven project) with some sample code that was provided by Gluon. On the PI4J documentation site you can find all information about installing JavaFX on the Raspberry Pi and in the article "JavaFX Running in Kiosk Mode on the Raspberry Pi" here on foojay, you can find more info on desktop versus kiosk mode.
The sources of the project shown in the video below are available on GitHub.
I used a CrowPi (electronics experiment kit) which has a small touchscreen, combined with a 4K display which is connected to the second micro HDMI connector of a Raspberry Pi 4.
On each screen a chess board pattern is created and by clicking on the small screen, the selected box is shown. Because both screens have a different resolution, the selected box is smaller on the big screen.
The application is first packaged with Maven and started with a bash script from another computer through SSH for easier demonstration.
$ mvn package
$ cd target/distribution
$ sudo bash run-kiosk.sh
The script first disables desktop mode with /sbin/init 3, starts the compiled jar with some additional settings, and when the program exits, the desktop mode is started again with /sbin/init 5. With this approach, hardware acceleration is used for maximum performance of the JavaFX rendering. It is also possible to use the cursor and hardware rotation, but this still needs to be fully documented.
rm #!/usr/bin/env bash
/sbin/init 3
export ENABLE_GLUON_COMMERCIAL_EXTENSIONS=true
java \
  -Degl.displayid=/dev/dri/card0 \
  -Dmonocle.egl.lib=/opt/javafx-sdk-17/lib/libgluon_drm.so \
  -Djava.library.path=/opt/javafx-sdk-17/lib \
  -Dmonocle.platform.traceConfig=false \
  -Dprism.verbose=false \
  -Djavafx.verbose=false \
  -Dmonocle.platform=EGL \
  --module-path .:/opt/javafx-sdk-17/lib \
  --add-modules javafx.controls \
  --module be.webtechie.test/be.webtechie.test.Main $@
/sbin/init 5
New JavaFX project wizard in IntelliJ IDEA
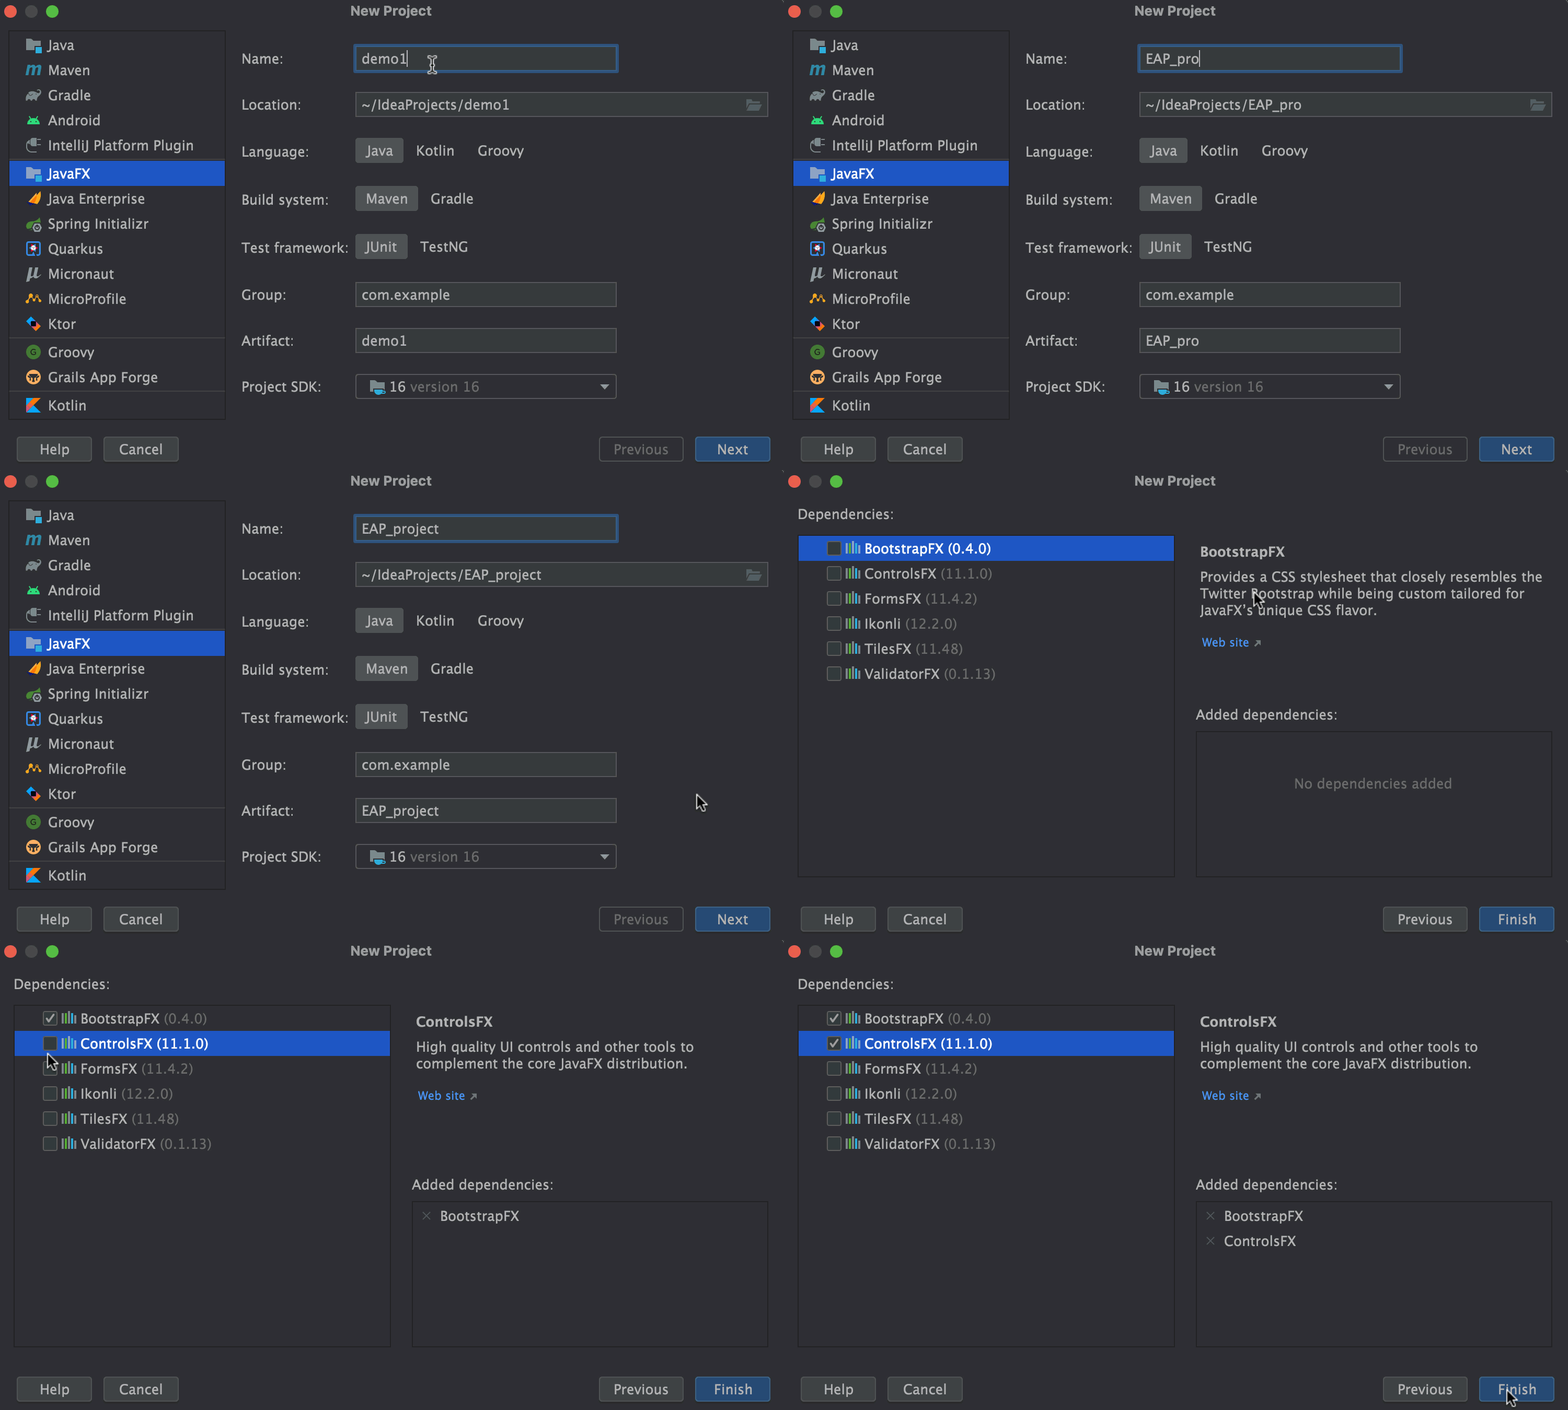
And that wasn't the only JavaFX announcement last week! JetBrains showed a great new JavaFX project wizard in IntelliJ IDEA (version 2021.2 EAP 1)!
To save you time configuring settings after project creation, we’ve reworked the new project wizard for JavaFX. It only takes two steps. First, you add a project SDK and the language you will use, the desired build system, and the test framework.
Then you will have the opportunity to choose from a list of the most frequently used libraries, which come with short descriptions on the right. Once you create your new JavaFX project, your IDE will generate a fully configured sample application.

Conclusion
I've always loved how easy it us to build nice user interfaces with JavaFX. And I love to see how this "old and reliable" framework on top of Java is gaining back the traction it deserves.
This dual-screen example on Raspberry Pi is just a quick demo to show and share the code. I'm still thinking of a nice demo that combines it with some of the electronic components in the CrowPi... Any ideas and some spare time you can share? 😉
At Gluon, they are working very hard to make sure Java developers can easily create client applications, run them on any platform, and connect them to cloud and enterprise systems. And with the powerful tools of JetBrains, developers can focus on good coding.
JavaFX in the browser will extend the market further and I'm are really looking forward to the first proof-of-concept code examples.
Don’t Forget to Share This Post!


Comments (5)
JavaFX: One Codebase for Web, PC, and Mobile
5 years ago[…] contributor Frank Delporte published a guide and sample project designed to showcase the capability to deliver a single application across Mac and Raspberry Pi […]
One Codebase for Web, PC, and Mobile - Techy Rack
4 years ago[…] contributor Frank Delporte published a guide and sample project designed to showcase the capability to deliver a single application across Mac and Raspberry Pi […]
JavaFX: One Codebase for Web, PC, and Mobile - InfoQ.com - Robil World
4 years ago[…] web or packaged locally through techniques like Electron.Pi4J contributor Frank Delporte published a guide and sample project designed to showcase the capability to deliver a single application across Mac and Raspberry Pi […]
Yo
2 years agoWhere is javaFx in browser?
Frank Delporte
2 years agoIndeed, not a lot of JavaFX in the browser. But this is a very nice example using JPro and it's sources are available on GitHub: https://www.jfx-central.com/