

IntelliJ IDEA Changelists and Git Staging
- April 16, 2021
- 9 min read
- Committing a Whole File
- Committing Part of a File
- Reverting Changes
- Multiple Changelists
- Moving Changes Between Changelists
- Making a Changelist Active
- Committing Your Changes to Git
- Staged and Unstaged Folders
- Unstaged Folder - Staging files
- Unstaged Folder - Staging Part of a File
- Staged Folder - Unstaging a File
- Staged Folder - Unstaging Part of a File
- Staging or Unstaging Individual Changes Using the Gutter Icons
- Committing Changes
Since the release of IntelliJ IDEA 2020.3, there are now two ways to manage your commits to Git. The first one is through existing functionality with IntelliJ IDEA changelists, the second is through support for Git staging. This blog will take you through both approaches and highlight the differences. There is no right or wrong answer, it's a case of choosing the method that works best for you, or that you're most familiar with.
Before we get started, it's important to know that both IntelliJ IDEA Changelists and Git staging allow you to commit part of a file, a whole file or multiple files to Git. How they achieve that is slightly different, but the end result is the same. IntelliJ IDEA Changelists work on the notion of a range in your content. All changes in that range will form part of the commit. Git staging uses the git-native notion of a staging area (also known as 'index').
Both IntelliJ IDEA Changelists and Git staging are accessible from the Commit tool window. From IntelliJ IDEA 2020.1 you can switch to use this non-modal commit window with ⌘, on macOS, or Ctrl+Alt+S to display the Preferences/Settings. From there type in commit and select the 'Use non-model commit interface' checkbox. You can also use ⌘⇧A (macOS), or Ctrl+Shift+A (Windows/Linux) for Find Actions and type in Commit. You can then access this with ⌘0 on macOS, or Alt+0 on Windows and Linux.
Finally, before we get started with the comparison, you can't use IntelliJ IDEA Changelists and the Git staging area at the same time. You can switch between them, but not use them simultaneously. Let's start with IntelliJ IDEA Changelists.
What is an 'IntelliJ IDEA Changelist'?
Prior to the release of 2020.3, IntelliJ IDEA Changelists were the only way to commit changes to your Git repository.
IntelliJ IDEA Changelists are not just for Git, they're for any supported VCS system, but in this blog we are going to focus on Git, so we can compare them to the new Git staging functionality.
Committing a Whole File
IntelliJ IDEA always gives you a Default Changelist and, when you change a file, the file will show in the Default Changelist with a checkbox that isn't selected:
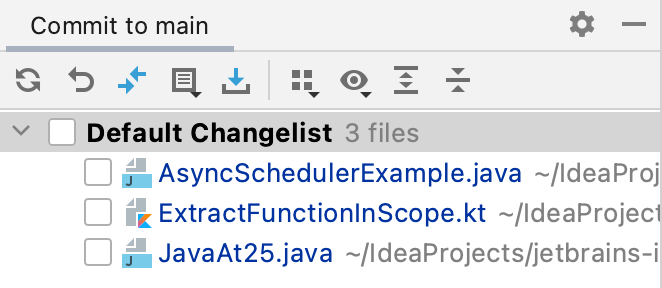
From there, if you want to select the whole file to be committed, you can select the checkbox to the left of the filename:
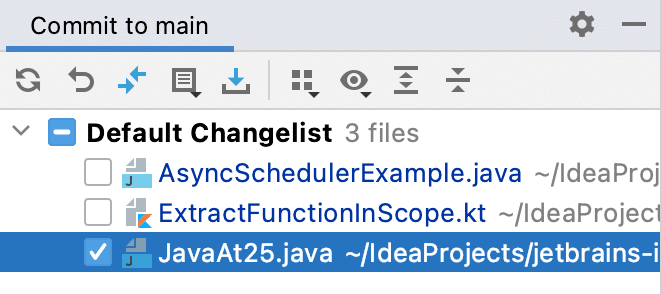
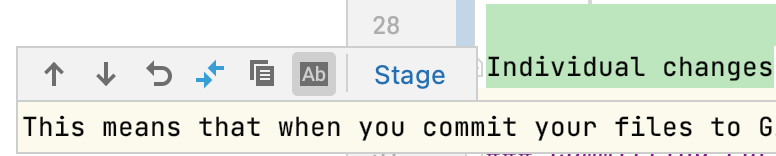
This means that when you commit your files to Git, all the changes in the file that you selected will be added and then committed to git. IntelliJ IDEA runs both the git add and the git commit command for you.
Committing Part of a File
Alternatively, if you want to commit some, but not all, of that file, you can double-click the file from the Default Changelist to open the diff view. This view shows the last known version that Git has on the left and then your local copy on the right in blue, which you can edit. You can select the checkboxes adjacent to each code change you have made on the right to specifically say that you only want to commit changes in that range, not the whole file.
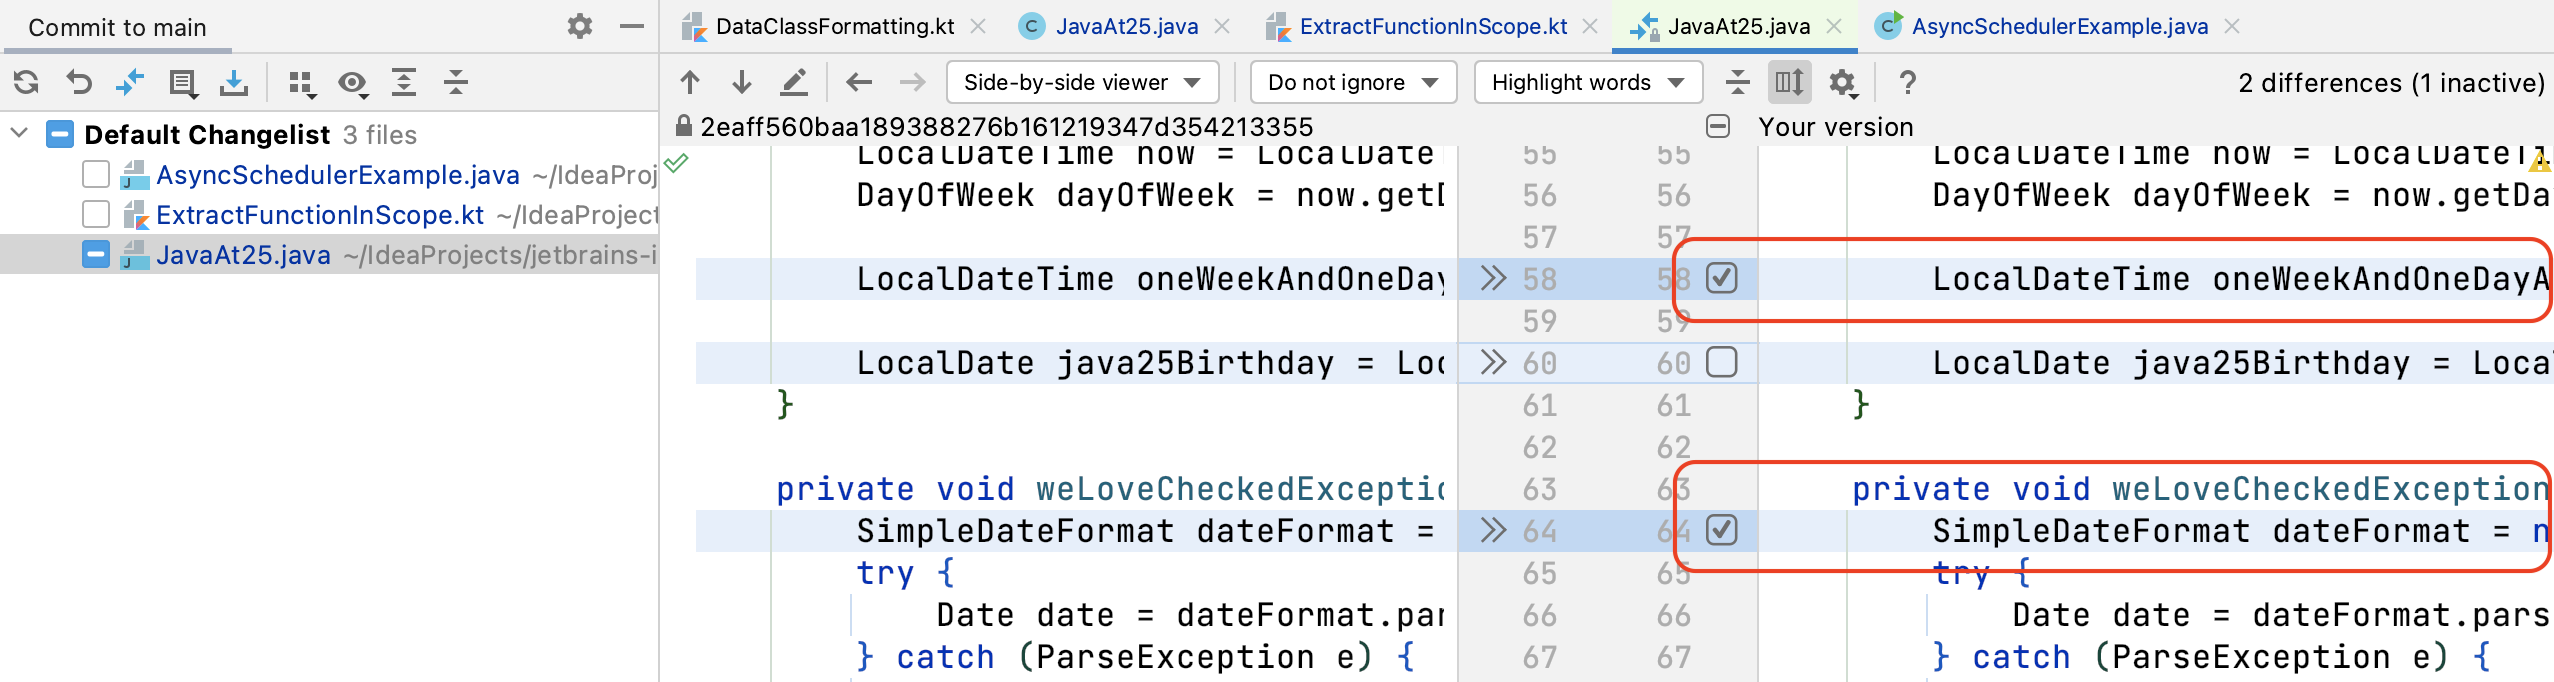
Note that if you only select part of the file to be committed as in this example, the Default Changelist will indicate that the file will be partially committed with a line through the checkbox adjacent to the filename in the Default Changelist as you can see above.
Tip: You can also use ⌘D or Ctrl+D to open up the diff view from the Commit tool window.
Reverting Changes
From the diff view you can also revert changes individually by using the >>

You can also rollback the whole file by right-clicking on it and selecting Rollback.
Multiple Changelists
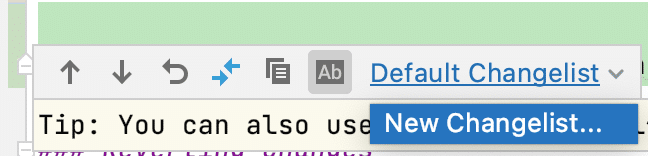
The Default Changelist in IntelliJ IDEA is only part of the story. IntelliJ IDEA supports multiple changelists. Let’s say you have changes that should not be committed, you can move those into a separate changelist. Changelists in IntelliJ IDEA are used to group changes. You can only commit one Changelist at a time. So, to build groups of changes up at the same time, you need to create multiple Changelists. It's helpful to name your Changelists according to the feature or bug that they apply to. This helps you to keep track of how you should split your commits up into your Changelists.
To create multiple Changelists you can right-click on the Default Changelist and select 'New Changelist':

Moving Changes Between Changelists
You can also move files between Changelists. You can move a whole file to a new Changelist and create that new Changelist if it doesn't already exist as part of that action. To do that, you can right-click on the file in the Changelist in the Commit window and select Move to Another Changelist. You will be prompted to select the changelist if it exists, or create the Changelist if it doesn't. When you create a new Changelist, you can optionally set it to 'Active'. This means that all future changes will be assigned to that Changelist.
In this example, all future changes will now be assigned to our DateFormat changelist because we set that one to be the 'Active' one when we created it.
There is an additional checkbox on the New Changelist dialog called Track context. If you are working with tasks and contexts and have connected IntelliJ IDEA with an appropriate 3rd party application, you can use this checkbox to get IntelliJ IDEA to manage the task context.
As well as moving whole files between Changelists, you can also move single changes within a file between Changelists. This is especially useful if you're working on changes that impact one file, but you want to split the commits up for the reasons we talked about earlier. To assign some, but not all changes in a file to a different Changelist, right-click on the change from the diff view in Your version on the right-hand side. You can then select 'Move to another changelist'. You can also use ⇧⌘M on macOS, or Alt+Shift+M on Windows and Linux.
You can also move changes between Changelists using the coloured bars in the gutter:
Making a Changelist Active
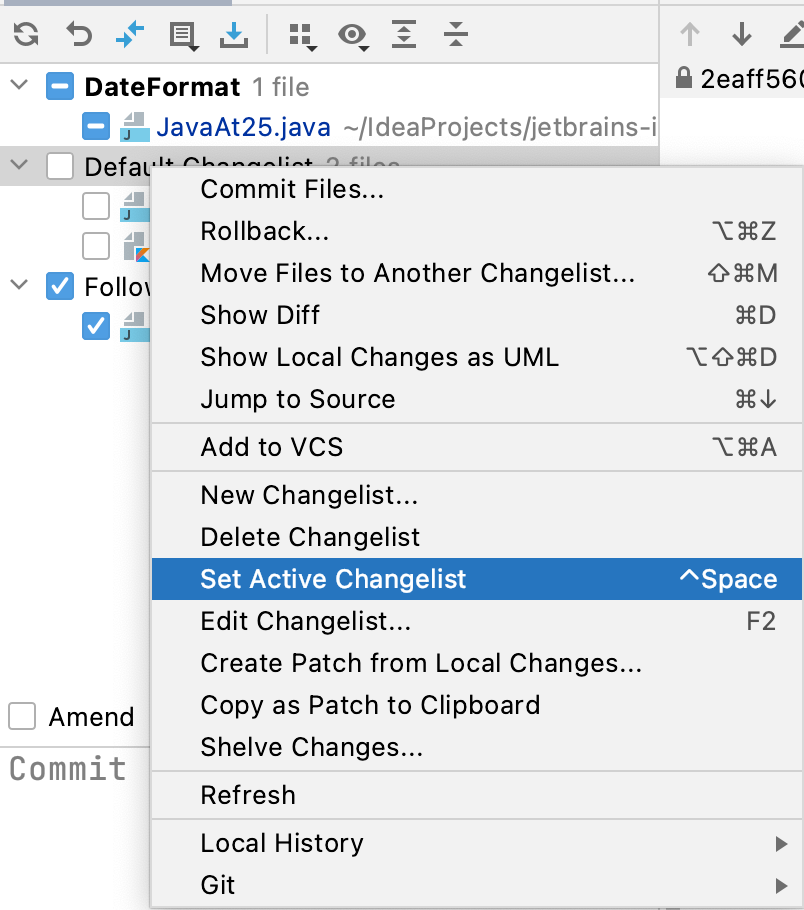
Lastly, we've already shown you how to set a new Changelist to be the active one, but it's worth mentioning that IntelliJ IDEA needs to know which Changelist to use for new changes; you always need one Changelist that is the active one. You can choose which Changelist is the active one when you have more than one by right-clicking on the Changelist and selecting Set Active Changelist. If you don't see this option, it's because the Changelist you have selected is already the active Changelist.
When you commit any new changes, they will be placed in your Active IntelliJ IDEA Changelist by default.
Committing Your Changes to Git
Now that you have your IntelliJ IDEA Changelists created, and your changes split up how you want them, you're ready to commit them to Git. You can see what will be committed to Git from the Commit window.
When you're happy with that you can use ⌘K on macOS, or Ctrl+K on Windows and Linux to open the Commit window. Before you press Commit, you need to enter a commit message. After you've done that and press commit to commit them to your Git history locally, IntelliJ IDEA runs two git commands:
git add
git commit
This adds the files and commits them in one step into your local Git history. You can then go ahead and push the changes to your remote repository if you want to.
What is 'Git Staging'?
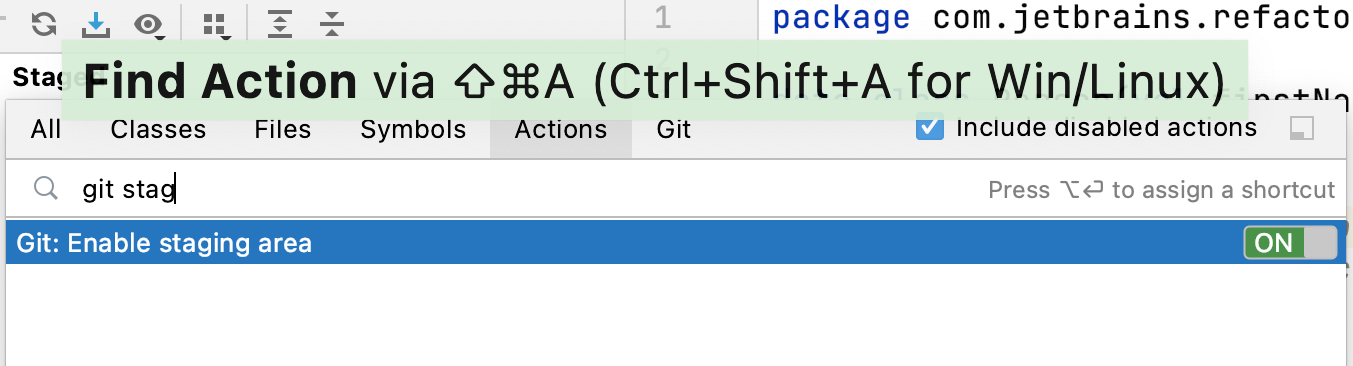
IntelliJ IDEA 2020.3 introduced support for Git staging. It is not enabled by default, but the fastest way to enable it is with Find Actions (⇧⌘A on macOS, or Ctrl+Shift+A on Windows and Linux) and type in git staging. Git staging is the git-native way of committing file diffs to a git repository.
You can then turn it on:
You can also enable Git staging from the Settings/Preferences dialog with ⌘, on macOS, or Ctrl+Alt+S to display and then type in git staging.
With Git staging, this process is managed in two steps. When you stage a file, or part of a file, IntelliJ IDEA runs the git add command for the changes. When you subsequently commit those files, or some diffs of a file, IntelliJ IDEA runs the git commit command. The end result is the same, however with Git staging you can take advantage of adding your changes before you commit them if you're more familiar with that model.
Staged and Unstaged Folders
With Git Staging you'll see two folders as opposed to the one IntelliJ IDEA Changelist in the Commit window. Each change you make to your file is represented by a diff between your local file and HEAD. The Unstaged folder is where all your diffs will appear initially. To include a diff in your next commit, you need to move it from the Unstaged folder to the Staged folder. The action of doing this means IntelliJ IDEA performs a git add command for all the diffs in the file.
Unstaged Folder - Staging files
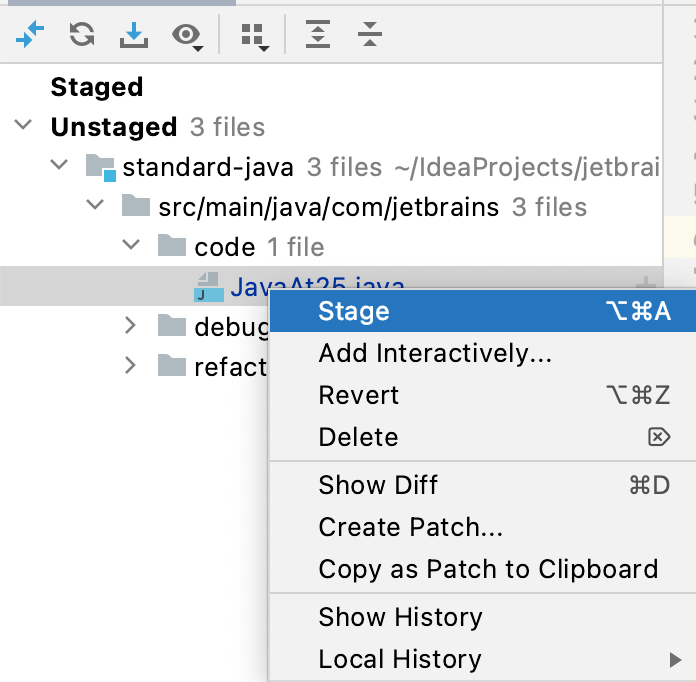
When you make a change to a file it will appear in your Unstaged folder initially as a diff that you can stage. You can stage the whole file by dragging it up to the Staged folder, by using the + icon in the tree, or right-click and select +Stage. IntelliJ IDEA will run a git add command when you do this:
Git add modifies the file content in the index (the staged content). If you subsequently modify content inside that same range, it will not be committed until it’s staged. You can use the staging area to change what is going to be committed independently of any modifications to the local files. With IntelliJ Changelists, any change inside of that same range will be committed.
Unstaged Folder - Staging Part of a File
Alternatively, you can add part of a file by double-clicking on the file from the Unstaged folder and using the <> arrows on the Staged version on the left-hand side:

You can also rollback a whole file by selecting it from the Unstaged area and selecting Rollback (or Revert prior to version 2021.1). This rollback the file to the state in the index, not the HEAD.
Let's take a look at the functionality in the Staged area. Changes in the Staged area means that IntelliJ IDEA has performed a git add for the change in the file.
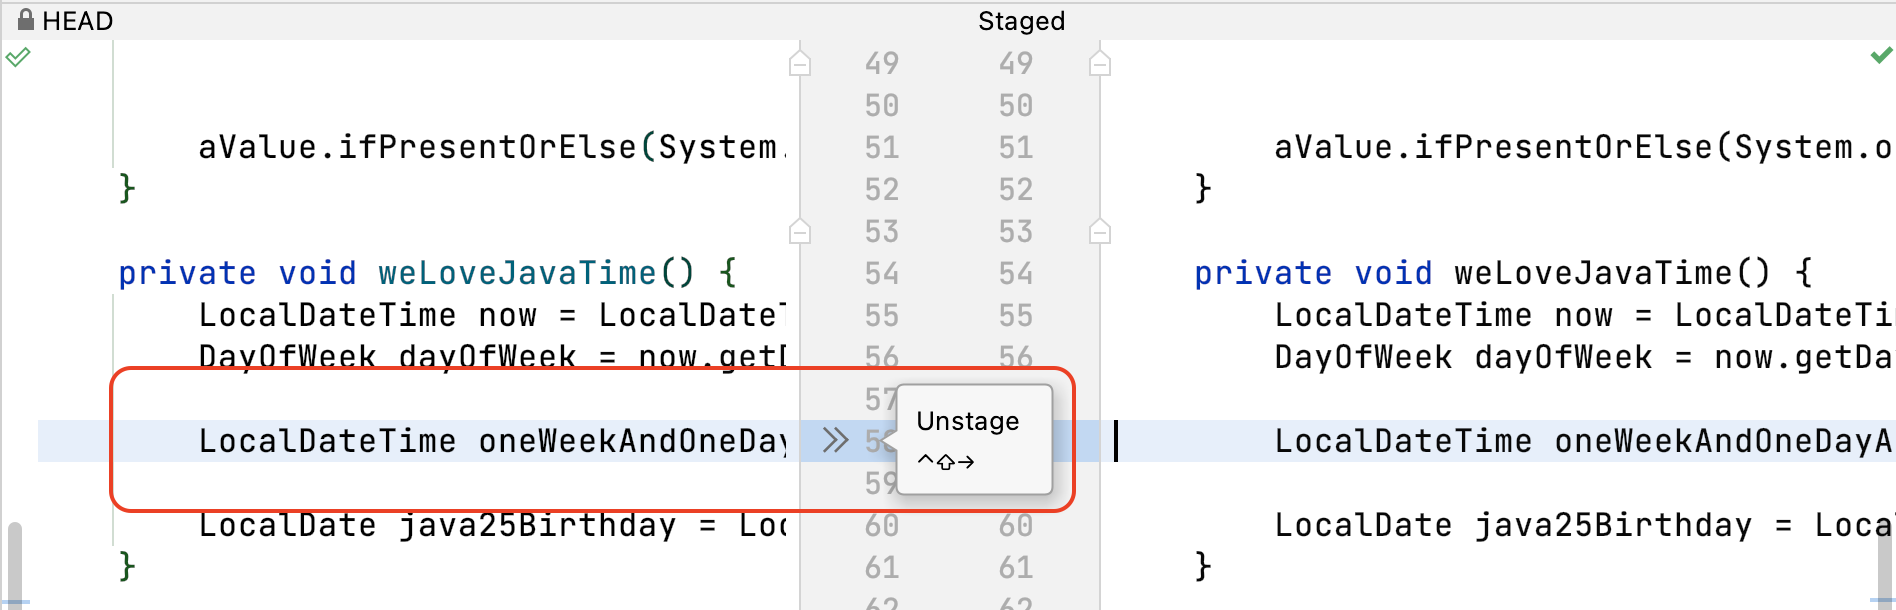
Staged Folder - Unstaging a File
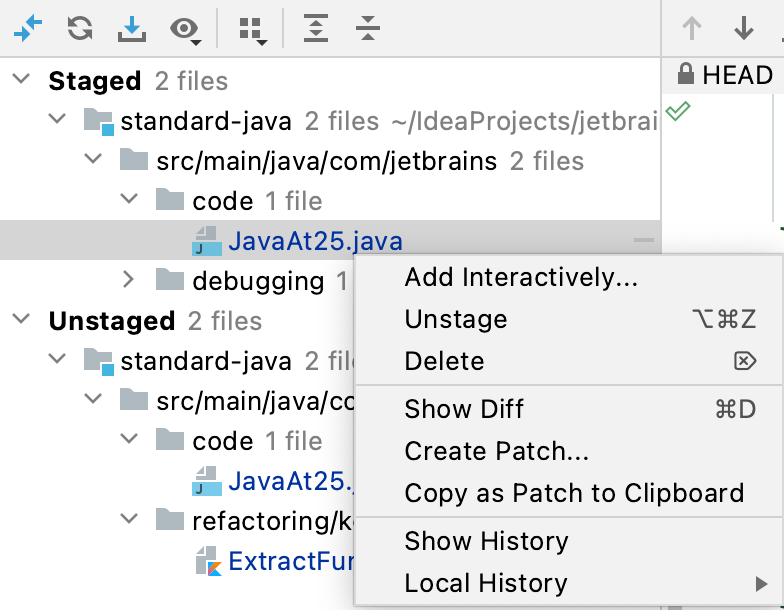
You may change your mind and decide you want to unstage a whole file that you've previously staged. As with staging a file, you can either drag it from the Staged folder into the Unstaged folder, click the *-** icon in the tree, or right-click and select 'Unstage':
When you unstage a file, or part of a file, IntelliJ IDEA runs a git reset for the change.
Staged Folder - Unstaging Part of a File
You can also unstage a change in a file if you need to. To do that, you need to open the file that contains the change that you want to unstage from the Staged folder diff view. You can then use the >> arrows from the staged portion on the left-hand side to Unstage the change. This will unstage that specific change and again, IntelliJ IDEA will run a Git command to reflect the change. You can also type into the editor if you prefer.
Staging or Unstaging Individual Changes Using the Gutter Icons
You can also use the gutter icons in IntelliJ IDEA to stage individual changes.
When you click on the solid coloured bar you can select to Stage your changes, the bar will change to an outline when you stage them. Clicking on an outline bar in the gutter will give you the option to Unstage those changes.
Committing Changes
With Git Staging enabled, your commit will be made up of the changes (diffs) you have in your Staged folder. When you're happy with that you can use ⌘K (macOS), or Ctrl+K (Windows/Linux) to load the Commit window. You can then enter a commit message and press commit to commit your selected changes to Git. Alternatively, you can use ⌘⏎ (macOS), or Ctrl+Enter (Windows/Linux) to commit the changes. IntelliJ IDEA will then run the required Git commands for the changes that you selected.
You can then go ahead and push the changes to your remote repository if you want to.
Summary
It's completely up to you which approach you prefer. They both achieve the same result in slightly different ways.
- Changelists focus on ranges in your content, meaning whatever changes are in that range in your file are included in the commit.
- Git Staging focuses on creating a snapshot commit in the staging area. Content that has been staged is effectively locked. You can proceed to edit the file even if it’s been staged; the staged content will not change. This allows you to prepare commits in an incremental fashion.
- April 16, 2021
- 9 min read
Helen is a Java Developer Advocate at JetBrains. She has over 20 years’ experience in the software industry which has been gained in a variety of roles including developer, technical writer, product owner, and advocacy.


Comments (1)
Shlomo Moller
5 years agoVery helpful! Thanks!