


Local AI with Spring: Building Privacy-First Agents Using Ollama
- May 06, 2025
- 6 min read
Introduction
Building local AI agents with Spring AI and Ollama has emerged as a game-changer for developers seeking to maintain complete control over their AI implementations and have access always at their fingertips, even offline.
This powerful combination allows you to create sophisticated AI agents that run entirely on your own machine, are perfect for experimenting and learning concepts, while, more importantly, eliminating the need to share sensitive data with third-party services. While cloud-based AI services dominate headlines, they come with significant trade-offs: sending your data to third parties, paying per-token fees, and suffering latency penalties.
In this hands-on guide, we'll walk through building local AI agents that maintain complete data privacy while eliminating API costs and reducing latency. You'll learn how to leverage Spring AI's consistent abstractions to create portable code that works across models, while Ollama gives you the flexibility to run different open-source LLMs locally based on your specific requirements.
By the end of this tutorial, you'll have a working local AI agent that can handle complex interactions entirely on your infrastructure, ready to be customized for your specific domain needs. No cloud dependencies, no unexpected token charges, and no data leaving your environment.
Let's dive in and explore what makes the Spring AI + Ollama combination such a powerful approach for privacy-first, cost-efficient AI development.
Configuring Ollama
Ollama has emerged as one of the best pieces of software for the modern AI-assisted era, giving developers access to a vast collection of open-source foundation models, that enable you running your own LLMs fully locally, in the comfort of your laptop!
Configuring it is extremely simple, just download the client from the link above, and, in order to start it, open a terminal window and run:
ollama serve
This will spin up a client on your machine and you should see something like below:
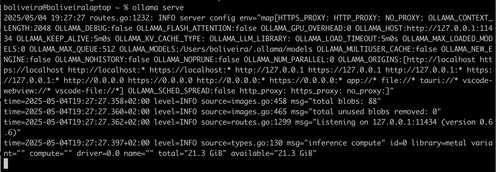
This means that your Ollama client is up and running, and, it will be accessible on port 11434.
Then you can think of this as an interface to a registry, akin to a docker registry (like Docker Hub, for example) where you can list, pull and run LLMs.
On their website you can find several models and commands on how to run them.
Essentially, doing a simple ollama run will pull and start a given LLM, using your machine to perform inference, so, it can and will be very resource intensive, but, the main advantage is that it will all be within your machine, running 100% under your control, and, if you pull the models you want beforehand, you can then run them fully offline, which is pretty neat!
Spring AI + Ollama: a perfect match!
We can have the best of both worlds: the ingenuity of Ollama and power of Springboot at our fingertips, to create a powerful AI agent that runs fully locally and can serve you in your own tasks, much better than proprietary AI ever would.
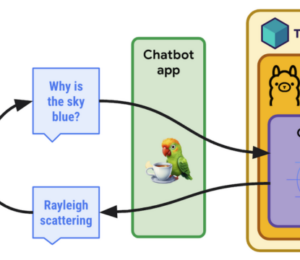
To start it off, here's what we'll be building: We will give an Ollama model, mistral-small3.1, a small, powerful LLM with the capability to use tools, the possibility to go to the internet to conduct searches on your behalf.
We will also go the extra mile and showcase how to create a local MCP server that can put tools in your own hands too, by creating a FastMCP based MCP server that can send emails using gmail.
We'll see just how easy all of this is with Spring AI.
Setting up the project
First, we'll use Maven and set up a simple POM.xml that sets the stage and leverages most of the starter dependencies we need for all the magic to happen:
<dependencies>
    <dependency>
        <groupId>org.springframework.boot</groupId>
        <artifactId>spring-boot-starter-web</artifactId>
    </dependency>
    <dependency>
        <groupId>org.springframework.boot</groupId>
        <artifactId>spring-boot-starter-webflux</artifactId>
    </dependency>
    <dependency>
        <groupId>org.springframework.ai</groupId>
        <artifactId>spring-ai-starter-mcp-client-webflux</artifactId>
    </dependency>
    <dependency>
        <groupId>org.springframework.ai</groupId>
        <artifactId>spring-ai-starter-model-ollama</artifactId>
    </dependency>
    <dependency>
        <groupId>org.springframework.boot</groupId>
        <artifactId>spring-boot-starter-test</artifactId>
        <scope>test</scope>
    </dependency>
    <dependency>
        <groupId>io.projectreactor</groupId>
        <artifactId>reactor-test</artifactId>
        <scope>test</scope>
    </dependency>
    <dependency>
        <groupId>org.projectlombok</groupId>
        <artifactId>lombok</artifactId>
        <scope>provided</scope>
    </dependency>
</dependencies>
<dependencyManagement>
    <dependencies>
        <dependency>
            <groupId>org.springframework.ai</groupId>
            <artifactId>spring-ai-bom</artifactId>
            <version>${spring-ai.version}</version>
            <type>pom</type>
            <scope>import</scope>
        </dependency>
    </dependencies>
</dependencyManagement>
With this in place, we can then prepare our application.yml file that will autowire and bring all relevant beans into context, auto-configured for us by Springboot. Some of the details will be explained below:
spring:
  ai:
    mcp:
      client:
        toolcallback:
          enabled: true
        stdio:
          connections:
            brave-search:
              command: docker
              args: run,-i,--rm,-e,BRAVE_API_KEY,mcp/brave-search
              env:
                BRAVE_API_KEY: ${BRAVE_API_KEY}
            gmail-sending:
              command: /Users/boliveira/.local/bin/uv
              args: run,--with,fastmcp,fastmcp,run,/Users/boliveira/fastmcp-experiments/fastmcp/test-servers/server.py
              env:
                GMAIL_APP_PASS: ${GMAIL_APP_PASS}
        request-timeout: 30s
    ollama:
      base-url: http://localhost:11434
      chat:
        options:
          model: "mistral-small3.1"
        temperature: 0.7
        max-tokens: 8192
What about this absolute beauty? In 25 lines, we configured an Ollama chat model, mistral-small3.1 that just became available within the context of our app when it runs, through the ChatModel bean, as well as configured two MCP servers, that expose two tools that our LLM can leverage to effectively act and become an agent, that can perform dedicated actions on the users' behalf that go beyond the typical pattern of static chat messages.
This is also why we call these agents, in the sense that we provide an LLM with tools so they can have agency by acting on a users' behalf. In our case, these are a tool for doing web searches (Give me a carbonara recipe) and also to send emails (Send me the recipe above to my email ``).
Enough talk, show me the code
Here it is, in all its glory. We start with a simple configuration class that showcases how a ChatClient is instantiated with tool capabilities. It wraps the lower-level ChatModel to enhance it with tool calling capabilities.
@Configuration
@AllArgsConstructor
public class McpDemoConfiguration {

    private final ChatModel chatModel;
    private final List<McpSyncClient> mcpSyncClients;

    private final String DEFAULT_SYSTEM_PROMPT = """
        You are a useful assistant that can perform web searches using Brave's search API to reply to your questions.
        You can also send emails using gmail and you follow user's instructions carefully and precisely.
        You always add references of pages you searched and mention all the sources used.
        Note: Before ANY tool call, you should always ask the user for confirmation. Output also the tool you are going
        to use and the parameters you are going to use. Only after the user confirms, you can call the tool.
        """;

    @Bean
    public ChatClient prepareChatClient() {
        return ChatClient.builder(chatModel)
            .defaultSystem(DEFAULT_SYSTEM_PROMPT)
            .defaultTools(new SyncMcpToolCallbackProvider(mcpSyncClients))
            .defaultAdvisors(new MessageChatMemoryAdvisor(new InMemoryChatMemory()))
            .build();
    }
}
Then, using it in a service is super simple:
public Flux<ChatResponse> processPromptStreaming(@RequestBody String promptText) {
     ChatClient chatClient = mcpDemoConfiguration.prepareChatClient();

     var prompt = new Prompt(promptText);

     return chatClient.prompt(prompt).stream().chatResponse();
 }
Now, we have a local running LLM, configured with Ollama that we can then use as our own private assistant that can send emails and conduct web searches on our behalf!
A quick detour on FastMCP
With FastMCP, you can build your own agents as shown above in the application.yml file.
The code inside server.py is quite simple:
# server.py
from fastmcp import FastMCP
import smtplib
from email.mime.text import MIMEText
from email.mime.multipart import MIMEMultipart
import os

# Create an MCP server
mcp = FastMCP("Demo")

# Add an addition tool
@mcp.tool()
def add(a: int, b: int) -> int:
    """Add two numbers"""
    return a + b

# Add a dynamic greeting resource
@mcp.resource("greeting://{name}")
def get_greeting(name: str) -> str:
    """Get a personalized greeting"""
    return f"Hello, {name}!"

@mcp.tool()
def send_gmail(sender_email: str, receiver_email: str, subject: str, message_body: str) -> bool:
    """
    Send an email using Gmail SMTP server

    Args:
        sender_email (str): Your Gmail address
        receiver_email (str): Recipient's email address
        subject (str): Email subject
        message_body (str): Email content

    Returns:
        bool: True if email was sent successfully, False otherwise
    """
    try:
        # Create message container
        message = MIMEMultipart()
        message['From'] = sender_email
        message['To'] = receiver_email
        message['Subject'] = subject

        # Add message body
        message.attach(MIMEText(message_body, 'plain'))

        # Connect to Gmail SMTP server
        with smtplib.SMTP_SSL('smtp.gmail.com', 465) as server:
            # Login to account
            server.login(sender_email, os.getenv('GMAIL_APP_PASS'))

            # Send email
            server.send_message(message)

        print(f"Email sent successfully to {receiver_email}")
        return True

    except Exception as e:
        print(f"Error sending email: {e}")
        return False
The most important piece here is to add a nice function description and use named arguments, as Spring AI's agent capabilities will make use of these to guide the LLM, fully internally, to know and decide which tools to use and when and with which arguments.
This is why it's required to use an LLM that has been fine-tuned for using tools, as they will know which tools to call in which contexts.
Conclusion
The combination of Spring AI and Ollama represents a significant advancement in local AI development, offering developers a powerful yet accessible pathway to creating sophisticated AI agents. This synergy allows you to maintain complete control over your AI implementations while eliminating the need to share sensitive data with third-party services.
Spring AI's elegant abstraction layer truly shines in this implementation, requiring minimal configuration to enable complex agent capabilities. With just a few lines of code, developers can create a fully functional AI agent capable of performing web searches and sending emails, all while running completely locally. The framework's intuitive ChatClient builder pattern makes adding tools, memory, and system prompts remarkably straightforward.
What makes Spring AI particularly impressive is its seamless integration with various tool providers through the MCP (Model Control Protocol) standard. Whether connecting to Docker-based tools like Brave Search or custom FastMCP implementations for email functionality, the configuration remains consistent and declarative. This unified approach to tool integration significantly reduces the complexity that typically accompanies agent development.
The ergonomics of Spring AI deserve special mention - by leveraging Spring Boot's auto-configuration capabilities, developers can focus on building meaningful agent experiences rather than wrestling with infrastructure setup. The declarative YAML configuration demonstrates how Spring AI embraces convention over configuration, making it accessible even to developers new to AI agent development.
- May 06, 2025
- 6 min read
Senior Software Developer at Software Improvement Group (SIG)


Comments (2)
Local AI Agents with Ollama and Spring AI by brunooliv - HackTech.info
11 months ago[…] Read More […]
Matt Calderaro
11 months agoNot able to follow along, as partial code provided. Would enjoy reviewing full code and running. Not possible.