


Project Panama for Newbies (Part 1)
- January 01, 2026
- 17 min read
Updated December 28, 2025 (originally published August 10, 2021, republished January 1, 2026): This article now features Java 25 and the Foreign Function & Memory (FFM) API, which has been a standard feature since JDK 22.

Introduction
In this series of articles, we will explore the APIs from OpenJDK’s Project Panama. My intent is to show you how to be proficient in using the Foreign Function and Memory Access APIs as it relates to Java interoperability with native code. After FFI (foreign function interface) & FFM (foreign function memory) have been finalized in JDK 22 the APIs currently reside in the following package namespaces.
java.lang.invoke.*;
java.lang.foreign.*;
While this article is for newbies, I assume you know the basics of the Java language, a little bash scripting, and a familiarity with C programming concepts. If you are new to C language don’t worry I will go over the concepts later.
For the impatient go to Panama4Newbies on GitHub.
In Part 1 of this series, I will give you an overview of the requirements and later go through some exercises as a primer to create memory outside of Java's heap and call into native C functions.
What is Project Panama?
Project Panama is a new way for the Java programming language to access native libraries that are written in native languages like C, C++, Objective-C/C++, Swift, Rust and Python (currently supports the C ABI). While my description might be an oversimplification, Project Panama has been in the making for quite some time (11+ years) and continues to have great success! Kudos and a huge shout out to the OpenJDK community at large!
Project Panama is an umbrella project that comprises many JEPs (Java Enhancement Proposal) as shown below:
- Foreign Function and Memory Access APIs
- Foreign-Memory Access API - is a way to allocate and map memory outside of the JVM’s heap. Capable of creating C pointers, structs, and other primitive or native data types: JEP-370, JEP-383
- Foreign Linker API - is a way to access functions in native libraries: JEP-389
- Vector API - a platform agnostic way to utilize vector hardware such as SIMD (Single Instruction Multiple Data) chips.
Note: "Project Panama for Newbies (articles)" will defer coverage of the Vector API until it moves past the incubation stage. Currently in its 11th incubation and slated for JDK 26, the API is undergoing significant alignment with Project Valhalla under
JEP 529. These efforts focus on leveraging value types and enhancing auto-vectorization for hardware targets, with the ultimate goal of reducing memory overhead and boosting performance.
Shown below is the timeline of the roadmap:
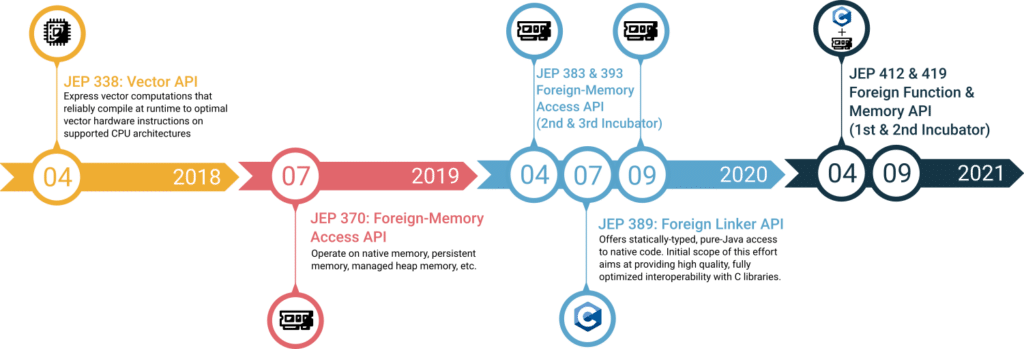
Note: The infographic above is missing the following Java Enhancement proposals:
- JEP-424 (2022-02 to 2025-09)
- JEP-454 (2023-06 to 2024-10)
The tutorial series is based on JEP 454 (final was released in JDK 22).
Why Use Project Panama?
Before answering why, let me ask another question, Have you heard of Minecraft? If you answered "Yes, of course", then, great! If you answered "No", then please go and visit https://www.minecraft.net/en-us. Did you also know that Minecraft is written in Java using the popular open source gaming library called LWJGL (LightWeight Java Game Library)?
So, where am I going with this? As you dig deeper into the gaming library’s implementation you’ll discover that it uses JNI (Java Native Interface) to access native libraries such as OpenGL, OpenCL, etc. These native libraries are written in C (language) capable of accessing hardware on a device such as sound, input devices, or GPUs.
So, back to the answer to "Why?". The short answer is: Panama is simpler to use and can have better performance.
The longer answer is that using JNI's generated code and wrapper code can be error prone, and is often difficult to maintain over time. Also, it requires natively compiled glue (wrapper) code to be installed on the system (which means you’ll need system administrative privileges). In other words, project Panama is a pure Java solution that allows you to access existing native libraries with comparable or better performance than JNI.
Here are the use cases for using Project Panama:
- Access C/C++ code from Java
- Access device drivers on embedded environments such as Raspberry Pi
- Access memory off the JVM’s heap (Safely). Replace the use of Unsafe API.
- Increased performance using lower level APIs to access SIMD hardware.
- Up calls or Callbacks from C code to Java code
Okay, so now that you are convinced, how to get started?
Before we begin, it is important to understand jextract, a command-line tool that automates the generation of the low-level Project Panama Java code. By binding native libraries to Java, jextract eliminates the tedious manual work required to invoke native functions and interact with native symbols.
Where do I get the jextract tool?
To acquire jextract, you can either build it from source or download a pre-compiled version:
- Build from source: Clone the official jextract repository on GitHub and follow the build instructions provided in the README.
- Download pre-built releases: For a more convenient setup, download the latest early-access binaries for your operating system (Windows, macOS, or Linux) directly from jdk.java.net/jextract.
As we explore further, we will learn that the jextract tool is responsible for generating Java (code) bindings derived from C header files (.h) and their associated native library files. Library files with the extension .dll, .so and .dylib are used on the Windows, Linux, and MacOS operating systems respectively.
Getting Started
Let us make sure your environment is setup before we begin. The following are the install instructions for your respective OS.
Mac OS X / Linux setup instructions:
Step 1: Download JDK 25+ from https://azul.com/downloads and untar or unzip into a directory.
$ export JAVA_HOME=<path to JDK>
Step 2: Download the latest release of jextract here . After download unzip into a directory. Next setup your JEXTRACT_HOME environment variable.
$ export JEXTRACT_HOME=<path to jextract>Step 3: Set PATH
 # Mac/Linux
 $ export JAVA_HOME=<path to JDK>
 $ export JEXTRACT_HOME=<path to jextract>
 $ export PATH=$JAVA_HOME/bin:JEXTRACT_HOME/bin:$PATH
Note: To make environment variables permanent you can set these in your .bashrc or .bash_profile files on Linux or MacOS respectively. On newer Macs you can set them in your .zshrc or .zprofile
Step 4: Test Java runtime and the jextract tool are available
 $ java -version
 $ jextract -h
Windows instructions:
Step 1: Download JDK and jextract here. Next, untar or unzip them into a directory.
Step 2: Set JAVA_HOME, JEXTRACT_HOME and PATH environment variables
 c:\> set JAVA_HOME=<path to JDK>
 c:\> set JEXTRACT_HOME=<path to jextract>
 c:\> set PATH=%JAVA_HOME%\bin;%JEXTRACT_HOME/bin%;%PATH%
Note: To make environment variables permanent on the Windows platform do the following:
- Right-click the Computer icon and choose Properties, or in Windows Control Panel, choose System.
- Choose Advanced system settings.
- Relaunch a command prompt (cmd.exe)
Step 3: Test runtime and jextract is available
 c:\> java -version
 c:\> jextract -h
After running jextract -h to display the switch options you’ll know you are ready to go. You should see something like the following:
Usage: jextract <options> <header file> [<header file>] [...]

Option                             Description
------                             -----------
-?, -h, --help                     print help
-D --define-macro <macro>=<value>  define <macro> to <value> (or 1 if <value> omitted)
-I, --include-dir <dir>            add directory to the end of the list of include search paths
--dump-includes <file>             dump included symbols into specified file
--header-class-name <name>         name of the generated header class. If this option is not
                                   specified, then header class name is derived from the header
                                   file name. For example, class "foo_h" for header "foo.h".
--include-function <name>          name of function to include
--include-constant <name>          name of macro or enum constant to include
--include-struct <name>            name of struct definition to include
--include-typedef <name>           name of type definition to include
--include-union <name>             name of union definition to include
--include-var <name>               name of global variable to include
-l, --library <libspec>            specify a shared library that should be loaded by the
                                   generated header class. If <libspec> starts with :, then
                                   what follows is interpreted as a library path. Otherwise,
                                   <libspec> denotes a library name. Examples:
                                      -l GL
                                      -l :libGL.so.1
                                      -l :/usr/lib/libGL.so.1
--use-system-load-library          libraries specified using -l are loaded in the loader symbol
                                   lookup (using either System::loadLibrary, or System::load).
                                   Useful if the libraries must be loaded from one of the paths
                                   in java.library.path.
--output <path>                    specify the directory to place generated files. If this
                                   option is not specified, then current directory is used.
-t, --target-package <package>     target package name for the generated classes. If this option
                                   is not specified, then unnamed package is used.
--symbols-class-name <name>        override the name of the root header class
--version                          print version information and exit

macOS platform options for running jextract (available only when running on macOS):
-F <dir>            specify the framework directory
--framework <framework>                     specify framework library. --framework libGL is equivalent to
                                      -l :/System/Library/Frameworks/libGL.framework/libGL
If you are seeing the jextract options then you are ready to go to the next section.
Do I need a C compiler?
In short, No. For demonstration purposes I will be using a standard C compiler on my MacOS environment. This is purely optional and I will use it to show concepts inside a C program.
If you are on a Windows OS you can check out Microsoft’s Visual C++ that includes a C compiler (https://docs.microsoft.com/en-us/cpp/build/walkthrough-compile-a-c-program-on-the-command-line?view=msvc-160). Also, you can download MingW at https://www.mingw-w64.org
Let’s Do It!
Before we get into using Panama’s APIs let's begin by looking at a Hello World example in the C programming language. By understanding what a C program consists of will help us know how to invoke native code. Later on we will write a pure Hello World Java program that will call into standard C (native) functions.
Anatomy of a Hello World in C
Note: Remember, this part of the tutorial is purely optional if you don’t have a C compiler handy for your OS just skip the compilation step.
Step 1: Enter the listing 1 into an editor and save the file as helloworld.c.
Listing 1: helloworld.c
#include <stdio.h>
int main() {
   printf("Hello, World! \n");
   return 0;
}
Step 2: Compile the code
$ gcc helloworld.c
Step 3: List the executable file
$ ls -l a.out
-rwxr-xr-x  1 jdoe  staff  49424 Jul 29 21:06 a.out
Step 4: Run or execute the program
$ ./a.out
Hello, World!
Well that was pretty straight forward! Let’s unpack what is actually going on. Below is a high-level look at what the C program is doing.
- Include statement using Ansi C’s
stdio.hlibrary header. Similar to Java’s imports. - The
main()function is the entry point similar to Java’spublic static void main()method - The
main()function has a Cintreturn type. - The body calls the
stdio’sprintf()function that takes aconst char *type.
Here are more details on the four observations:
In Step 1 the stdio is C’s standard input output library. In the C programming language files with .h are similar to Java’s interfaces where it defines or describes function signatures and constants of a library. The stdio library in the example contains the printf() function equivalent to the System.out.printf() in a Java program.
In Step 2 the C programming language it has two overloaded functions of main(). One takes an empty parameter signiture, and the other will take number of args (type int) and an array of type char * (C string).
int main() {}
int main(int argc, char *argv[]) {}
In Step 3 the main() function will return an integer of zero to denote success, and any other value is an error status code.
In step 4 The stdio.h header function int printf(const char *format, ...), has a signature that takes a C string type with variable arguments (0-to-many) values to perform a string interpolation. Similar to Java’s System.out.printf(“Hello, %s\n”, “Hello Panama!”);.
There are two things to keep in mind when talking to C.
- Be aware of C
#includes. Header files on your system will allowjextractto generate code bindings (class files). - Know that C’s datatypes will need to be converted between Java and C as needed. Luckly, Panama will create convience methods that makes this easy!
Now that we have a good understanding of a Hello World C program let’s create an equivalent Panama Java Hello World example. In other words the Java program will natively call the printf() function.
Panama Hello World Example
As mentioned before, the C code of our Hello World program was using the stdio.h library. At this point, we will generate Java code to talk to the stdio.h library. Instead of hand coding this (which is out of the scope of this tutorial) we will be using the jextract tool. This magical tool will generate pure Java code that will bind to native libraries. These class files will contain meta data and much of the lower level Panama code that will make things convenient for the user of the API (you and me).
Note: When using jextract's switch --output it can emit or generate source code that can be used in projects. Here's where you can view Panama specific code.
Because the C language specification is well defined jextract can generate Java code pretty easily. C++ on the other hand will be another effort and is not currently supported. If you have a native library written in C++ you’d have to take some additional steps which I won’t cover (See Java Panama Polyglot (C++) Part 1).
Let’s jextract STDIO please!
The jextract tool has been updated to make it easier for standard C libraries by specifying header files in double quotes as follows:
jextract --output generatedsrc -t org.unix "<stdio.h>"
--output <destination directory of generated java code>-t<package namespace>"<stdio.h>"the standard header file to generate from surrounded by quotes.
The generated Java (Panama) code will be placed in the directory generatedsrc/org/unix
It should look like the following:
$ ls -l generatedsrc/org/unix
__darwin_pthread_rwlock_t.java
__darwin_pthread_rwlockattr_t.java
__mbstate_t.java
__sbuf.java
__sFILE.java
_opaque_pthread_attr_t.java
_opaque_pthread_cond_t.java
_opaque_pthread_condattr_t.java
_opaque_pthread_mutex_t.java
... more
If you were successful in generating the code you can skip the next steps 1 & 2 and go straight into step 3 where you begin to create the HelloWorld.java example using the generated Panama code.
To use jextract let’s locate where your stdio.h file is located on your local computer.
Step 1: (Optional Step) Find header file stdio.h
$ gcc -H -fsyntax-only helloworld.c
On MacOS (Big Sur, Monterey) the output looks something to the following:
. /Applications/Xcode.app/Contents/Developer/Platforms/MacOSX.platform/Developer/SDKs/MacOSX.sdk/usr/include/stdio.h
.. /Applications/Xcode.app/Contents/Developer/Platforms/MacOSX.platform/Developer/SDKs/MacOSX.sdk/usr/include/_stdio.h
...
Now that you know where the file is located, we can target the file when using the jextract tool.
$ jextract [options] <path_to_file/stdio.h>
Step 2: (Optional step) Use jextract to generate Java code from a specific stdio.h header file location using -I <include files directory>.
On MacOS do the following:
$ jextract --output generatedsrc -t org.unix -I /Applications/Xcode.app/Contents/Developer/Platforms/MacOSX.platform/Developer/SDKs/MacOSX.sdk/usr/include /Applications/Xcode.app/Contents/Developer/Platforms/MacOSX.platform/Developer/SDKs/MacOSX.sdk/usr/include/stdio.h
On Linux:
$ jextract --output generatedsrc -t org.unix -I /usr/include /usr/include/stdio.h
Now we can use the generated code to be used in our Panama Java Hello World program.
Step 3: Create a Java HelloWorld.java file
Copy and paste the following into a file HelloWorld.java.
import static org.unix.stdio_h.*;

void main() {
   // Use a confined arena for deterministic memory management
   try (Arena arena = Arena.ofConfined()) {
       // MemorySegment C's printf using a C string
       MemorySegment cString = arena.allocateFrom("Hello World! Panama style\n");
       int charCount = printf.makeInvoker().apply(cString);
   }
}
Step 4: Compiling generated files along with HelloWorld.java
# Compile Jextract generated Java code in generatedsrc
javac generatedsrc/org/**/*.java -d classes

# Compile Example Java code in src
javac -cp .:classes src/*.java -d classes
Step 5: Running the Panama Java HelloWorld.java
$ java -cp .:classes \
 --enable-native-access=ALL-UNNAMED \
 HelloWorld
The output is the following:
Hello World! Panama style
How does it work?
Step 1, the C compiler on MacOS/Linux platforms allows you to find where headers are located on a system. Often MacOS developers will use Brew (package manager) to install 3rd party libraries such as OpenCL, Tensorflow, etc.
Step 2 This is where the magic happens. The jextract tool will generate the source code using --output. The -t is the namespace on the class path. The older jextract tool used to compile the generated Java code, but now only outputs Java source code. -I (dash capitol ‘i’) specifies the directory of include files. If you want to target other directories just specify additional -I <dir_path_to_header_files> (Include switches).
The targeting file path to the header file (stdio.h) is the last argument to jextract. Now for standard header files can be specified with double quotes similar to how they are imported in native C code.
Step 3 HelloWorld.java file you'll notice the file doesn't contain the public HelloWorld class and the main() is more concise. That is because it is new in Java as of Java 25's JEP 512 Compact classes - Concise Java code. Other conveniences such as IO.println() and many others.
You may notice that calling C's printf() has changed significantly since the early FFI incubator stages. More on this later, but for now just know that jextract will generate two methods makeInvoker() and apply() to C functions having variable arguments (known as a variadic function).
int charCount = printf.makeInvoker().apply(cString);.makeInvoker(MemoryLayout...) - Returns an instance of a printf object.
.apply(MemorySegment cCharArray, Object... values) - Invokes printf() function with values and returns an int .
Upon successful execution, printf() returns the total character count of the output. If the function encounters an issue, it returns a negative integer instead.
Step 4 Compiling both generated source code and HelloWorld.java.
Step 5 Running HelloWorld. -cp denotes the class path of the compiled classes, --enable-native-access=ALL-UNNAMED will enable access to native code and stop warnings from outputting.
-cp .:classes \
--enable-native-access=ALL-UNNAMED \
HelloWorld
What about 3rd party C libraries?
When 3rd party libraries are installed they typically are in your library path such as /usr/lib or /usr/local/lib. To specify a library the -l (lowercase 'L') option is used. The value will be the name of the library or the absolute path to the library. For example, say you want to use Tensorflow (Google's Machine Learning library).
On the Mac OS the file would be named libtensorflow.dylib and on Linux should be tensorflow.so. I believe on Windows OS it should be named tensorflow.dll.
To specify -l (option L) you can specify the name of the library or the absolute path of the library file. For example, to jextract Tensorflow it will look like the following:
$ jextract \
  -I /Applications/Xcode.app/Contents/Developer/Platforms/MacOSX.platform/Developer/SDKs/MacOSX.sdk/usr/include/ \
  -t org.tensorflow \
  -I ${LIBTENSORFLOW_HOME}/include \
  -l ${LIBTENSORFLOW_HOME}/lib/libtensorflow.dylib \
  ${LIBTENSORFLOW_HOME}/include/tensorflow/c/c_api.h
You will notice on MacOS I specified the fully qualified library file ${LIBTENSORFLOW_HOME}/lib/libtensorflow.dylib instead of the name (tensorflow). Usually, if libraries are installed in /usr/lib or /usr/local/lib you can just specify the name.
Step 3: Java code talks to C.
 void main() {
    // Use a confined arena for deterministic memory management
    try (Arena arena = Arena.ofConfined()) {                 // (A)
        // MemorySegment C's printf using a C string
        MemorySegment cString = arena.allocateFrom("Hello World! Panama style\n"); // (B)
        int charCount = printf.makeInvoker().apply(cString); // (C)
    }
 }
In line (A) the statement is where the code uses a try with resources to create an Arena. An Arena is type of scope confined will auto close when it's finished after the try-block. This will deallocate native memory safely. Please see the javadoc documentation for additional types of Arenas.
The statement in line (B) calls the allocateFrom(String) method to allocate and convert a Java String into a C string (char type). Any time you are mimicking C variables they will be of type MemorySegment. In part 2 of this series we will look at C pointers (address), so if you find the asterisk beside the char type a little odd, don't be too concerned about it for now, and just know that it is the C language's way of storing a string value (or array of characters and null terminated).
In statement (C) the makeInvoker() method
In statement (C) the call to the native function printf() with the object cString of type MemorySegement is passed in and invoked. Another important note to understand is stdout (Standard output) in C, when used in combination with Java's System.out.printlin() you may need to flush the native side first for instance:
var cString = arena.allocateFrom("Hello World (Native C Called)\n");
printf.makeInvoker().apply(cString);
System.out.println("Java System.out\n");
On some systems, (on MacOS) the following output occurs because of the C's output hasn't been flushed:
Java System.out
Hello World (Native C Called)
So, what do you do? You need to call fflush()to flush C's buffer to stdout.
var cString = arena.allocateFrom("Hello World (Native C Called)\n");
printf.makeInvoker().apply(cString);
fflush(NULL()); // jextract generated functions in org.unix.stdio_h.*
System.out.println("Java System.out\n");
Now, the output will be in the correct order shown below:
Hello World (Native C Called)
Java System.out
So, now that you know how to output a newly created C string using the printf() function let's learn how to substitute values into a format string or string template. Java's System.out.printf() also has the same calling convention as C's stdio.h printf() function. Let's examine a format string passed into the printf() function.
In the example below, the %s format specifier is substituted with the string "Fred":
printf("Hello %s!", "Fred"); // Output: Hello Fred!
When using the Foreign Function & Memory (FFM) API, you must define the function's data types using a FunctionDescriptor before it can be invoked. In this case, the printf function expects a char* (a C string), which is a pointer.
Manual Layout: If you are not using jextract, use ValueLayout.ADDRESS to represent a pointer to a memory segment. In this case we want to pass a char* so we use the ADDRESS layout. Because pointers in C are just an address.
Using jextract: If you generate bindings via jextract, the tool will typically provide a platform-specific constant like stdio_h.C_POINTER to handle these address values for any C pointer type.
- Memory Allocation: You cannot pass a Java
Stringdirectly to C. You must first use anArenato allocate aMemorySegmentthat holds the string's bytes in off-heap memory. To call Cprintf()we need to allocateconst char *memory segment within a arena and pass the memory segment to the Cprintf()function. - Variadic Arguments: If you are manually calling printf (not using jextract) you would need to call the
downcallHandle()method on the Linker object. Calling a function with variadic arguments is more of an advanced topic and we can stick to the functions (methods) generated by jextract. But for those that are curious you want to look at the Linker object'sdowncallHandle()method.
MethodHandle downcallHandle(MemorySegment address,
                                FunctionDescriptor function,
                                Option... options);
Let's get back to where we left off regarding MemoryLayouts specified prior to invoking (apply() method) printf.
Below shows the static method on the printf class called makeInvoker(ValueLayout... (variable arguments)). We specify the first variadic argument to be of type C_POINTER.
MemorySegment formatCStr = arena.allocateFrom("Hello %s!\n");
printf printfAlpha = printf.makeInvoker(stdio_h.C_POINTER);

MemorySegment nameStr = arena.allocateFrom("Fred");

printfAlpha.apply(formatCStr, nameStr); // Hello Fred!
The following shows commonly used format specifiers (not an exhaustive list).
| Format Specifier | Data Type | Description |
|---|---|---|
%d or %i | int (signed) | Prints a signed decimal integer. |
%f or %F | float, double | Prints a floating-point number in scientific (exponential) notation. |
%s | char*(string) | Prints a sequence of characters until a null terminator (\0) is found. |
%p | Pointer (void*) | Prints a memory address, typically in hexadecimal format. |
Let's look at a more advanced format string using different format specifiers. To begin we will examine the following C code to be translated to Panama (FFI & FFM) code.
int charCount = printf("%s is %d years old and is %.1f feet tall.\n", "Fred", 60, 5.9d);
Above you'll notice %s, %d and %.1f which tells you there are three format specifiers: C string, int, and double(floating point number). Now we can call the makeInvoker() method with the appropriate data types generated from jextract. The types would be the following: C_POINTER, C_INT, and C_DOUBLE.
    void main() {
       try (Arena arena = Arena.ofConfined()) {
         // *******************************************************************************
         // * How to call printf() with format string such as
         // * printf("%s is %d years old and is %.1f feet tall.\", "Fred", 60, 5.9f);
         // *******************************************************************************
         MemorySegment formatCStr = arena.allocateFrom("%s is %d years old and is %.1f feet tall.\n");
         MemorySegment nameCStr = arena.allocateFrom("Fred");

         // Create an instance of a generated org.unix.printf class from jextract. (FYI, class is named all lowercase)
         printf printfAlpha = printf.makeInvoker(
                stdio_h.C_POINTER,  /* 2nd param - C string %s. A pointer to character array address */
                stdio_h.C_INT,      /* 3rd param - C int %d. Integer value (32bit whole number) */
                stdio_h.C_DOUBLE);  /* 4th param - C double %f. Floating point decimal. floats promote to a double*/

         int charCount = printfAlpha.apply(
                                        formatCStr,
                                        nameCStr,
                                        60,
                                        5.9f);
       }
    }
This time I separated the calls makeInvoker() and apply() instead of the earlier example of method chaining. By separating the calls you can see makeInvoker() returns an instance of a printf object capable of receiving 3 variadic arguments ("Fred", 60, 5.9d). The first parameter will be the format string "%s is %d years old and is %.1f feet tall.\n".
The output is:
Fred is 60 years old and is 5.9 feet tall.
Congratulations for getting this far! While it's nice to create and output C strings. Let's look at how to create primitive data types off of the Java's memory heap.
Let's look at how to create C primitive data types and later how to create arrays of primitives.
Creating/Getting/Setting C primitive data types from Java
To make this easy to remember think of AllocatorFrom -> MemorySegment -> get/set (aka MemSeg pattern). When creating C primitive data (variables) remember that they are like objects where space is allocated and has a memory addresses to change or access the value (dereferenced).
Creating a C String or C primitive call an Arena instance's allocateFrom() method.
String-allocateFrom(String str),allocateFrom(String str, CharSet cs)
e.g.arena.allocateFrom("hello", UTF_8)byte-allocateFrom(ValueLayout.OfByte layout, byte value)booleanallocateFrom(ValueLayout.OfBoolean layout,booleanvalue)char-allocateFrom(ValueLayout.OfChar layout, char value)doubleallocateFrom(ValueLayout.OfDoublelayout,doublevalue)floatallocateFrom(ValueLayout.OfFloat layout,floatvalue)intallocateFrom(ValueLayout.OfInt layout,intvalue)longallocateFrom(ValueLayout.OfLong layout,longvalue)shortallocateFrom(ValueLayout.OfShort layout,shortvalue)
Note: I've only listed out the common methods used. There are many other overloaded methods to choose from that will allow you to create arrays, structs and custom memory layouts.
Getting primitive data from a MemorySegment object the following are special get() methods:
byte - get(ValueLayout.OfByte, long offset)boolean - get(ValueLayout.OfBoolean, long offset)- char
- get(ValueLayout.OfChar, long offset) double - get(ValueLayout.OfDouble, long offset)float - get(ValueLayout.OfFloat, long offset)int - get(ValueLayout.OfInt, long offset)long - get(ValueLayout.OfLong, long offset)short - get(ValueLayout.OfShort, long offset)
Note: there are other overloaded methods to create custom memory layouts
Setting primitive data to a MemorySegment object:
byte - set(ValueLayout.OfByte, long offset, byte value)boolean - set(ValueLayout.OfBoolean, long offset,)booleanvalue- char
- set(ValueLayout.OfChar, long offset, char value) double - set(ValueLayout.OfDouble, long offset, double value)float - set(ValueLayout.OfFloat, long offset, float value)int - set(ValueLayout.OfInt, long offset, int value)long - set(ValueLayout.OfLong, long offset, long value)short - set(ValueLayout.OfShort, long offset, short value)
MemorySegment formatCStr = arena.allocateFrom("A slice of %f \n");

// Create an off heap double containing the value of Pi.
MemorySegment cDouble = arena.allocateFrom(C_DOUBLE, Math.PI);

// Create an instance of a printf object via makeInvoker() that accepts a double (%f floating point number)
printf printfFun = printf.makeInvoker(C_DOUBLE);

// Invoke printf function such as printf("A slice of %f \n", 3.141593d);
printfFun.apply(formatCStr, cDouble.get(C_DOUBLE, 0)); // A slice of 3.141593
Output:
A slice of 3.141593
Of course you can also call by passing in Java's Math.PI (primitive double) into the function.
printfFun.apply(cFormatStr, Math.PI); // A slice of 3.141593
Note: It's better to use the jextract generated stdio_h.C_DOUBLE (as opposed to ValueLayout.JAVA_DOUBLE) because it takes on the underlying OS' bit width. It might not occupy the same number of bits if you are assuming it's 64 bits (8 bytes). The following is the C_DOUBLE variable of type OfDouble that gets generated by jextract as follows.
// jextract generated C_DOUBLE
public static final ValueLayout.OfDouble C_DOUBLE = (ValueLayout.OfDouble) Linker.nativeLinker().canonicalLayouts().get("double");
Creating C primitive arrays
Now that you know how to create primitive data types let's create C primitive arrays. Shown below is allocating space to hold a single dimensional array off of the Java heap. Then we just re-access the C array using getAtIndex(ValueLayout, index) and then displaying the contents.
out.println("An array of data");
MemorySegment cDoubleArray = arena.allocateFrom(C_DOUBLE,
       1.0, 2.0, 3.0, 4.0,
       1.0, 1.0, 1.0, 1.0,
       3.0, 4.0, 5.0, 6.0,
       5.0, 6.0, 7.0, 8.0
);

for (long i = 0; i < (4*4); i++) {
   if (i>0 && i % 4 == 0) {
       System.out.println();
   }
   out.printf(" %f ", cDoubleArray.getAtIndex(C_DOUBLE, i));
}
The output:
An array of data
 1.000000  2.000000  3.000000  4.000000
 1.000000  1.000000  1.000000  1.000000
 3.000000  4.000000  5.000000  6.000000
 5.000000  6.000000  7.000000  8.000000
As demonstrated above, you can use the MemorySegment.getAtIndex(ValueLayout, index) method to extract and display a specific value from the array.
To change the array's values, you'll need to call the MemorySegment.setAtIndex() method. The provided example below shows how to fetch each value and multiply it by 3.
for (long i = 0; i < 16; i++) {
   double newVal = cDoubleArray.getAtIndex(C_DOUBLE, i) * 3;
   cDoubleArray.setAtIndex(C_DOUBLE, i, newVal);
}
Output is shown below:
 3.000000  6.000000  9.000000  12.000000
 3.000000  3.000000  3.000000  3.000000
 9.000000  12.000000  15.000000  18.000000
 15.000000  18.000000  21.000000  24.000000
Conclusion
In Part 1, we learned about the what, where, and whys regarding project Panama. Next, we examined the anotomy of a typical Hello World C program. After learning how to use jextract to generate Java code from stdio.h, we were able to create a Java Hello World to access the C function printf(). Lastly, we learned how to create C primitive data types including arrays.
If you're still interested, in Part 2 we will continue our journey into Project Panama, by looking at C's concept of structs and pointers.
Resources
- Panama4Newbies: https://github.com/carldea/panama4newbies
- Panama4Newbies part 1 source: https://github.com/carldea/panama4newbies/tree/main/part01
- Interconnecting Java and Native Code with the FFM API - JavaOne 2025 : https://www.youtube.com/watch?v=Bhh07Rz5enw
- OpenJDK's Project Panama - https://openjdk.java.net/projects/panama/
- jextract releases - http://jdk.java.net/panama/
- Mailing list: - https://mail.openjdk.java.net/mailman/listinfo/panama-dev
- Fosdem 2022 Project Panama talk
Native Language Access: Project Panama for Newbies (Carl Dea): https://youtu.be/REyl4cOsItE - Panama Examples: https://hg.openjdk.java.net/panama/dev/raw-file/4810a7de75cb/doc/panama_foreign.html#using-panama-foreign-jdk
- Minecraft - https://www.minecraft.net/en-us
- LWJGL and JNI - https://github.com/LWJGL/lwjgl3/blob/master/config/macos/build.xml
- JNI: https://docs.oracle.com/javase/8/docs/technotes/guides/jni/
- January 01, 2026
- 17 min read
Carl Dea is a Lead Developer and Software Engineer at Deloitte. He has authored Java books and has been developing software for 20+ years with many clients, from Fortune 500 companies to nonprofit organizations. He has written software ranging from mission-critical applications to e-commerce applications. Carl has been using Java since the very beginning (when Applets were cool) and is a JavaFX enthusiast (fanboy) dating back to when it used to be called F3/JavaFX script. He greatly loves sharing and advocating Java based technologies.


Comments (20)
Updated! (Feb 15, 2002)
4 years agoI assume this "Updated! (Feb 15, 2002)" meant the "Updated! (Feb 15, 2022)" ?
Does Java 18 lastly have a greater different to JNI? - Abu Sayed
4 years ago[…] Project Panama for Newbies […]
Does Java 18 finally have a better alternative to JNI? - The web development company Lzo Media - Senior Backend Developer
4 years ago[…] Project Panama for Newbies […]
Does Java 18 finally have a better alternative to JNI? - DEV Community
4 years ago[…] Project Panama for Newbies […]
Ken
4 years agojextract generate java code but not class file. Something seems to be missing in this tutorial.
Carl Dea
4 years agoDid you resolve your issue? Let me know what else I can do to fix any issues in the code or article.
Ken
4 years agoNevermind... jextract shouldn't be run with --source for this tutorial. But after that I get cannot find symbol error for MemorySegment
Carl Dea
4 years agoNot a big deal. Hopefully, it's clear.
Ken
4 years agoOh and the output surely should be "Hello World! Panama style" instead of just "Hello World". And instead of printf(str), it probably should be printf(cString)?
Carl Dea
4 years agofixed. Thanks!
Ken
4 years agoThe first example is also missing "import jdk.incubator.foreign.MemorySegment;"
Carl Dea
4 years agoFixed. Thanks!
Ken
4 years agoSecond example should be 'cString2.getUtf8String(0);' instead of just cString
Carl Dea
4 years agoFixed. Thanks!
Ken
4 years agoFor the double example, I can't find C_DOUBLE in my build. Has to "import jdk.incubator.foreign.ValueLayout;" and use ValueLayout.JAVA_DOUBLE instead.
Carl Dea
4 years agoKen, I've updated the article regarding the <code>jextract</code> generated <code>C_DOUBLE</code>. Thank you for pointing that out.
Kazu
4 years agoThank you for the helpful article. I found an error in the example. "MemorySession.newConfine" is error. "MemorySession.openConfined" is correct.
Carl Dea
4 years agoKazu, Good catch! I made the change. Glad you like these articles! Carl
Java Project Panama | Andreas' Blog
3 years ago[…] Project Panama for Newbies (Part 1) […]
Stackd 67: AI NullPointers – Pub House Network
3 years ago[…] OpenJDK Panama Project (https://foojay.io/today/project-panama-for-newbies-part-1/) […]