

Introduction to CQRS using MongoDB
- June 09, 2026
- 7 min read
In enterprise environments, projects often begin with a simple structure: one model, one service, and one document, using a single class and data transfer object for both read and write operations. While this unified approach works at first, it becomes problematic as requirements grow. Operations become more complex, requiring additional validations, rules, and constraints. Over time, read operations may demand different formats, such as aggregations, summaries, or custom views. Relying on a single model for both reading and writing leads to maintenance challenges and inefficient queries. This approach can result in returning unnecessary data or omitting required information, violating the single responsibility principle and making the design less effective.
The distinction between read and write operations becomes increasingly important as their goals diverge. Command Query Responsibility Segregation (CQRS) addresses this by separating read (Query) and write (Command) operations into distinct models. This architectural pattern allows each model to be optimized, scaled, and secured independently, reducing conflicts and improving overall system efficiency.
This tutorial introduces the CQRS architectural pattern and demonstrates how to implement it with MongoDB.
In this tutorial, you’ll:
- Model a simple payment system.
- Model and interact with MongoDB using Java.
- Explore how MongoDB can help you achieve a CQRS design.
You can find all the code presented in this tutorial in the GitHub repository:
git clone [email protected]:soujava/helidon-mongodb-cqrs.git
Prerequisites
For this tutorial, you’ll need:
- Java 21.
- Maven.
- A MongoDB cluster.
- MongoDB Atlas (Option 1)
- Docker (Option 2)
You can use the following Docker command to start a standalone MongoDB instance:
docker run --rm -d --name mongodb-instance -p 27017:27017 mongo
By decoupling read and write operations, CQRS assigns each its own responsibility. Instead of using one model to manage both state changes and data retrieval, CQRS separates these into commands and queries. Commands represent actions and enforce business rules, while queries retrieve information from purpose-built data models. This separation avoids conflicts and allows each side to evolve independently.
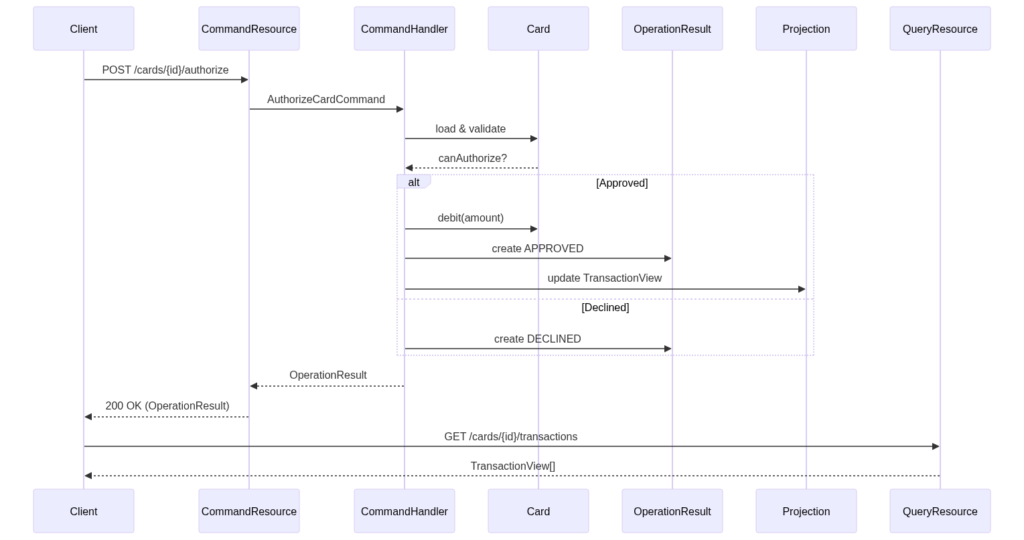
This tutorial focuses on a specific, instructional use case: authorizing card usage. Instead of building a complete financial system, we concentrate on authorizing transactions and retrieving transaction history. This limited scope helps demonstrate the process of creating both command and query components.To maintain consistency with the previous post, we will use Helidon with MicroProfile. You may define the groupId, artifactId, version, and package name as you prefer. After downloading the project, include the MongoDB integration—Eclipse JNoSQL—in the pom.xml file at the project root:
To maintain consistency with the previous post, we will use Helidon with MicroProfile. You may define the groupId, artifactId, version, and package name as you prefer. After downloading the project, include the MongoDB integration—Eclipse JNoSQL—in the pom.xml file at the project root:
<dependency>
   <groupId>org.eclipse.jnosql.databases</groupId>
   <artifactId>jnosql-mongodb</artifactId>
   <version>1.1.13</version>
</dependency>
With the project defined, the next step is to set the database configuration. You can either use a local database or explore MongoDB Atlas; either is fine. We will use locally, thus, run this Docker command to start a MongoDB instance:
Include those new properties:
# configure the MongoDB client for a replica set of two nodes
jnosql.mongodb.url=mongodb+srv://admin:<db_password>@cluster0.gblhb3d.mongodb.net/?appName=devrel-article-java-jnosql
# mandatory define the database name
jnosql.document.database=cards
jnosql.mongodb.application.name=devrel-article-java-jnosql
PRO TIP: MongoDB Atlas is a valuable Database-as-a-Service option. It simplifies operations by delegating database management to MongoDB experts.
Step 1: Create the entities
The first step is to create the necessary entities. We need entities for managing status and a separate entity for queries, which can serve as an aggregator or summary. On the command side, we define two entities: Card, which holds the current status and available amount, and OperationResult, which records each card operation attempt. OperationResult is immutable and cannot be changed once it is stored in the database.
package com.acme.cards.command;

import com.acme.cards.infraestructure.JsonFieldStrategy;
import jakarta.json.bind.annotation.JsonbVisibility;
import jakarta.nosql.Column;
import jakarta.nosql.Entity;
import jakarta.nosql.Id;

import java.math.BigDecimal;
import java.util.Objects;
import java.util.UUID;

@Entity
@JsonbVisibility(JsonFieldStrategy.class)
public class Card {

    @Id
    private UUID id;

    @Column
    private BigDecimal availableBalance;

    @Column
    private CardOperationStatus status;

    Card() {
    }

    public Card(UUID id, BigDecimal availableBalance, CardOperationStatus status) {
        this.id = id;
        this.availableBalance = availableBalance;
        this.status = status;
    }

    public UUID getId() {
        return id;
    }

    public BigDecimal getAvailableBalance() {
        return availableBalance;
    }

    public CardOperationStatus getStatus() {
        return status;
    }

    /**
     * Determines whether a card can authorize a transaction for the given amount.
     * The authorization is possible only if the card is active and the available
     * balance is greater than or equal to the specified amount.
     *
     * @param amount the transaction amount to be authorized
     * @return true if the card is active and has enough available balance
     *         to authorize the transaction, false otherwise
     */
    public boolean canAuthorize(BigDecimal amount) {
        return status == CardOperationStatus.ACTIVE
                && availableBalance.compareTo(amount) >= 0;
    }

    /**
     * Deducts the specified amount from the available balance of the card.
     *
     * @param amount the amount to be debited from the card's available balance
     */
    public void debit(BigDecimal amount) {
        this.availableBalance = this.availableBalance.subtract(amount);
    }

    @Override
    public boolean equals(Object o) {
        if (!(o instanceof Card card)) {
            return false;
        }
        return Objects.equals(id, card.id);
    }

    @Override
    public int hashCode() {
        return Objects.hashCode(id);
    }

    @Override
    public String toString() {
        return "Card{" +
                "id=" + id +
                ", availableBalance=" + availableBalance +
                ", cardOperationStatus=" + status +
                '}';
    }
}
package com.acme.cards.command;

import jakarta.nosql.Column;
import jakarta.nosql.Entity;
import jakarta.nosql.Id;

import java.time.Instant;
import java.util.UUID;

@Entity
public record OperationResult(@Id UUID id,
                              @Column UUID cardId,
                              @Column OperationStatus status,
                              @Column String reason,
                              @Column Instant processedAt) {
}
package com.acme.cards.command;

public enum CardOperationStatus {
    ACTIVE, BLOCKED
}
package com.acme.cards.command;

public enum OperationStatus {
    APPROVED, DECLINED
}
After creating the command operations, the next step is to define the entity where we will store the transactions and operations. This entity will define where the user will read. This one is where we will process the data and make it available to the read operations.
package com.acme.cards.query;

import jakarta.nosql.Column;
import jakarta.nosql.Entity;
import jakarta.nosql.Id;

import java.math.BigDecimal;
import java.time.Instant;
import java.util.UUID;

@Entity
public record TransactionView(@Id UUID id,
                              @Column UUID cardId,
                              @Column BigDecimal amount,
                              @Column String status,
                              @Column Instant createdAt) {
}
To simplify the structure, we will create a REST API to generate cards. Based on these cards, we will handle debit operations and check if a card has sufficient available balance.
package com.acme.cards.command;

import jakarta.enterprise.context.ApplicationScoped;
import jakarta.inject.Inject;
import jakarta.ws.rs.*;
import jakarta.ws.rs.core.MediaType;

import jakarta.ws.rs.core.Response;
import org.eclipse.jnosql.mapping.document.DocumentTemplate;

import java.math.BigDecimal;
import java.util.ArrayList;
import java.util.List;
import java.util.UUID;
import java.util.logging.Logger;
import java.util.stream.IntStream;

@Path("/cards")
@Produces(MediaType.APPLICATION_JSON)
@Consumes(MediaType.APPLICATION_JSON)
@ApplicationScoped
public class CardResource {

    private static final Logger LOGGER = Logger.getLogger(CardResource.class.getName());
    private static final BigDecimal INITIAL_BALANCE = new BigDecimal("1000");

    private final DocumentTemplate template;

    @Inject
    public CardResource(DocumentTemplate template) {
        this.template = template;
    }

    CardResource() {
        this.template = null;
    }

    @GET
    public List<Card> findAll() {

        LOGGER.info("Fetching all cards");

        List<Card> cards = template.select(Card.class).result();
        if (cards.isEmpty()) {
            LOGGER.warning("No cards found. Seeding initial dataset...");
            cards = generateCards();;
        }
        LOGGER.info("Returning " + cards.size() + " cards");
        return cards;
    }

    @GET
    @Path("/{id}")
    public Card findById(@PathParam("id") UUID id) {

        LOGGER.info("Fetching card with id=" + id);

        return template.find(Card.class, id).orElseThrow(() ->
                   new WebApplicationException("Card not found with the id: " + id, Response.Status.NOT_FOUND)
                );
    }

    private List<Card> generateCards() {
        List<Card> cards = new ArrayList<>(); ;

        IntStream.range(0, 5)
                .mapToObj(i -> new Card(
                        UUID.randomUUID(),
                        INITIAL_BALANCE,
                        CardOperationStatus.ACTIVE
                ))
                .forEach(card -> {
                    cards.add(template.insert(card));
                    LOGGER.fine("Seeded card with id=" + card.getId()
                            + " and balance=" + card.getAvailableBalance());
                });

        LOGGER.info("Finished seeding cards + " + cards.size() + " cards created");
        return cards;
    }
}
With this structure, we can now work with cards. In a real-world scenario, additional card statuses such as frozen or canceled would be included. Here, we focus on a small part of the problem to highlight the architectural pattern.
Step 2: Creating Command
The next step is to create the command responsible for write operations. Here, we use the AuthorizeCardCommand, which encapsulates the attributes needed for card operations. This approach avoids handling numerous parameters by using a single class.
package com.acme.cards.command;

import java.math.BigDecimal;
import java.util.UUID;

public record AuthorizeCardCommand(UUID cardId, BigDecimal amount, String reason) {
}
The next class is the handler responsible for processing authorizations. When a debit is requested, it checks if sufficient funds are available. If so, it processes the transaction and updates the TransactionView, as addressed in the query section.
package com.acme.cards.command;

import com.acme.cards.query.TransactionView;
import jakarta.enterprise.context.ApplicationScoped;
import jakarta.inject.Inject;

import jakarta.ws.rs.WebApplicationException;
import org.eclipse.jnosql.mapping.document.DocumentTemplate;

import java.time.Instant;
import java.util.UUID;
import java.util.logging.Logger;

import static jakarta.ws.rs.core.Response.Status.NOT_FOUND;

@ApplicationScoped
public class AuthorizeCardCommandHandler {

    private static final Logger LOGGER = Logger.getLogger(AuthorizeCardCommandHandler.class.getName());

    private final DocumentTemplate template;

    @Inject
    public AuthorizeCardCommandHandler(DocumentTemplate template) {
        this.template = template;
    }

    AuthorizeCardCommandHandler() {
        this.template = null;
    }

    public OperationResult handle(AuthorizeCardCommand command) {

        LOGGER.info("Processing authorize command for cardId=" + command.cardId()
                + " amount=" + command.amount());

        var card = template.find(Card.class, command.cardId())
                .orElseThrow(() -> new WebApplicationException("Card not found, cardid=" + command.cardId(), NOT_FOUND));

        var operationId = UUID.randomUUID();

        if (!card.canAuthorize(command.amount())) {
            LOGGER.warning("Authorization declined for cardId=" + command.cardId());

            var result = new OperationResult(
                    operationId,
                    card.getId(),
                    OperationStatus.DECLINED,
                    "Insufficient balance or inactive card",
                    Instant.now()
            );

            template.insert(result);

            return result;
        }

        card.debit(command.amount());
        template.update(card);

        LOGGER.info("Authorization approved for cardId=" + command.cardId());

        var result = new OperationResult(
                operationId,
                card.getId(),
                OperationStatus.APPROVED,
                command.reason(),
                Instant.now()
        );

        template.insert(result);
        updateProjection(command, result);

        return result;
    }

    private void updateProjection(AuthorizeCardCommand command, OperationResult result) {

        LOGGER.info("Updating transaction view for id=" + result.id());

        var view = new TransactionView(
                result.id(),
                command.cardId(),
                command.amount(),
                result.status().name(),
                result.processedAt()
        );

        template.insert(view);
    }
}
Finally, we define the resource that initiates the command operation:
package com.acme.cards.command;

import jakarta.enterprise.context.ApplicationScoped;
import jakarta.inject.Inject;
import jakarta.ws.rs.*;
import jakarta.ws.rs.core.MediaType;

import java.util.UUID;
import java.util.logging.Logger;

@Path("/cards/{id}/authorize")
@Produces(MediaType.APPLICATION_JSON)
@Consumes(MediaType.APPLICATION_JSON)
@ApplicationScoped
public class CardCommandResource {

    private static final Logger LOGGER = Logger.getLogger(CardCommandResource.class.getName());

    private final AuthorizeCardCommandHandler handler;

    @Inject
    public CardCommandResource(AuthorizeCardCommandHandler handler) {
        this.handler = handler;
    }

    CardCommandResource() {
        this.handler = null;
    }

    @POST
    public OperationResult authorize(@PathParam("id") UUID cardId, AuthorizeRequest request) {

        LOGGER.info("Received authorize request for cardId=" + cardId);

        var command = new AuthorizeCardCommand(cardId, request.amount(), request.reason());
        return handler.handle(command);
    }

}
Step 3: Create Query
The final step is to create the query resource. While the command writes transactions, the query retrieves processed transactions for a given card.
package com.acme.cards.query;

import jakarta.enterprise.context.ApplicationScoped;
import jakarta.inject.Inject;
import jakarta.ws.rs.*;
import jakarta.ws.rs.core.MediaType;

import org.eclipse.jnosql.mapping.document.DocumentTemplate;

import java.util.List;
import java.util.UUID;
import java.util.logging.Logger;

@Path("/cards/{id}/transactions")
@Produces(MediaType.APPLICATION_JSON)
@ApplicationScoped
public class CardQueryResource {

    private static final Logger LOGGER = Logger.getLogger(CardQueryResource.class.getName());

    private final DocumentTemplate template;

    @Inject
    public CardQueryResource(DocumentTemplate template) {
        this.template = template;
    }

    CardQueryResource() {
        this.template = null;
    }

    @GET
    public List<TransactionView> findByCardId(@PathParam("id") UUID cardId) {

        LOGGER.info("Fetching transactions for cardId=" + cardId);

        return template.select(TransactionView.class)
                .where("cardId")
                .eq(cardId)
                .orderBy("createdAt")
                .desc()
                .result();
    }
}
Conclusion
CQRS is not simply about dividing code for architectural reasons. It recognizes that reads and writes have distinct purposes. Separating commands from queries allows each to focus on its role: commands enforce business rules and generate decisions, while queries deliver optimized views of the system’s state. In this tutorial, we demonstrated this approach using a basic card authorization flow, highlighting the difference between a decision (OperationResult) and the data used for reading (TransactionView).
This example uses a limited scope to clarify the concept. CQRS is not a default choice, but a response to complexity, particularly when read and write requirements diverge. By understanding this separation in a focused scenario, you can better assess when CQRS is valuable and apply it where it has the most impact.
Ready to explore the benefits of MongoDB Atlas? Get started now by trying MongoDB Atlas.
Access the source code used in this tutorial. Any questions? Come chat with us in the MongoDB Community Forum.
References:
- June 09, 2026
- 7 min read
Software Engineer | Software Architect | Speaker | Writer| Book Author | Consultant | Staff Engineer | Mentor | Open Source Committer| Java Champion


Comments (0)
No comments yet. Be the first.